
Lily in Crochet - Pattern

The Granny Square Easter Carrot – Pattern is a whimsical and inventive way to celebrate the spring season, blending the iconic “granny” crochet technique with the festive imagery of the holiday. This delightful project reimagines the traditional square as a vibrant, orange-toned base that is cleverly folded and shaped to mimic the tapered silhouette of a garden-fresh vegetable. Whether you are looking to dress up your Easter brunch table or create unique basket fillers for the little ones in your life, this pattern offers a perfect marriage of vintage charm and seasonal playfulness that appeals to makers of all skill levels.
By diving into the Granny Square Easter Carrot – Pattern, you have the opportunity to experiment with color gradients and textural stitches that bring a three-dimensional life to your yarn work. The brilliance of this design lies in its structural simplicity; by mastering a basic geometric shape, you can manipulate the fabric to create a charming decorative piece that stands out in any holiday display. It is a fantastic “stash-buster” project, allowing you to utilize small scraps of orange and green yarn to produce a “harvest” of handmade joy that reflects the warmth and rebirth associated with the spring months.
In this comprehensive guide to the Granny Square Easter Carrot – Pattern, we will explore the essential materials needed, the step-by-step assembly process, and creative ways to personalize your finished carrots. We will discuss the importance of stitch tension for maintaining the carrot’s shape and how to choose the right fiber content for a durable, professional finish. This project is more than just a holiday craft; it is a celebration of the versatility of crochet, providing you with a structured yet imaginative path to building a handmade Easter collection that your family will treasure for years to come.
The success of your Granny Square Easter Carrot – Pattern starts with the selection of a vibrant, high-quality worsted weight yarn in various shades of orange. While a single solid color works well, using a variegated yarn can add a rustic, “earthy” look that mimics the natural variations found in real carrots. For the leafy greens at the top, a bright emerald or a soft moss green provides the perfect contrast, ensuring that the finished product is visually striking. Cotton yarns are highly recommended for this project as they offer the stitch definition and rigidity needed to hold the carrot’s shape without sagging.
In addition to your main yarn, you will need a crochet hook that is slightly smaller than what the label recommends to ensure a tight, sturdy fabric. A 3.5mm or 4.0mm hook is typically ideal for most medium-weight yarns when following the Granny Square Easter Carrot – Pattern. Using a smaller hook prevents the polyester stuffing from peeking through the holes of the granny square, which is a common issue with more open-work designs. This technical choice results in a much more professional and “toy-quality” finish that is safe for children and durable for long-term display.
The interior of the Granny Square Easter Carrot – Pattern requires a high-loft polyester fiberfill to give the vegetable its plump, realistic volume. Because the granny square has natural gaps, some crafters prefer to place the stuffing inside a small pouch of orange felt or stockings before inserting it into the crochet shell. This “lining” technique ensures that the carrot remains soft and squishy while maintaining a clean, solid color throughout the body. It is a small extra step that significantly elevates the quality of your handmade gift.
For the “greenery” or the carrot tops, you can use a variety of techniques ranging from simple chains to more complex picot stitches. Having a sharp pair of embroidery scissors and a large-eye tapestry needle is essential for weaving in the numerous ends that come with color changes. You might also want to include some “stitch markers” to keep track of your rounds if you decide to add a spiral or a more complex border to the base granny square before folding it into its final carrot form.
If you intend to use your Granny Square Easter Carrot – Pattern as a functional item, such as a localized sachet, consider adding a small bag of dried lavender or scented beads inside the stuffing. This transforms the decoration into a sensory experience, making it perfect for placing in linens or as a refreshing addition to a spring-themed gift basket. This type of functional personalization is what makes handmade items so much more valuable than mass-produced holiday decor found in retail stores.
Lastly, consider the “embroidery” phase of the Granny Square Easter Carrot – Pattern. Some makers like to add small “root lines” using a darker brown or a deep orange embroidery floss to give the carrot more character and realism. A few well-placed stitches can make the granny square texture look even more like a textured vegetable skin. This attention to detail is the hallmark of a master fiber artist, turning a simple geometric project into a sophisticated piece of seasonal art.
The foundation of the Granny Square Easter Carrot – Pattern is the classic “granny square” construction, which typically begins with a magic ring or a small chain circle. You will work in rounds, creating groups of three double crochets (clusters) separated by chains. For this specific pattern, you want the square to be large enough to fold—usually around five to seven rounds. The traditional crochet motif provides a beautiful, nostalgic texture that serves as the “skin” of the carrot, offering a unique twist on the standard smooth-stitch amigurumi designs.
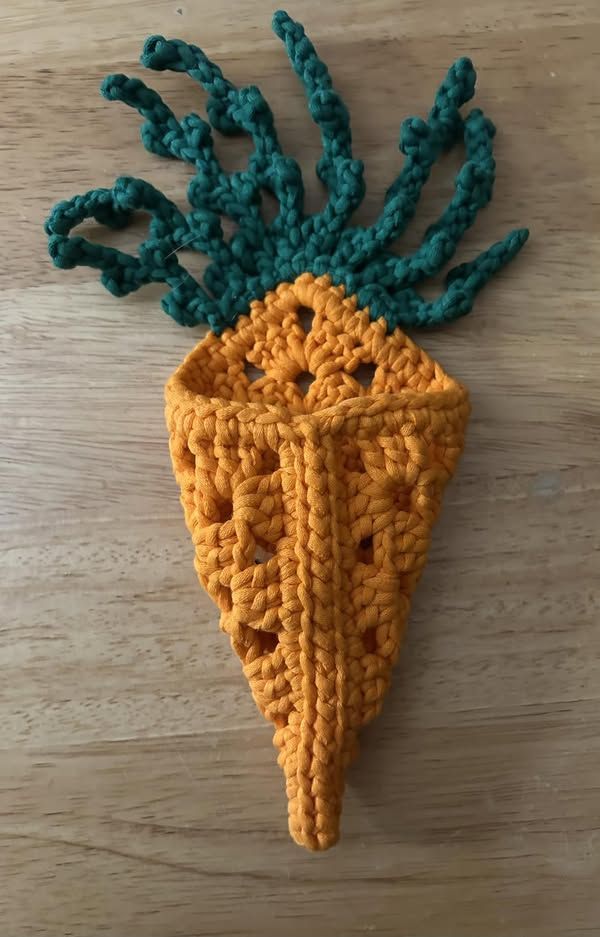
Once your square is complete, the magic of the Granny Square Easter Carrot – Pattern happens during the folding process. To achieve the iconic tapered shape, you fold the square diagonally to form a triangle. By sewing two of the sides together while leaving the top open, you create a “cone” that perfectly mimics the body of a carrot. This geometric transformation is a fantastic way for beginners to learn about 3D construction in crochet, as it demonstrates how a flat plane can become a dimensional object through simple assembly techniques.
The “seam” of your Granny Square Easter Carrot – Pattern should be as invisible as possible. Using a “mattress stitch” or a whip stitch with the same orange yarn ensures that the joint is strong but subtle. It is best to sew from the “point” of the carrot upward toward the opening, which allows you to adjust the tightness as you go. Ensuring the point is sharp and well-defined is crucial for the visual accuracy of the design, making the finished piece look like it was harvested straight from a crocheted garden.
Before closing the top of the Granny Square Easter Carrot – Pattern, you will add your fiberfill. The trick is to stuff the bottom point firmly and then gradually add less stuffing as you move toward the top. This prevents the carrot from looking like a blocky tube and instead gives it that elegant, tapered transition. Proper stuffing distribution is the secret to a professional-looking plushie; it should feel substantial and hold its shape when squeezed, but remain soft enough to retain its “handmade” textile charm.
Adding the greenery to the Granny Square Easter Carrot – Pattern is the final step of the main assembly. You can attach the green yarn directly to the top edge of the carrot and work several “fringe” or “loop” stitches to create a bushy top. Some crafters prefer to make a separate “green plug” that they sew into the opening, which can be easier to manage. Whichever method you choose, the goal is to create a lush foliage effect that balances the bright orange body of the carrot.
Finally, you can “scrunch” or “block” your Granny Square Easter Carrot – Pattern to add more realism. By lightly steaming the finished carrot, you can encourage the granny square to relax into its new conical shape. Some makers even use a bit of “fabric stiffener” on the green tops to make them stand upright or curl in specific directions. This level of post-production finishing ensures that your Easter carrots look fantastic on a mantel, in a bowl, or as part of a larger holiday centerpiece.
One of the most exciting aspects of the Granny Square Easter Carrot – Pattern is how easily it can be adapted into a “Carrot Garland.” By making a dozen or so carrots and stringing them together with a length of twine or a crocheted chain, you create a festive banner that can be draped over a fireplace or across a window. This seasonal home decor project is a great way to use up leftover yarn and adds a cozy, handmade touch to your Easter celebrations that guests will surely admire.
For those who enjoy “micro-crochet,” the Granny Square Easter Carrot – Pattern can be scaled down using embroidery floss and a 1.0mm hook to create tiny carrot earrings or charms. These miniature versions are incredibly cute and make for unique “maker gifts” for your fellow crochet enthusiasts. The scaling versatility of the granny square means the logic of the pattern remains the same, whether you are making a giant plush carrot for a nursery or a tiny accessory for a keychain.
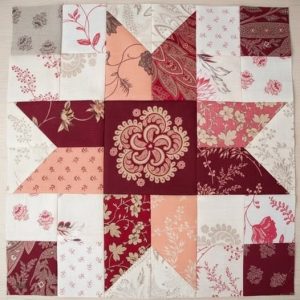
Another popular variation of the Granny Square Easter Carrot – Pattern is the “Flat Carrot Appliqué.” Instead of stuffing and sewing the square into a cone, you can work a triangular granny and use it as a patch for children’s clothing, tote bags, or even as a decorative element on an Easter-themed quilt. This flat version is much faster to produce and serves as a wonderful embellishment that ties a whole collection of spring-themed handmade items together with a consistent motif.
Color-blocking within the Granny Square Easter Carrot – Pattern can also lead to stunning modern results. You might try making a “rainbow carrot” set using purple, yellow, and white yarns to represent the heirloom varieties found in gourmet markets. This contemporary color palette makes the project feel less like a traditional holiday craft and more like a piece of modern textile art, perfect for those who prefer a “farm-to-table” aesthetic in their seasonal home styling.
You can also use the Granny Square Easter Carrot – Pattern to create “Carrot Gift Bags.” By making the square larger and adding a drawstring at the top instead of sewing it shut, the carrot becomes a functional container for jelly beans, chocolate eggs, or small toys. This functional packaging idea is a sustainable alternative to plastic eggs and adds an extra layer of “handmade love” to the traditional Easter morning hunt, making the holiday even more memorable for children.
Lastly, consider the “texture play” in your Granny Square Easter Carrot – Pattern. You can substitute the traditional double crochet with a “puff stitch” or a “bobble stitch” in every other round to give the carrot a “bumpy,” more organic surface. Mixing textures makes the crochet work more engaging to look at and provides a wonderful tactile experience. Whether you stick to the classic look or experiment with new stitches, the carrot remains a recognizable and beloved symbol of spring.
The “finishing” stage of the Granny Square Easter Carrot – Pattern is what separates a hobbyist project from a boutique-quality item. Weaving in your ends securely is non-negotiable; since these carrots are likely to be handled or moved frequently, you want to ensure the yarn tails don’t pop out over time. Using a “duplicate stitch” method to weave the ends back into the clusters of the granny square is the most invisible and secure way to finish your crochet work, ensuring it remains beautiful for years.
If you find that your Granny Square Easter Carrot – Pattern is leaning to one side, it may be a result of “tension drift” during the square’s construction. To fix this, you can “pin-block” the square into a perfect 90-degree alignment before you sew it into the cone shape. A perfectly square base leads to a perfectly symmetrical carrot. This attention to geometric accuracy is vital for any project that relies on folding and joining, as it prevents the “spiraling” effect that can occur with uneven edges.
Long-term care for your Granny Square Easter Carrot – Pattern items is relatively simple, especially if you used high-quality cotton or acrylic. If they get dusty after being on display, a quick “spot clean” with a damp cloth is usually sufficient. If you made the “gift bag” version and it needs a full wash, place it in a delicate laundry bag and wash on a cold cycle, then air dry to prevent the stuffing from clumping. Proper maintenance ensures your holiday decorations can be brought out year after year, becoming part of your family’s spring traditions.
Labeling your work is a professional touch that should not be overlooked, especially if you plan to sell your Granny Square Easter Carrot – Pattern creations at spring craft fairs. A small “Handmade” tag or a personalized ribbon tied around the greenery adds a sense of brand identity and value. It tells the story of the maker and the time invested in the craft. This boutique presentation is what allows handmade items to command a higher price and garners respect for the craft of crochet.
For those who want a “scented” carrot, remember that the scent will fade over time. A professional tip is to leave a tiny gap in the seam near the top where you can “inject” a few drops of essential oil into the stuffing every year before Easter. This keeps your Granny Square Easter Carrot smelling fresh like a spring garden without having to open and re-sew the entire project. It’s a clever, low-maintenance way to keep your holiday decor engaging for all the senses.
In conclusion, the Granny Square Easter Carrot – Pattern is a testament to how creative thinking can transform a basic crochet staple into something entirely new and festive. It is a project that invites you to play with color, shape, and function, resulting in a charming accessory that brightens any room. We hope this guide inspires you to pick up your hook and start “growing” your own yarn garden, creating a vibrant Easter atmosphere that celebrates the beauty of handmade craftsmanship and the joy of the spring season.
1. Is the Granny Square Easter Carrot – Pattern suitable for a beginner?
Yes, it is one of the best projects for beginners because it uses the “standard granny square,” which is often the first thing people learn. The only “new” skill is the simple sewing used to fold it into a cone. It is a fast and rewarding way to practice your double crochets!
2. How do I prevent my stuffing from showing through the holes?
The best way is to use a smaller hook than usual to make the stitches tighter. You can also line the inside of the carrot with a scrap of orange fabric or felt. This keeps the stuffing contained and ensures the orange color looks solid and “full” throughout the crochet carrot.
3. Can I make this pattern in different sizes?
Absolutely! The size of the carrot is determined by the size of the granny square. If you want a giant carrot, just keep adding rounds to your square. If you want a tiny one, stop after two or three rounds. The scaling logic is perfectly linear, making it a very flexible pattern for different uses.
4. What is the best yarn for a “child-safe” Easter carrot?
I recommend a 100% cotton yarn. It is natural, doesn’t “pill” like acrylic, and can be washed easily. Most importantly, cotton doesn’t have the fuzzy “halo” that some wools do, which can be irritating for small children who might put the toy in their mouth.
5. How long does it take to make one carrot?
A seasoned crocheter can complete one Granny Square Easter Carrot – Pattern in about 30 to 45 minutes, including the stuffing and assembly. This makes it a perfect “marathon” project for when you need to make several gifts or a long garland in a single weekend.
In this article, we have explored the colorful and creative journey of crafting a Granny Square Easter Carrot – Pattern, highlighting its roots in traditional crochet and its modern application as a festive holiday decoration.
We discussed the importance of choosing high-quality orange and green cotton yarns, the technical steps for folding a 2D square into a 3D cone, and various ways to customize your “harvest” with garlands, gift bags, and heirloom color palettes. This project is a wonderful example of how simple shapes can be reimagined through the lens of seasonal joy, providing a handmade touch that makes the Easter holiday feel even more special and personal.


