
Lily in Crochet - Pattern

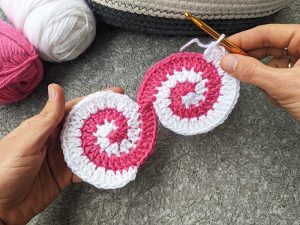
Heart-shaped snail in crochet – Pattern is one of the most charming and whimsical projects a crafter can undertake, blending the slow-paced nature of a snail with the universal symbol of love. In the world of modern fiber arts, creating a Heart-shaped snail in crochet has become a viral sensation, allowing enthusiasts to transform simple yarn into a three-dimensional character full of personality. This specific Pattern is designed to guide both beginners and intermediate crocheters through the process of shaping a spiral shell into a perfect heart, resulting in a unique plushie that serves as a wonderful gift or a decorative piece for the home.
The beauty of a Heart-shaped snail in crochet – Pattern lies in its versatility and the emotional connection it fosters. Crocheting is known to be a therapeutic activity, and when you focus on a design as adorable as a snail with a heart shell, the joy of creation is doubled. The Pattern serves as your roadmap, detailing every stitch and turn required to ensure the snail’s body is sturdy enough to support the weight of its romantic shell. Whether you are making this for a Valentine’s Day surprise, a nursery decoration, or simply to add to your collection of handmade amigurumi, the finished result is guaranteed to bring a smile to anyone who sees it.
To successfully complete a Heart-shaped snail in crochet, one must understand that this is more than just a toy; it is a labor of love that combines geometry with soft textures. The Pattern typically breaks down the project into two main components: the elongated, soft body of the snail and the intricately curved heart shell. By using the right crochet hook and high-quality yarn, you can ensure that the stitches are tight enough to hold the stuffing without showing any gaps. This article will dive deep into the materials, techniques, and creative variations of this project, ensuring that your journey with this Heart-shaped snail in crochet – Pattern is as smooth and enjoyable as possible.
When embarking on the journey of creating a Heart-shaped snail in crochet – Pattern, the first step is gathering the right supplies to ensure a professional finish. You will primarily need a medium-weight cotton or acrylic yarn, which provides the necessary structure for the snail’s body and shell. Cotton is often preferred for amigurumi projects because it offers excellent stitch definition, making the heart shape of the shell clearly visible. You will also need a crochet hook that is slightly smaller than what the yarn label recommends, typically a 2.5mm or 3.0mm hook, to create a dense fabric that keeps the fiberfill stuffing hidden inside.
The colors you choose for your Heart-shaped snail in crochet will define its entire character. Many crafters opt for traditional romantic shades like crimson red, dusty rose, or creamy white for the heart shell, while the snail’s body can be a neutral beige or a soft pastel green. If you want to follow a more modern Pattern, you might even consider using variegated yarn to give the shell a multicolored, whimsical look. Having a variety of colors on hand allows you to experiment and create a whole family of snails, each with its own unique personality and flair.
In addition to yarn and hooks, you will need polyester fiberfill stuffing, which is lightweight and washable, making it perfect for handmade toys. The stuffing is what gives the Heart-shaped snail in crochet its three-dimensional form, so it is important to have plenty on hand. You will also need a pair of safety eyes, usually between 6mm and 10mm in size, to give your snail a cute and expressive face. If the snail is intended for a small child, you might prefer to embroider the eyes with black thread to avoid any potential choking hazards, a common safety tip in any professional Pattern.
Don’t forget the small but essential tools like a tapestry needle, sharp scissors, and stitch markers. The tapestry needle is used for weaving in ends and, most importantly, for sewing the heart shell onto the snail’s body securely. Stitch markers are vital when working in continuous rounds, which is the standard method for this Heart-shaped snail in crochet – Pattern, as they help you keep track of where each row begins and ends. Without these markers, it is very easy to lose your place, which can result in an asymmetrical heart or a lopsided snail body.
Another material to consider is a small amount of embroidery floss for the mouth and perhaps some pink blush for the cheeks. These tiny details are often what elevate a simple crochet project into a work of art. While the Pattern provides the structural instructions, these cosmetic additions are where your individual creativity shines. Some makers even add small beads or sequins to the shell of the Heart-shaped snail in crochet to represent “dew drops,” adding an extra layer of enchantment to the finished piece.
Finally, ensure you have a comfortable workspace with good lighting. Crocheting a Heart-shaped snail in crochet – Pattern involves looking at small stitches for extended periods, so a well-lit area will prevent eye strain. A dedicated project bag is also helpful for keeping all your yarn, hooks, and half-finished pieces together, especially if you like to crochet on the go. Once your materials are organized, you are ready to delve into the technical side of the Pattern and begin bringing your little snail to life.
The core of the Heart-shaped snail in crochet – Pattern is the technique used to create the heart shell. Unlike a traditional snail shell that is a simple spiral, the heart shape requires a specific sequence of increases and decreases to create the two top lobes and the pointed bottom. You will likely start by making two small “cups” that represent the tops of the heart, which are then joined together to form the main body of the shell. Mastering the invisible join and the invisible decrease is crucial here, as these techniques ensure that the transitions between rounds are seamless and professional.
The body of the Heart-shaped snail in crochet is usually worked as a long, tapered tube. This part of the Pattern is relatively straightforward, but it requires consistent tension to ensure the body is smooth and even. You will start with a magic ring, a fundamental skill for any amigurumi enthusiast, which allows you to start crocheting in the round without leaving a hole in the center. As you work through the rows, you will gradually increase the number of stitches to create the head and then decrease them to form the tail, following the specific counts provided in the Pattern.
One of the most important aspects of this Heart-shaped snail in crochet – Pattern is the “shaping” of the heart. As you stuff the shell, you must be careful to push the fiberfill into the lobes to maintain the heart’s definition. If you overstuff, the heart might look like a round ball; if you understuff, it will look limp and lose its shape. The Pattern will often suggest “stuffing as you go,” which means adding small amounts of fiberfill every few rounds to ensure it is distributed evenly throughout the complex curves of the heart-shaped shell.
Understanding how to read a crochet pattern is essential for success. Most patterns use standard abbreviations like sc (single crochet), inc (increase), and dec (decrease). In a Heart-shaped snail in crochet – Pattern, you might also encounter more advanced stitches like the half-double crochet (hdc) or double crochet (dc), which are sometimes used to create a slight curve in the snail’s neck or to add decorative trim to the shell. Taking the time to familiarize yourself with these terms before you start will prevent mistakes and make the process much faster.
The assembly stage is where many crafters feel nervous, but it is the most rewarding part of the Heart-shaped snail in crochet – Pattern. You will use the long yarn tails left from your crochet work to sew the shell onto the body. The key is to position the heart so that it sits centrally on the snail’s back, leaning slightly forward or backward depending on the look you want to achieve. Using pins to hold the pieces in place before you start sewing is a professional trick that ensures everything stays aligned while you work with your tapestry needle.
Finally, don’t forget the antennae! These are usually small, thin tubes or simple chains that are attached to the top of the snail’s head. Some Pattern variations suggest adding small balls or “bobble stitches” to the ends of the antennae to make the snail look even cuter. Once the antennae are attached and the face is embroidered, your Heart-shaped snail in crochet is complete. Each step, from the magic ring to the final stitch, is a testament to your skill and patience as a maker.
One of the best things about the Heart-shaped snail in crochet – Pattern is how easily it can be adapted to different sizes. By simply changing your yarn weight and hook size, you can create a tiny snail to use as a keychain or a giant, huggable snail to serve as a throw pillow. For a miniature version, use embroidery thread or lace-weight yarn with a 1.0mm hook. For a jumbo version, try chenille or velvet yarn with a 6.0mm hook. The Pattern remains the same, but the finished product will have a completely different feel and purpose.
Customizing the “skin” of your Heart-shaped snail in crochet is another way to make your project stand out. While solid colors are classic, you can use a “marled” effect by holding two strands of thin yarn together as you crochet. This adds a beautiful texture and depth to the snail’s body. You could also experiment with surface crochet, adding small swirls or lines to the heart shell after it is finished to mimic the natural patterns found on real snail shells, but with a romantic twist inspired by your Pattern.
If you want your Heart-shaped snail in crochet to be extra festive, consider themed decorations. For a “Christmas Snail,” you could use red and green yarn and add a tiny crochet Santa hat. For a “Bridal Snail,” use white iridescent yarn and attach a small piece of lace or a tiny pearl to the shell. The Heart-shaped snail in crochet – Pattern is a fantastic base for seasonal creativity, allowing you to repurpose the same design for various holidays and special occasions throughout the year.
The face of your snail is where its soul truly lies. You can change the entire “mood” of your Heart-shaped snail in crochet just by how you place the eyes. Placing them lower on the head gives a more “kawaii” or baby-like appearance, while placing them higher makes the snail look more inquisitive. You can also add tiny eyelashes or eyebrows using a single strand of black thread. Following the Pattern gives you the structure, but these artistic choices make the snail uniquely yours.
Texture is another area where you can play with your Heart-shaped snail in crochet – Pattern. Instead of using standard single crochet for the entire shell, you could use the popcorn stitch or waffle stitch for certain sections to give the heart a “bumpy” or “knobby” feel. This is particularly effective if you are making the snail as a sensory toy for a child. Just keep in mind that changing the stitch may affect the amount of yarn you need, so always have a little extra on hand just in case.
Lastly, consider the presentation if you are giving the Heart-shaped snail in crochet as a gift. You can create a small “nest” for it out of shredded paper or even crochet a little leaf for it to sit on. Including a printed copy of the Pattern (if you have the designer’s permission) or a small “handmade with love” tag adds a professional touch. Whether it’s a small token of affection or a major project, your Heart-shaped snail in crochet will be a cherished item thanks to the care you put into every detail.
Even with a perfect Heart-shaped snail in crochet – Pattern, you might encounter some common challenges during the process. One frequent issue is the heart shell leaning too much to one side. This is usually caused by uneven stuffing or a slight tension shift during the joining of the two heart lobes. If this happens, you can often “massage” the stuffing into place or use a few hidden stitches with matching yarn to pull the shell into a more upright position. Don’t be discouraged; even experienced crafters have to make minor adjustments to their amigurumi.
If you notice that your stitches are too loose and the stuffing is peeking through, it might be time to go down a hook size. In the world of Heart-shaped snail in crochet, tight stitches are the key to a high-quality finish. If you find your hands are cramping from tight tension, try using an ergonomic crochet hook with a thicker handle. The Pattern is meant to be a joy to work on, not a source of physical discomfort, so listen to your body and take breaks when needed.
Another tip for a clean Heart-shaped snail in crochet – Pattern is to use the “invisible finish” when fastening off your yarn. Instead of a bulky knot, the invisible finish mimics the look of a regular stitch, making the end of your work almost impossible to find. This is especially important on the head and the tip of the heart shell, where a knot would be very noticeable. Most modern patterns will include instructions for this, but it is a great skill to learn for all your crochet projects.
Once your Heart-shaped snail in crochet is complete, it’s important to know how to care for it. If you used cotton or acrylic yarn, the snail can usually be hand-washed in cool water with a gentle detergent. Avoid wringing it out, as this can distort the shape of the heart and the body. Instead, gently squeeze out the excess water and let it air dry on a flat surface. If the snail has safety eyes or delicate embellishments, avoid the washing machine to ensure no parts come loose or get scratched.
Longevity is a hallmark of a well-made Heart-shaped snail in crochet – Pattern. Over time, the stuffing may settle, making the snail look a little less plump. You can usually fix this by gently squishing the snail to redistribute the fiberfill. If you made the snail for a child who plays with it constantly, you might need to reinforce the neck stitches after a few months of “heavy use.” A quick “surgical” repair with a tapestry needle and some matching yarn will have your Heart-shaped snail in crochet looking brand new again.
Finally, keep a record of the modifications you made to the Pattern. If you used a different hook size or changed the color sequence, jot it down in a notebook or on your digital device. This way, if you want to make another Heart-shaped snail in crochet in the future, you can replicate your successful results. Sharing your finished project on social media or in crochet communities is also a great way to inspire others and show off the beautiful results of your hard work and dedication to the craft.
1. Is the Heart-shaped snail in crochet – Pattern suitable for absolute beginners?
While a complete beginner can certainly try it, it is helpful to have a basic understanding of amigurumi techniques like the magic ring and working in rounds. If you know how to do a single crochet, increase, and decrease, you can follow this Pattern with a little bit of patience. There are many video tutorials available online that can help you with the specific “heart join” technique if you get stuck.
2. How long does it take to complete one snail?
On average, a seasoned crocheter can complete a medium-sized Heart-shaped snail in crochet in about 3 to 5 hours. For a beginner, it might take a bit longer as you navigate the shaping of the heart. Because it’s a relatively small project, it is a great “weekend project” that provides quick satisfaction and a beautiful finished result.
3. What is the best yarn for this project?
For the best results with this Pattern, a “Mercerized Cotton” is highly recommended. It has a slight sheen, doesn’t pill, and holds the heart shape perfectly. However, if you want a softer, cuddlier version, a high-quality acrylic or a plush “Chenille” yarn works wonders. Just remember to adjust your hook size to match the thickness of the yarn you choose for your Heart-shaped snail in crochet.
4. Can I sell the snails I make using this Pattern?
In most cases, yes! Most designers allow you to sell the physical items you make from their Pattern, provided you give them credit for the design. However, you should never sell or redistribute the Pattern itself, as that is protected by copyright. Always check the “terms of use” included in your specific Heart-shaped snail in crochet – Pattern to be sure.
5. How do I make the snail stand up without tipping over?
If your Heart-shaped snail in crochet is top-heavy because of the shell, you can add a small amount of “plastic pellets” or clean pebbles at the bottom of the snail’s body (inside a small fabric pouch) before stuffing with fiberfill. This adds weight to the base and acts as a stabilizer, ensuring your snail stays upright on a shelf or desk.
In this article, we have thoroughly explored the delightful world of the Heart-shaped snail in crochet – Pattern. We began by identifying the essential materials, from the perfect cotton yarn to the vital safety eyes and stitch markers. We then moved into the technical heart of the project, explaining how to master the curves of the heart shell and the tapering of the snail’s body. We also discussed the endless possibilities for customization, whether through size adjustments, color choices, or festive themes, and provided essential tips for troubleshooting and long-term care of your handmade creation.
Creating a Heart-shaped snail in crochet is a rewarding experience that combines the discipline of following a technical Pattern with the joy of artistic expression. It teaches us that even the slowest creatures can carry a heart full of love, a message that resonates in every stitch we make. We hope this guide has provided you with the confidence and inspiration to start your own crochet journey and create something truly special.


