
Lily in Crochet - Pattern

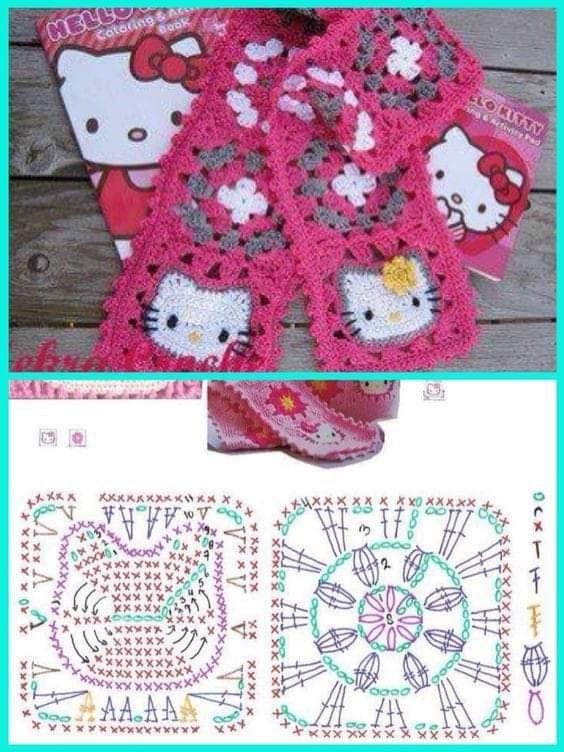
This Hello Kitty scarf crochet – Pattern is the ultimate fusion of nostalgic pop culture and cozy handmade fashion, offering a delightful project for fans of all ages who want to wear their heart on their sleeve—or rather, around their neck. Crocheting a themed accessory like this allows you to tap into the “kawaii” aesthetic, a Japanese cultural phenomenon centered around cuteness, which has taken the global crafting world by storm. Whether you are making a gift for a young child or a whimsical accessory for an adult who loves “Sanrio” style, this pattern provides a structured yet playful way to master character-based crochet while creating a functional garment that provides warmth during the colder months.
The beauty of the Hello Kitty scarf crochet – Pattern lies in its iconic simplicity, utilizing a clean palette of white, pink, and red, accented by the unmistakable yellow nose and black eyes that define the world’s most famous feline character. For beginners, this is an excellent introduction to “tapestry crochet” or “appliqué work,” as the base of the scarf is often a simple, rhythmic repeat of stitches, while the character details require more focused attention to shape and placement. By following a dedicated character crochet guide, you can ensure that the proportions are just right, maintaining the charm of the original design while adding the unique texture and “soul” that only a handmade item can possess.
As we dive into this comprehensive Hello Kitty scarf crochet – Pattern, we will explore the best yarn choices for sensitive skin, the technical steps for creating the perfect bow, and how to assemble the facial features so they remain secure and symmetrical. This article is designed to be your companion through every stitch, offering professional tips on maintaining consistent tension and choosing the right hook size for a soft, drapable finish. By the end of this journey, your handcrafted scarf will be more than just an accessory; it will be a conversation piece and a cherished heirloom that celebrates the joy of creative expression and the timeless appeal of Hello Kitty.
The foundation of a successful Hello Kitty scarf crochet – Pattern begins with selecting a high-quality acrylic or cotton blend yarn that is both soft and durable. Since scarves sit directly against the sensitive skin of the neck, you want a fiber that is “non-itchy” and hypoallergenic. An anti-pilling acrylic is often the best choice for children’s items because it can be machine-washed frequently without losing its softness or becoming fuzzy. For a more luxurious feel, a merino wool blend offers incredible warmth and a high-end finish that elevates the character design into a boutique-style garment.
Color accuracy is vital for the Hello Kitty scarf crochet – Pattern. You will need a crisp, “snow white” for the main character elements and the classic “bubblegum pink” or “cherry red” for the iconic bow. Using a yarn with a slight sheen can make the colors “pop” and give the scarf a more professional, store-bought look. It is also important to ensure that all your yarn colors are of the same weight (usually medium/worsted) so that the scarf doesn’t have sections that are thicker or thinner than others, which could lead to an uneven drape and a distorted silhouette.
Choosing the correct hook size for your Hello Kitty scarf crochet – Pattern depends on how you want the finished item to feel. A 5.0mm (H) hook is standard for worsted weight yarn and creates a fabric that is flexible and warm. However, if you are a “tight crocheter,” you might want to go up to a 5.5mm hook to ensure the scarf isn’t too stiff. A scarf should be soft enough to wrap around the neck comfortably multiple times; if the stitches are too tight, the fabric will behave more like a rug than a piece of clothing, losing its cozy handmade appeal.
Sizing is another critical factor in the Hello Kitty scarf crochet – Pattern. For a toddler, a length of about 30 to 35 inches is usually sufficient, whereas an adult scarf should be at least 60 inches long to allow for stylish knotting and wrapping. The width should be proportional, generally ranging from 4 to 6 inches. Taking the time to measure the intended recipient before you start will prevent the common mistake of making a scarf that is either dangerously long for a small child or too short to be practical for an adult fan of kawaii fashion.
Don’t forget the “notions” needed for the facial details in the Hello Kitty scarf crochet – Pattern. You will need small amounts of black yarn or embroidery floss for the whiskers and eyes, and a bright yellow for the nose. Using safety eyes is a popular option for adult scarves, but for children under three, it is always safer to crochet the eyes or embroider them to avoid any choking hazards. Having a sharp tapestry needle and some high-quality stitch markers will make the assembly process much more organized and stress-free.
Finally, consider the “stitch texture” for the main body of the Hello Kitty scarf crochet – Pattern. While a simple double crochet (dc) is fast and beginner-friendly, a “moss stitch” or “waffle stitch” can add a sophisticated depth to the white sections of the scarf. These textures mimic the plushness of a stuffed animal and make the white yarn look more interesting. Whatever stitch you choose, consistency is key; maintaining the same rhythm throughout the project ensures that your hand-stitched scarf looks polished and intentional from end to end.
The most recognizable part of the Hello Kitty scarf crochet – Pattern is the face, which is usually created as a separate “appliqué” and then sewn onto the ends of the scarf. This is typically an oval shape rather than a perfect circle. To achieve this, you start with a “foundation chain” and work in rounds around both sides of the chain, increasing at the ends to create the elongated look. Mastering this oval crochet technique is essential for getting the character’s proportions right, as a face that is too round will look more like a generic cat than the famous icon.
In the Hello Kitty scarf crochet – Pattern, the ears are usually worked directly into the top of the oval or made separately and sewn on. They are small triangles created using a mix of single, half-double, and double crochets to get the right height and pointiness. Precision here is key; the ears need to be spaced evenly apart to maintain the “balance” of the face. Using pins to position the ears before you sew them permanently allows you to check the symmetry and make adjustments, ensuring your character looks “on-model” and professionally crafted.
The bow is the “crowning glory” of the Hello Kitty scarf crochet – Pattern. It is often a simple rectangle that is pinched in the middle and wrapped with a small strip of yarn to create the bow shape. For a more 3D effect, you can crochet two identical rectangles, sew them together, and add a tiny bit of stuffing before pinching the center. This “puffy bow” look adds a wonderful tactile element to the scarf and is a favorite in Sanrio-inspired crochet projects, making the accessory look like a high-quality designer item.
Placement of the facial features in the Hello Kitty scarf crochet – Pattern is where the character truly comes to life. The eyes should be placed on the same horizontal line as the nose, but spread further apart toward the edges of the face. This “wide-set” look is what gives the character her signature innocent expression. Using fabric glue to temporarily hold the eyes and nose in place while you sew them ensures they don’t shift during the process, which is the most common reason for a “lopsided” or “wonky” character face.
Whiskers are the final detail in the Hello Kitty scarf crochet – Pattern. These are usually three short, straight lines embroidered on each side of the face. Using a “surface slip stitch” or a “stem stitch” provides a clean, bold line that stands out against the white yarn. It is important to keep the whiskers symmetrical; they should angle slightly outward and upward. These tiny details are what define the character’s identity, and taking an extra ten minutes to get them right will significantly improve the final look of your scarf.
Once all the features are attached to the face, and the face is attached to the scarf, you must ensure the “joins” are invisible. When sewing the white face onto the scarf, only catch the back loops of the scarf stitches so the sewing thread doesn’t show through on the other side. This “double-sided” neatness is a hallmark of expert crochet finishing. A well-assembled Hello Kitty scarf crochet – Pattern looks just as good from the back as it does from the front, reflecting the care and craftsmanship you put into every single loop.
The versatility of the Hello Kitty scarf crochet – Pattern allows you to move beyond the basic white design and experiment with different styles. A popular variation is the “striped scarf,” where you alternate rows of pink and white. This adds a playful, candy-cane energy to the accessory and is a great way to incorporate the character’s favorite colors throughout the entire length of the garment. Using a color-change technique where you carry the yarn up the side of the work can save you from weaving in dozens of ends later.
For those who want extra warmth, the Hello Kitty scarf crochet – Pattern can be adapted into a “hooded scarf” or a “scoodie.” By making the center section of the scarf wider and folding it over to create a hood, you turn a simple neck-warmer into a full winter head-covering. You can then add the Hello Kitty ears and bow directly onto the top of the hood. This variation is particularly popular for toddlers and young children, providing a functional and cute way to stay warm during snowy days or outdoor play.
“Pocket scarves” are another trendy modification of the Hello Kitty scarf crochet – Pattern. By folding the ends of the scarf up and sewing the sides, you create cozy pockets for the wearer’s hands. You can then place the Hello Kitty face appliqué directly onto the outside of the pocket. This “double-purpose” design is highly practical and turns the scarf into a multi-functional winter set, perfect for keeping small hands warm while waiting for the school bus or going for a walk in the park.
If you are a fan of “lacy” textures, you can work the Hello Kitty scarf crochet – Pattern using a “V-stitch” or “shell stitch” in a lightweight cotton yarn. This creates a “spring/summer” version of the scarf that acts more like a fashion accessory than a winter garment. In this version, the Hello Kitty head might be smaller and used as a “fob” or a “dangle” at the end of the scarf. This boutique-style lace scarf is perfect for conventions, theme park visits, or adding a “pop of cute” to a simple summer dress.
For a “pop art” or “modern” look, you can try working the Hello Kitty scarf crochet – Pattern in non-traditional colors. Imagine a “Gothic Hello Kitty” scarf in black and purple, or a “Retro” version in teal and orange. As long as you keep the shape of the head and the placement of the bow the same, the character remains recognizable. This “alternative palette” approach is very popular in the alternative fashion community, allowing you to blend your love for the character with your own personal subculture or style.
Finally, consider adding “fringe” or “tassels” to the ends of your Hello Kitty scarf crochet – Pattern. You can alternate white and pink tassels to match the color theme. This adds movement and a bit of “flair” to the scarf, making it more fun to wear. For an extra special touch, you could even crochet tiny “apples” (Hello Kitty’s favorite fruit) to hang from the ends of the fringe. These customized details are what make a handmade project so much more meaningful than a generic, factory-made alternative.
One of the most important technical aspects of the Hello Kitty scarf crochet – Pattern is “blocking.” Because scarves are long and can sometimes “curl” at the edges, blocking ensures that the scarf lies perfectly flat and maintains its intended width. For acrylic yarn, a “steam block” is best; hold a steam iron an inch above the fabric and let the moisture relax the fibers. This process “sets” the stitches and gives the scarf a professional, high-end drape that looks much more polished than an unblocked piece.
Managing the “weight” of the appliqués is also vital in the Hello Kitty scarf crochet – Pattern. If the character’s head is too heavy and the scarf is too thin, the ends will sag and look awkward when worn. To prevent this, ensure that the body of the scarf has enough “substance”—using a slightly denser stitch or a wider width helps support the weight of the decorations. A well-balanced crochet accessory stays in place and looks flattering on the body, rather than pulling or stretching out of shape over time.
“Weaving in ends” is a chore that every crocheter hates, but it is essential for the longevity of your Hello Kitty scarf crochet – Pattern. Since a scarf is handled frequently and pulled on and off, the ends must be secured very tightly. Use a “zig-zag” weaving motion through the back of the stitches to ensure the yarn tails don’t pop out after a few wears. This “security stitching” ensures that your handmade gift is durable enough to withstand the daily adventures of a child or a busy adult.
If you find that the white yarn of your Hello Kitty scarf crochet – Pattern is getting dirty during the making process, don’t worry! You can “spot clean” it with a damp cloth and mild soap. However, the best way to keep your work pristine is to keep it in a “project bag” when you aren’t working on it. This prevents dust, pet hair, or food crumbs from getting into the fibers, ensuring that your pristine white crochet looks bright and clean when it is finally time to present it or wear it.
For those who plan to sell their work, adding a “custom tag” to the Hello Kitty scarf crochet – Pattern is a great way to add value. A small leather or fabric tag with your brand name or “Handmade with Love” gives the scarf a boutique feel. It also provides a professional place to list the care instructions, which is important for items made from specialty yarns. This attention to detail turns your hobby into a professional-grade product that people will be excited to buy and own.
Ultimately, the secret to a great Hello Kitty scarf crochet – Pattern is patience. Character work requires a different mindset than making a simple blanket; it’s more like “sculpting with yarn.” By taking your time with the facial features and the assembly, you ensure that the final product captures the “spirit” of the character. This labor of love is what makes the craft so special, resulting in a unique, heartwarming accessory that brings a smile to everyone who sees it and provides cozy comfort to everyone who wears it.
1. Is the Hello Kitty scarf crochet – Pattern suitable for absolute beginners?
Yes! The scarf body is very simple. The most “challenging” parts are the facial features, but these are small and can be practiced multiple times. If you can do a single crochet (sc) and a double crochet (dc), you have the skills needed to complete this pattern with a bit of focus.
2. How do I make the scarf longer or shorter?
The Hello Kitty scarf crochet – Pattern is easily adjustable. Simply continue adding rows of the main scarf body until you reach your desired length. For a child, stop around 3 feet; for an adult, aim for 5 to 6 feet. Remember to save enough yarn for the character appliqués at the end!
3. What is the best yarn for a child’s Hello Kitty scarf?
I highly recommend an anti-pilling acrylic yarn. It is soft, doesn’t shed, and can be tossed in the washing machine. Since children can be messy, having a scarf that is easy to clean is a huge bonus for parents and ensures the handmade accessory stays looking new for longer.
4. How do I stop the scarf edges from curling?
Curling usually happens if your tension is too tight. Try using a slightly larger hook for the scarf body. Additionally, blocking your finished scarf with a light steam will relax the fibers and make the edges lie flat and straight, giving it a much better finish.
5. Can I use this pattern to make other characters?
Absolutely! Once you master the “face and appliqué” method used in the Hello Kitty scarf crochet – Pattern, you can change the colors and ear shapes to make other characters like My Melody, Keroppi, or even a basic kitty cat. The base scarf pattern remains the same!
In this article, we have explored the whimsical and rewarding process of creating a Hello Kitty scarf crochet – Pattern, from selecting the softest worsted weight yarn to mastering the precise proportions of the character’s iconic face and bow.
We discussed the importance of symmetry in appliqué placement, the technical benefits of blocking for a flat finish, and various creative modifications like pockets and hoods that can turn a simple scarf into a multi-functional winter essential. This project is a perfect marriage of “pop culture” and “traditional craft,” providing a way to create a high-quality, hand-stitched accessory that brings a touch of “kawaii” charm to any wardrobe.


