
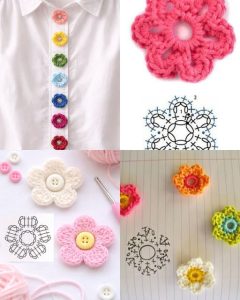
Lily in Crochet - Pattern

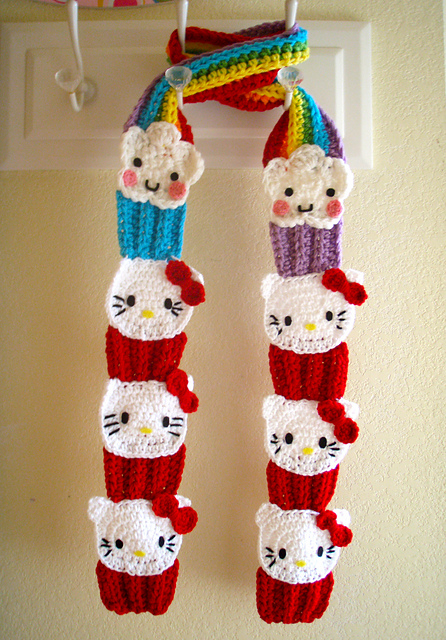
The Little Kitty Cupcake Scarf – Pattern is one of the most delightful and whimsical projects you can undertake if you love combining the charm of animals with the sweetness of baked goods in your crochet or knitting work. This unique accessory serves as both a functional winter garment and a playful fashion statement, making it a favorite for children and adults who enjoy “kawaii” or cute aesthetics. In this guide, we will explore the intricate details of creating this piece, ensuring that even if you are relatively new to the world of yarn crafts, you can achieve a professional and adorable result.
Creating a Little Kitty Cupcake Scarf – Pattern requires a blend of different techniques, including working in the round for the “cupcake” elements and using flat rows for the main body of the scarf. The design typically features a series of cupcake-shaped motifs where the “frosting” doubles as the kitty’s head, complete with tiny ears and embroidered whiskers. Because this project is so visually textured, it offers a fantastic opportunity to experiment with various yarn weights and colors, allowing you to customize each “flavor” of the cupcake to match your personal style or the recipient’s favorite colors.
As we dive into this comprehensive Little Kitty Cupcake Scarf – Pattern tutorial, we will focus on the structural integrity of the scarf and the fine details that bring the character to life. Using the right tools and high-quality materials is essential for ensuring the scarf is soft against the skin while remaining durable enough for daily wear. By the end of this article, you will have a deep understanding of the construction process, from the initial foundation chain to the final decorative touches that make this handcrafted accessory truly stand out in a crowd of ordinary winter wear.
Selecting the perfect materials is the first step in successfully executing the Little Kitty Cupcake Scarf – Pattern. Since this scarf will be worn close to the neck, choosing a soft acrylic blend or a high-quality cotton yarn is highly recommended to avoid irritation. You want a yarn that has good stitch definition so that the “ribbing” of the cupcake liner and the “fluffiness” of the kitty frosting are clearly visible. Using a worsted weight yarn is generally the best balance between speed of completion and manageable detail.
The color palette you choose for your Little Kitty Cupcake Scarf – Pattern can completely change the vibe of the finished piece. For a classic look, consider pastel pinks and creams for the frosting and a light tan for the cupcake base. Since the character is a kitty, you might want to use grey, white, or ginger yarn for the head sections. Don’t forget to pick up small amounts of black or pink embroidery floss for the facial features, as these small details are what give the kitty cupcake its personality.
In terms of tools, a standard crochet hook (usually size 4.0mm or 5.0mm) is the primary instrument for this Little Kitty Cupcake Scarf – Pattern. However, you should also have a set of stitch markers handy to keep track of your increases and decreases, especially when working on the rounded kitty head. A sharp yarn needle is also indispensable for weaving in ends and “sculpting” the ears so they stand upright. Having a measuring tape nearby will help you ensure the scarf reaches the desired length for the wearer.
Tension is a critical factor when working on the Little Kitty Cupcake Scarf – Pattern. If your stitches are too loose, the scarf may stretch out of shape; if they are too tight, the cupcakes might feel stiff and uncomfortable. It is a good idea to create a small gauge swatch before you start the main project. This allows you to adjust your hook size if necessary, ensuring that the dimensions of your cupcakes are consistent throughout the entire length of the scarf.
For those looking to add an extra touch of luxury, consider using a velvet yarn for the frosting part of the Little Kitty Cupcake Scarf – Pattern. This adds a tactile, 3D effect that looks just like real whipped cream. However, keep in mind that textured yarns can sometimes make it harder to see your stitches, so this might be a better option for intermediate crafters. If you are a beginner, sticking to a smooth, multi-ply yarn will make the process much smoother and more enjoyable.
Lastly, make sure you have enough yarn to finish the project. The Little Kitty Cupcake Scarf – Pattern can be surprisingly yarn-hungry because of the decorative elements and the length required for a functional scarf. It is always better to buy an extra skein of the main colors than to run out halfway through and find that the dye lot has changed. Preparation is the key to a stress-free crafting experience, allowing you to focus on the joy of creating something truly unique and handmade.
The foundation of the Little Kitty Cupcake Scarf – Pattern typically starts with the main length of the scarf, which acts as the “connector” between the decorative ends. You can choose a simple stitch like the half-double crochet for the body to provide warmth and flexibility. This part of the pattern is meditative and rhythmic, allowing you to build the length quickly. Ensure you count your stitches every few rows to maintain a straight edge, which is vital for a professional look.
Once the main body is complete, you will transition into the cupcake base for the Little Kitty Cupcake Scarf – Pattern. This section usually employs a front-post and back-post stitch technique to create a ribbed texture that mimics a paper cupcake liner. This architectural detail adds a layer of realism to the design. It is important to work these stitches consistently so the “liner” looks sturdy and capable of holding the “kitty frosting” that will be attached later.
The transition between the scarf body and the cupcake base requires careful increasing or decreasing, depending on the specific design of your Little Kitty Cupcake Scarf – Pattern. Some versions have the cupcake as a separate motif that is sewn on, while others are worked in one continuous piece. If you are sewing them together, use a mattress stitch for a nearly invisible seam. This ensures the transition is smooth and doesn’t create a bulky ridge that might be uncomfortable for the wearer.
The base of the cupcake in the Little Kitty Cupcake Scarf – Pattern is often worked in a darker or more neutral shade than the rest of the piece. This provides a visual “weight” to the ends of the scarf. If you want a more festive look, you can even use a metallic-infused yarn for the liner to give it a “foil” appearance. Small creative choices like this are what make the pattern so versatile and fun to adapt for different holidays or special occasions.
One technical tip for the Little Kitty Cupcake Scarf – Pattern is to use a slightly smaller hook for the ribbed base. This creates a tighter, denser fabric that holds its shape better, preventing the “liner” from sagging under the weight of the decorative kitty head. This structural reinforcement is especially important if the scarf is intended for an active child who might pull or tug on the decorative ends during play.
As you finish the base, you will have a clear platform for the most exciting part of the Little Kitty Cupcake Scarf – Pattern: the kitty head. At this stage, it is helpful to visualize where the facial features will go. Some crafters prefer to embroider the face onto the “frosting” before attaching it to the base, as it is easier to manipulate the piece when it is smaller. Taking this extra moment to plan will result in a much more symmetrical and cute final product.
The “frosting” of the Little Kitty Cupcake Scarf – Pattern is where the character truly comes to life. This section is usually worked as a rounded dome or a slightly flattened sphere to represent the top of the cupcake. Using a magic ring to start this section will ensure there is no hole at the very top of the kitty’s head. As you work through the rounds of increases, the shape will begin to curve beautifully, creating that perfect “scoop” look.
For the kitty ears in the Little Kitty Cupcake Scarf – Pattern, you will typically create two small triangles. These are often worked separately and then sewn onto the top of the frosting. To make the ears look more realistic, you can use a contrasting color for the inner ear or use a “pinch” technique when sewing them down to give them a bit of depth. Positioning is everything; placing the ears slightly to the sides gives the kitty a curious, alert expression.
Embroidering the face is the most delicate part of the Little Kitty Cupcake Scarf – Pattern. Using a small amount of black yarn or embroidery floss, you can create “sleeping” eyes with a simple U-shape or “bright” eyes with small French knots. A tiny pink triangle for the nose and a few straight lines for whiskers complete the transformation. Remember, less is often more when it comes to kawaii facial expressions, so keep your stitches neat and minimal.
If you want to add an extra layer of “cupcake” charm to your Little Kitty Cupcake Scarf – Pattern, you can sew on small multi-colored beads or “sprinkle” stitches. These tiny pops of color represent candy sprinkles and add to the whimsical nature of the scarf. Just be sure that if the scarf is for a small child, you use embroidered sprinkles rather than beads to avoid any potential choking hazards, keeping the project both cute and safe.
The stuffing of the kitty head in the Little Kitty Cupcake Scarf – Pattern should be done with high-quality polyester fiberfill. You want the head to be firm enough to hold its shape but soft enough to be comfortable. Be careful not to overstuff, as this can cause the stitches to stretch and the white stuffing to show through. A light, airy fill is usually best for maintaining the “fluffy frosting” aesthetic without adding too much weight to the ends of the scarf.
Finally, the assembly of the frosting to the base in the Little Kitty Cupcake Scarf – Pattern requires a steady hand. Align the edges carefully and use a whip stitch to join them. If your pattern includes a “scalloped” edge for the frosting, make sure those scallops overlap the liner slightly to create a realistic 3D effect. Once joined, your kitty cupcake should look like a seamless, delicious treat that happens to have adorable feline features.
The final stage of the Little Kitty Cupcake Scarf – Pattern is all about the finishing touches that ensure durability and professional appeal. Once both ends of the scarf are adorned with their kitty cupcakes, it is time to weave in all the loose yarn tails. Use a yarn needle to hide the ends deep within the stitches, following the path of the yarn so they don’t pop out later. This is a tedious but necessary step for a high-quality handmade item.
Blocking your finished Little Kitty Cupcake Scarf – Pattern can make a world of difference in the final drape. If you used natural fibers, a light steam block will help the stitches settle and the scarf to lie flat. For acrylic yarns, a gentle wash and laying it flat to dry is usually sufficient. Blocking ensures that the main body of the scarf doesn’t twist and that the cupcake motifs sit perfectly at the ends when worn.
Consider adding a “cherry” on top of one or both of the kitties in your Little Kitty Cupcake Scarf – Pattern. A small red pom-pom or a crocheted sphere adds a classic cupcake element and a splash of bright color. This small addition acts as a focal point and enhances the “dessert” theme. You could even add a small crocheted bow near one of the kitty’s ears for an extra dose of personality and charm.
To ensure the Little Kitty Cupcake Scarf – Pattern is practical for winter, check the width of the scarf. It should be wide enough to cover the neck but not so wide that it becomes bulky under a coat. The length is also important; for children, a shorter scarf is safer, while for adults, a longer “infinity” style or a traditional long wrap is often preferred. You can easily adjust the number of rows in the middle section to reach your ideal dimensions.
If you are making the Little Kitty Cupcake Scarf – Pattern as a gift, consider creating a custom label. A small “Handmade with Love” tag sewn into the back of the scarf adds a professional touch and reminds the recipient of the effort you put into the project. Packaging the scarf in a box that looks like a bakery box is another fun way to play up the cupcake theme and make the gift-giving experience even more special.
Now that you have completed the Little Kitty Cupcake Scarf – Pattern, take a moment to admire your work! You have successfully combined complex textures, character construction, and functional design into one beautiful accessory. This project not only keeps someone warm but also brings a smile to everyone who sees it. Whether you are selling your creations at a craft fair or gifting them to loved ones, this unique scarf is sure to be a hit.
What is the best yarn for the Little Kitty Cupcake Scarf – Pattern?
A soft, anti-pilling acrylic yarn is often the best choice for this Little Kitty Cupcake Scarf – Pattern. It is durable, machine-washable, and comes in a vast array of “cupcake-like” colors. It also holds its shape well, which is important for the 3D elements like the kitty’s head.
Is this pattern suitable for beginners?
The Little Kitty Cupcake Scarf – Pattern is best suited for “ambitious beginners” or intermediate crafters. It involves basic stitches but requires knowledge of working in the round, increasing, decreasing, and basic embroidery. If you can make a simple hat and a scarf, you can likely handle this project.
How long does it take to finish the Little Kitty Cupcake Scarf?
Depending on your speed and the length of the scarf, it typically takes between 6 to 10 hours. The main body goes quickly, while the decorative kitty cupcake ends require more focused time for the detail work and assembly.
Can I make this scarf in different sizes?
Absolutely! The Little Kitty Cupcake Scarf – Pattern is easily adjustable. Simply add or subtract rows in the middle scarf section to change the length. For a wider scarf, you can increase the number of stitches in your foundation chain, though you may need to scale up the size of the cupcakes to match.
How do I clean my Little Kitty Cupcake Scarf?
Because of the 3D elements and embroidery, hand-washing in cool water with a mild detergent is recommended. Lay the scarf flat on a towel to dry. Avoid wringing it out, as this can distort the shape of the cupcake bases and the kitty’s ears.
Can I use safety eyes instead of embroidery?
Yes, safety eyes can be used for the Little Kitty Cupcake Scarf – Pattern, but they are only recommended for scarves intended for older children or adults. For infants and toddlers, embroidery is always the safer choice to prevent any risk of the eyes coming loose.
In this article, we have explored the wonderful world of the Little Kitty Cupcake Scarf – Pattern, covering everything from material selection to the final assembly of this adorable accessory. We learned how to create a sturdy, textured cupcake base using ribbing techniques, how to craft a “frosting” kitty head with character-filled facial features, and how to finish the project with professional touches like blocking and labeling.
This pattern is a perfect example of how traditional crafting can be infused with modern, playful design to create something truly memorable. By following these steps, you have mastered the art of combining functional winter wear with the delightful aesthetics of handmade toys and treats.


