
Lily in Crochet - Pattern

Finding the perfect Mini Bags Crochet – Pattern is the first step toward creating a trendy, functional, and adorable accessory that has taken the fashion world by storm. These tiny masterpieces are not just for children; they have become a staple for adults who want to carry just the essentials—like a lip balm, keys, or a small card wallet—while making a bold style statement. Whether you are a beginner looking for a quick weekend project or an expert wanting to experiment with intricate textures on a small scale, a well-written Mini Bags Crochet – Pattern provides the ultimate creative outlet for your yarn stash.
The beauty of a Mini Bags Crochet – Pattern lies in its versatility and the speed at which you can see a finished product. Unlike large sweaters or blankets that can take weeks to complete, these small accessories allow you to practice new stitches and construction techniques in just a few hours. Because of their compact size, they are the perfect “portable” project, easily fitting into your purse so you can crochet while commuting, waiting for an appointment, or relaxing at a coffee shop. High-quality Mini Bags Crochet – Pattern designs often incorporate unique handles, closures, and linings that elevate the final look from a simple pouch to a boutique-quality accessory.
In this guide, we will explore the essential components that make a Mini Bags Crochet – Pattern successful, from choosing the right durable fibers to mastering the assembly of tiny handles and straps. We will also discuss how to customize your projects with embellishments like tassels, beads, or embroidery to make each piece truly one-of-a-kind. By the end of this article, you will have all the knowledge needed to dive into your next Mini Bags Crochet – Pattern with confidence and creativity. Let’s explore why these miniature wonders are the current must-have project for every fiber artist.
The foundation of any successful Mini Bags Crochet – Pattern begins with the selection of the perfect yarn. Since these bags are designed to hold weight and withstand daily handling, you should prioritize mercerized cotton or a sturdy raffia yarn. These fibers provide the structural integrity needed to prevent the bag from sagging or losing its shape when items are placed inside. Unlike soft wool, which can stretch significantly, cotton ensures that your Mini Bags Crochet – Pattern remains crisp and professional-looking for a long time.
Selecting the correct crochet hook size is equally vital to the durability of your project. For most Mini Bags Crochet – Pattern designs, you will want to use a hook that is slightly smaller than what is recommended on the yarn label. This creates a “tight gauge,” ensuring that the stitches are dense enough to prevent small items like coins or hairpins from slipping through the gaps. A 3.0mm or 3.5mm hook is often the “sweet spot” for achieving a sturdy fabric that doesn’t require an immediate fabric lining.
In addition to yarn and hooks, you will need a few essential crochet notions to complete your Mini Bags Crochet – Pattern. Sharp scissors, a large-eye tapestry needle for weaving in ends, and locking stitch markers are non-negotiable. Stitch markers are particularly helpful when working in a spiral (the “amigurumi style”), which is a common construction method for the base of many small bags. They help you keep track of the beginning of each round, ensuring your Mini Bags Crochet – Pattern stays symmetrical.
Hardware can transform a simple Mini Bags Crochet – Pattern into a high-end fashion piece. Consider incorporating metal lobster claws, D-rings, or magnetic snaps into your design. These elements provide a functional and aesthetic upgrade that makes the bag feel more like a commercial product. If your Mini Bags Crochet – Pattern is intended for a phone or a small wallet, a secure magnetic closure is much more practical than a simple button, offering better security for your belongings.
Don’t forget the importance of a stiffening agent or lining if you choose a lacy Mini Bags Crochet – Pattern. If the pattern features “mesh” or “openwork” stitches, sewing in a simple cotton fabric lining will protect the interior and keep the bag’s silhouette intact. Some crafters even use plastic canvas hidden between the lining and the crochet work to give the base of the Mini Bags Crochet – Pattern a very firm, flat bottom that allows the bag to stand upright on its own.
Finally, consider the aesthetic of your color palette. Since you only need a small amount of yarn for a Mini Bags Crochet – Pattern, this is the perfect opportunity to use “hand-dyed” luxury scraps or vibrant, bold colors that you might be hesitant to use for a larger garment. Neon pinks, deep emeralds, or even variegated yarns can make a tiny bag pop against a neutral outfit. Experimenting with color is what makes following a Mini Bags Crochet – Pattern so addictive and rewarding for creators of all levels.
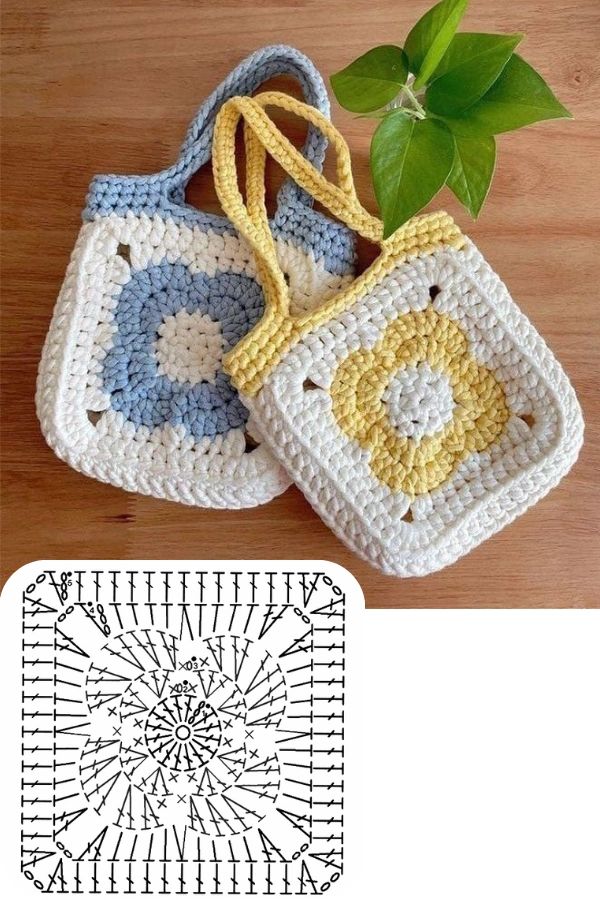
The most common way to start a Mini Bags Crochet – Pattern is by creating a flat base, which can be circular, oval, or rectangular. For a circular base, you will use the “magic ring” method and increase stitches in each round to keep the circle flat. If your Mini Bags Crochet – Pattern requires an oval base, you will work around both sides of a foundation chain. This foundational step is crucial because it determines the overall capacity and “footprint” of your finished bag.
Once the base is complete, you will stop increasing and begin working “up” the sides of the Mini Bags Crochet – Pattern. This transition is often marked by working in the back loops only (BLO) for one round, which creates a sharp ridge that defines the bottom of the bag. From here, you can choose various stitch patterns—like the waistcoat stitch for a knit-look texture or the star stitch for something more decorative—to build the body of your Mini Bags Crochet – Pattern.
Handles and straps are where you can really show off your technical skills within a Mini Bags Crochet – Pattern. You can crochet a simple I-cord for a delicate crossbody strap or a wider, reinforced band for a “top-handle” style. When attaching these to your Mini Bags Crochet – Pattern, it is essential to reinforce the connection points with extra stitches. A heavy phone can put a lot of strain on a small bag, so a secure attachment ensures the longevity of your handmade accessory.
Shaping the “mouth” or opening of the Mini Bags Crochet – Pattern is the next step in the construction process. Some patterns use a “drawstring” closure, where you create a row of eyelets (chain spaces) near the top. Others might require a flat flap that folds over the front. Regardless of the style, ensuring the opening is wide enough to access your items while still being secure is a hallmark of a well-designed Mini Bags Crochet – Pattern.
If your Mini Bags Crochet – Pattern involves a “flat” construction (sewing two panels together), the seaming technique becomes very important. Using a mattress stitch or a slip-stitch join on the outside can add a decorative “piping” effect to the edges. For a more seamless look, turning the bag inside out and using a simple whipstitch is preferred. A clean seam makes the Mini Bags Crochet – Pattern look more polished and prevents the yarn from bunching at the corners.
The final shaping technique often involves “blocking” your finished Mini Bags Crochet – Pattern. By wetting the bag and stuffing it with paper towels or a small box to dry, you “set” the stitches into their final form. This is especially helpful if your Mini Bags Crochet – Pattern looks a bit crumpled after assembly. Blocking gives the cotton fibers a chance to relax and ensures that the bag has the exact dimensions and crisp lines intended by the original designer.
Personalizing your Mini Bags Crochet – Pattern is what makes the “DIY” aspect so enjoyable. Adding a long tassel to the zipper or a side loop is an easy way to add a bohemian touch. You can make tassels using the same yarn as the bag or a contrasting color for more visual interest. In a Mini Bags Crochet – Pattern, these small details act as the “jewelry” of the piece, drawing the eye and giving the accessory a professional, boutique-style finish.
Embroidery is another fantastic way to elevate a Mini Bags Crochet – Pattern. Using a tapestry needle and a different color of yarn or embroidery floss, you can stitch small flowers, initials, or geometric borders onto the surface of the crochet. Since the canvas is small, adding a few lazy daisy stitches or a French knot doesn’t take much time but adds immense value to the Mini Bags Crochet – Pattern. It turns a simple utility item into a piece of custom, wearable art.
Beading can also be integrated directly into your Mini Bags Crochet – Pattern. You can string beads onto your yarn before you begin and “lock” them into place as you crochet, or sew them onto the finished bag. Beaded Mini Bags Crochet – Pattern designs are perfect for evening wear or special occasions, adding a bit of weight and sparkle. The key is to use lightweight beads so they don’t cause the crochet fabric to sag or stretch out of shape.
Consider the “Strap Style” as a form of customization for your Mini Bags Crochet – Pattern. Instead of a crochet strap, you could use a gold metal chain or a leather strap purchased from a craft store. This “mixed media” approach is very popular in modern fashion and makes the Mini Bags Crochet – Pattern look much more expensive. The contrast between the soft, textured yarn and the cold, hard metal creates a sophisticated look that is perfect for city life.
Buttons can serve as both a functional closure and a decorative focal point in a Mini Bags Crochet – Pattern. You can choose a vintage pearl button, a rustic wooden toggle, or even a crocheted button made to match the bag. Placing a large, interesting button on the front flap of your Mini Bags Crochet – Pattern provides an instant “wow” factor. It’s a simple addition that can completely change the vibe of the bag from “cute” to “elegant.”
Finally, think about the “Themed” possibilities of a Mini Bags Crochet – Pattern. You can adapt the colors and shapes to create animal-faced bags for children, or use metallic yarns for a “party” version of the pattern. Because the Mini Bags Crochet – Pattern is so quick to make, you can easily create a whole collection for different outfits, seasons, or as personalized gifts for friends. The only limit to customizing these tiny bags is your own imagination and your yarn collection.
To keep your Mini Bags Crochet – Pattern looking brand new, proper care is essential. Because they are often made of cotton, most of these bags are machine washable on a cold, gentle cycle. However, to prevent snagging, it is highly recommended to place your Mini Bags Crochet – Pattern inside a mesh laundry bag. Avoid using the dryer, as the heat can cause the cotton to shrink or the fibers to become brittle; instead, lay the bag flat to air dry.
If you have used metal hardware or beads on your Mini Bags Crochet – Pattern, hand washing is the safest route. Use a mild “wool wash” or a gentle soap and lukewarm water. Gently squeeze the water out—never wring or twist the crochet—and reshape the bag while it is damp. Regular maintenance ensures that the colors of your Mini Bags Crochet – Pattern remain vibrant and that the structural integrity of the stitches is preserved for years to come.
Over time, you may notice “pilling” on your Mini Bags Crochet – Pattern, especially if it rubs against your hip while you walk. You can easily remove these small fuzz balls with a fabric shaver or a sharp pair of embroidery scissors. Keeping your bag “groomed” prevents it from looking worn out and maintains the high-quality aesthetic of the original Mini Bags Crochet – Pattern. A little bit of upkeep goes a long way in preserving handmade items.
Organizing your essentials within a Mini Bags Crochet – Pattern requires a bit of strategy. Since space is limited, using a small “card sleeve” or a tiny coin purse can keep things tidy. If you didn’t line your Mini Bags Crochet – Pattern, avoid carrying sharp objects like unprotected keys or pens without caps, as they can poke through the stitches and potentially damage the yarn. Being mindful of what you carry helps maintain the inner shape of the bag.
For storage, it is best to keep your Mini Bags Crochet – Pattern collection in a dust-free environment, like a drawer or a lidded box. If the bag has a long strap, wrap it loosely around the body of the bag to prevent it from getting tangled with other items. If your Mini Bags Crochet – Pattern has a flat base, store it upright to maintain the “footing.” Proper storage ensures that whenever you’re ready to head out, your favorite accessory is in perfect condition.
Lastly, if your Mini Bags Crochet – Pattern ever develops a “snag” where a loop of yarn is pulled out, don’t cut it! Instead, use your crochet hook to gently pull the loop back through to the inside of the bag. This simple fix preserves the strength of the fabric and hides the imperfection. Understanding these basic repair and care tips ensures that your hard work in following the Mini Bags Crochet – Pattern is protected and that your bag remains a beautiful part of your wardrobe.
What is the best yarn for a Mini Bags Crochet – Pattern?
The best choice is a Category 4 (Worsted) or Category 3 (DK) cotton yarn. Cotton is preferred because it is non-stretchy and very durable. Brands like Lily Sugar ‘n Cream or 24/7 Cotton are excellent for maintaining the structure of a small bag.
How long does it take to finish a Mini Bags Crochet – Pattern?
Depending on the complexity of the stitches, most people can finish a basic Mini Bags Crochet – Pattern in 2 to 5 hours. This makes it a perfect “instant gratification” project for a rainy afternoon or a quick gift for a friend.
Do I need to line my mini crochet bag?
It isn’t strictly necessary if your stitches are very tight (like the single crochet), but a lining adds a professional touch and prevents the bag from stretching. If you plan to carry heavy items like a phone, a fabric lining is highly recommended to support the weight.
Is this project suitable for a total beginner?
Absolutely! A simple Mini Bags Crochet – Pattern that uses only single and double crochet stitches is an excellent way for beginners to learn about shaping and assembly. It’s a low-risk project that teaches you a lot about garment construction on a smaller scale.
Can I wash my crochet bag if it has metal hardware?
If the hardware is high-quality (stainless steel or plated), you can hand wash it. However, you should dry the metal immediately with a soft cloth to prevent rusting or spotting. If the hardware is removable (like a clip-on strap), always remove it before washing the crochet portion.
How much yarn do I need for one mini bag?
You usually need less than one full skein (approx. 50 to 100 yards) of yarn for a standard Mini Bags Crochet – Pattern. This makes it a fantastic “stash-buster” project for using up leftover yarn from previous, larger projects.
In this article, we have explored the delightful and trendy world of the Mini Bags Crochet – Pattern, covering everything from the importance of choosing sturdy cotton fibers to the technical details of base construction and strap reinforcement.
We’ve learned that whether you prefer a minimalist “pouch” style or a complex “beaded evening bag,” the key to success lies in maintaining a tight stitch gauge and paying attention to professional finishes like blocking and lining. These tiny accessories are a testament to the fact that you don’t need a massive project to make a significant fashion statement or to experience the deep satisfaction of the creative process.


