Crochet Rose - Pattern

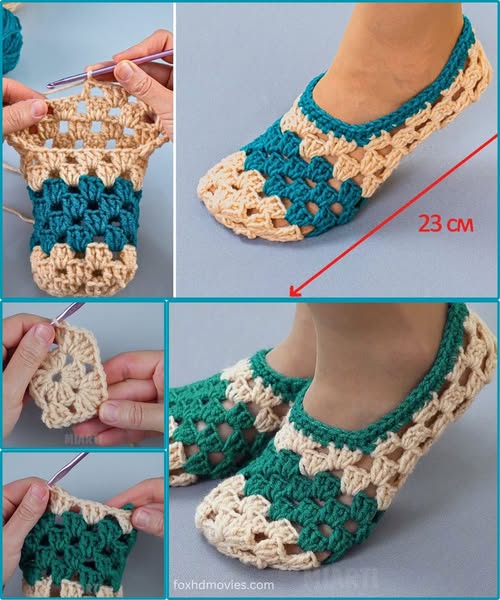
If you’re looking for a cozy handmade project that’s both functional and stylish, this Quick and Easy Crochet Granny Square Slippers – Pattern is exactly what you need. Granny squares are not only classic and beautiful, but they’re also incredibly versatile. When cleverly assembled, they can transform into warm, snug slippers that are perfect for lounging around the house or gifting to a loved one.
This quick and easy crochet granny square slippers – pattern is perfect for beginners who want to try something beyond scarves or dishcloths, as well as experienced crocheters who are looking for a relaxing and satisfying project. You’ll only need a few granny squares and some basic crochet skills to get started—no complicated techniques or hours of measuring involved.
In this guide, we’ll walk you through everything from choosing the right yarn to assembling your slippers. You’ll also find ideas to personalize your creation, answers to frequently asked questions, and helpful tips to ensure your slippers are both durable and comfortable. Let’s begin your journey into turning simple squares into cozy handmade footwear!
To begin the Quick and Easy Crochet Granny Square Slippers – Pattern, you’ll first need to gather the right materials. These slippers are budget-friendly and require tools that you likely already have in your crochet kit.
Start with medium-weight (worsted) yarn, which offers the perfect balance of warmth, durability, and flexibility. Acrylic yarn is a popular choice for its affordability and ease of maintenance, but cotton or a wool blend can add a touch of luxury and softness.
Next, choose an appropriate crochet hook size. For worsted weight yarn, a hook between 4.5 mm and 5.5 mm usually works best. Always check your yarn label for the recommended hook size, especially if you want to maintain consistent tension throughout the squares.
You’ll also need a yarn needle for sewing your granny squares together. A blunt-tipped needle makes it easier to weave through stitches without splitting the yarn fibers.
Have a pair of sharp scissors on hand to trim ends neatly. While this might seem like a small detail, a clean cut helps when weaving in ends and finishing your project professionally.
If you want a snug fit, you can also consider adding elastic bands inside the slippers or using slip-resistant fabric paint on the soles to prevent slipping on tile or hardwood floors.
Finally, consider color options. Choose solid colors for a modern look or multiple vibrant colors for a fun, eclectic slipper design. Don’t be afraid to express your personality with your color choices—granny squares are perfect for that!
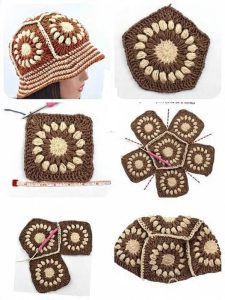
Now let’s get into the heart of this Quick and Easy Crochet Granny Square Slippers – Pattern. This method involves creating six identical granny squares and assembling them in a clever way to form each slipper.
Start by crocheting six traditional granny squares for each slipper—twelve in total. Begin with a magic ring or chain 4, join with a slip stitch to form a loop. Into the ring, work [3 double crochet, chain 2] four times, joining at the end with a slip stitch to the top of the first chain 3.
In the second round, work 3 double crochets in each chain space and chain 2 at each corner. Continue adding rounds until your square measures about 4 to 5 inches across, depending on your foot size.
Once you have all twelve squares ready, begin assembling. For each slipper, place one square on the sole of the foot, one on top of the foot, and one on each side. Then, one square becomes the heel, and the last one forms the toe. Stitch them together using your yarn needle and the whip stitch method, making sure to align corners neatly.
Test the fit as you go. If the slipper feels too tight, you can add another round to each square or make looser stitches. If it feels too loose, consider shrinking the square size or using a smaller hook.
After all squares are stitched together, weave in the yarn ends carefully. This step ensures there are no loose threads that could come undone with wear.
To finish, you may want to crochet a simple border around the opening of the slipper using single crochet stitches. This not only enhances the appearance but also provides a little more structure.
One of the best parts of using a Quick and Easy Crochet Granny Square Slippers – Pattern is the flexibility to make them uniquely yours. With a few creative touches, you can elevate your slippers from simple to standout.
Start with color play. Use a different color for each square to create a patchwork effect, or alternate colors in each round of your granny square for a vibrant, boho-style slipper.
Try incorporating texture into your slippers by using puff stitches, bobble stitches, or popcorn stitches in the center or final round of each granny square. These small variations add depth and interest to the finished product.
Add buttons, pom-poms, or crocheted flowers to the tops of your slippers for a whimsical or elegant finish. These embellishments are easy to attach and allow for maximum creativity.
If you want added comfort, consider sewing a soft fabric lining inside the slippers. Felt or fleece works well and keeps your feet extra cozy in colder months.
Experiment with different square patterns. Instead of the classic granny square, try variations like the sunburst, solid square, or diagonal mesh. These changes can completely alter the look of your slippers while maintaining the same structure.
Finally, you can crochet matching accessories, like a headband, wrist warmers, or a scarf using the same granny square design and colors. It makes a great gift set for friends or family—or even for yourself!
After completing your Quick and Easy Crochet Granny Square Slippers – Pattern, it’s important to know how to care for them properly so they last. These slippers are handmade treasures, and with the right care, they’ll stay cozy for a long time.
Most yarns used for slippers are machine washable, especially acrylic blends. However, to preserve the shape and stitches, it’s best to wash them on a gentle cycle with cold water or hand wash if you have the time.
Avoid using a dryer, as the heat can cause the slippers to shrink or lose their shape. Instead, lay them flat to dry on a towel, reshaping if needed. This helps them retain their form and comfort.
If your slippers stretch out after repeated wear, you can tighten them by adding an extra border around the opening or using elastic thread in the final row.
Watch for signs of wear on the soles, especially if you walk on hard surfaces. You can extend their life by sewing felt patches or applying non-slip glue on the bottom.
Store your slippers in a clean, dry place when not in use. If you’re gifting them, consider wrapping them in tissue or placing them in a cloth bag for a personal touch.
Don’t forget to check for loose ends or small holes over time. A quick fix with your hook and some leftover yarn can keep your slippers in tip-top shape.
Q1: How long does it take to make these slippers?
Most people can complete a pair of these slippers in about 2–4 hours, depending on skill level and how fast you crochet. It’s a great weekend project!
Q2: Can beginners follow this pattern?
Absolutely! This Quick and Easy Crochet Granny Square Slippers – Pattern is ideal for beginners. It uses simple stitches and basic assembly techniques.
Q3: What size do these slippers fit?
This pattern fits most adult feet. To adjust, you can make larger or smaller squares, or add/subtract rounds. Test fit as you assemble.
Q4: Can I make these with cotton yarn?
Yes, cotton works well and is breathable. Just note that cotton doesn’t stretch as much as acrylic or wool, so sizing may need adjusting.
Q5: How can I make the soles non-slip?
Apply dots of hot glue or non-slip fabric paint to the bottom. You can also sew on felt or leather patches for extra grip.
Q6: Do I need a specific type of granny square?
Not at all! You can use any granny square variation. Just make sure they’re all the same size and shape before assembling.
This Quick and Easy Crochet Granny Square Slippers – Pattern is the perfect blend of comfort, creativity, and craft. Whether you’re new to crochet or a seasoned maker, turning simple granny squares into cozy slippers is both satisfying and practical.
Throughout this article, we explored the materials needed, step-by-step instructions, customization ideas, and care tips to help you create slippers you’ll truly love. With just yarn, a hook, and a few hours, you can craft handmade footwear that adds warmth to your feet and joy to your day.
We’d love to hear your thoughts! If you found this guide helpful or have suggestions for improvement, please leave your honest opinion and ideas in the comments. What did you love? What other patterns would you like to see? Let’s keep the creativity flowing together!


