
Lily in Crochet - Pattern

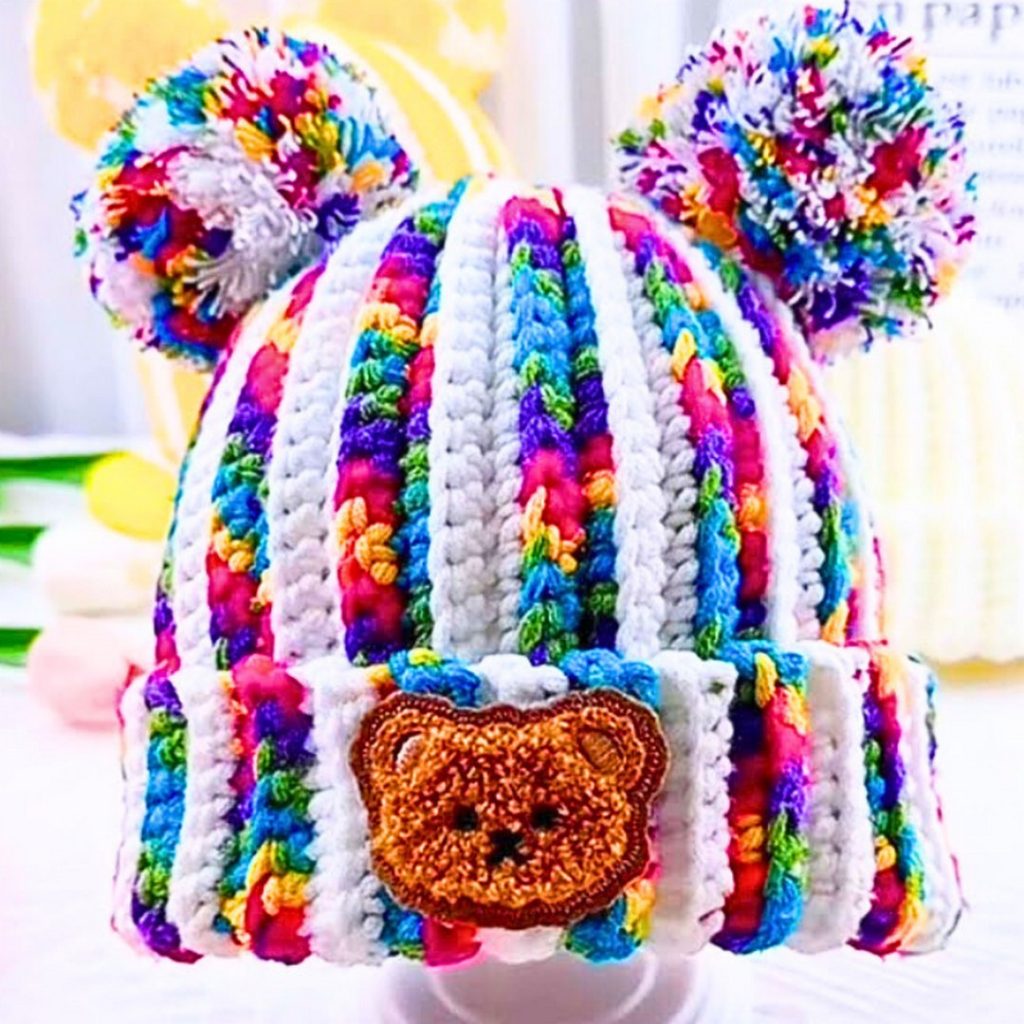
A Rainbow crochet hat – Pattern is one of the most joyful and vibrant projects a crafter can embark on, offering a perfect blend of artistic expression and practical warmth. There is something inherently magical about watching a spectrum of colors emerge from your hook as you work through each round, transforming simple yarn into a wearable piece of art. Whether you are making this for a child who loves bright colors or as a bold statement piece for your own winter wardrobe, mastering a Rainbow crochet hat – Pattern allows you to brighten up even the greyest of days with handmade charm.
The beauty of a Rainbow crochet hat – Pattern lies in its incredible versatility and the way it encourages you to play with color theory in a tangible way. You don’t have to stick to the traditional “red, orange, yellow, green, blue, indigo, violet” sequence if you don’t want to; a modern Rainbow crochet hat – Pattern can feature pastel rainbows, neon shades, or even earthy, muted tones that mimic a sunset. This flexibility makes the project a favorite among fiber artists who want to use up their yarn scraps while creating something that looks intentional, professional, and high-quality.
In this comprehensive guide, we will explore the technical nuances and creative possibilities of the Rainbow crochet hat – Pattern to help you achieve a flawless finish. From selecting the right yarn fibers that hold their color to mastering the seamless transitions between different hues, we will cover every essential detail. By understanding the underlying structure of a Rainbow crochet hat – Pattern, you will gain the confidence to adjust sizes, experiment with textures, and create a cozy accessory that stands out for its craftsmanship and brilliant design.
The foundation of a successful Rainbow crochet hat – Pattern starts with selecting the right yarn weight, which determines the overall drape and warmth of the finished piece. Most patterns recommend a worsted weight (Level 4) yarn because it provides a sturdy structure that shows off the color transitions beautifully. If you choose a yarn that is too thin, the colors might blend too much, while a yarn that is too thick can make the Rainbow crochet hat – Pattern feel heavy and stiff.
When picking colors for your Rainbow crochet hat – Pattern, consider the “vibrancy” of the yarn. Acrylic yarns are popular for rainbows because they are available in a massive array of saturated colors and are machine washable, making them perfect for kids. However, if you prefer a more natural feel, a merino wool blend can give your Rainbow crochet hat – Pattern a luxurious softness and excellent stitch definition, ensuring that each stripe of color is crisp and clear.
The hook size you select for your Rainbow crochet hat – Pattern is just as important as the yarn itself. If your tension is naturally tight, you might want to go up half a millimeter in hook size to ensure the hat remains stretchy and comfortable. A Rainbow crochet hat – Pattern that is too tight will lose its “give,” making it difficult to wear over different hairstyles or head sizes, so always check your gauge before starting the main body of the work.
In the context of this Pattern, “color pooling” or “stripe sequence” refers to the order in which you arrange your yarn. To get a classic look, you’ll need seven distinct colors, but you can also create a beautiful Rainbow crochet hat – Pattern using a single “self-striping” yarn. These yarns are dyed to change colors automatically, which reduces the number of ends you have to weave in later, making the Rainbow crochet hat – Pattern much faster and more beginner-friendly.
Don’t forget the importance of a good pair of yarn snips and a blunt tapestry needle for your Rainbow crochet hat – Pattern. Because a rainbow design involves frequent color changes, you will have more yarn tails than usual to hide. Using a high-quality needle ensures you can weave those ends securely into the stitches so they don’t pop out after the first wash, maintaining the professional integrity of your Rainbow crochet hat – Pattern.
Lastly, consider adding a pompom to the top of your Rainbow crochet hat – Pattern. You can make a multicolored pompom using all the yarn scraps left over from the project, or choose a faux-fur pompom for a trendy, boutique-style finish. The pompom acts as the “crown” of your Rainbow crochet hat – Pattern, tying all the colors together and adding a playful element of movement and texture to the final design.
Most variations of a Rainbow crochet hat – Pattern begin with a magic circle, a technique that creates a tight, hole-free center at the top of the hat. From this center, you will work in rounds, increasing the number of stitches in each layer to create a flat circle that eventually curves into a dome. Understanding how to “increase” correctly is vital for the Rainbow crochet hat – Pattern to fit the head without puckering or looking like a cone.
The primary stitch used in a standard Rainbow crochet hat – Pattern is often the double crochet (dc). This stitch is tall enough to make the project grow quickly but dense enough to provide warmth. For a more textured Rainbow crochet hat – Pattern, you might incorporate front post double crochet stitches, which create a ribbed effect that mimics the look of a knit hat and adds extra elasticity to the fabric.
Managing color changes is where the Rainbow crochet hat – Pattern truly becomes a skill-building project. The cleanest way to change colors is to pull the new color through the last two loops of the final stitch of the previous round. This “seamless join” prevents the colors from bleeding into each other, ensuring that the stripes in your Rainbow crochet hat – Pattern look like perfect, horizontal bands rather than jagged steps.
The “brim” of the Rainbow crochet hat – Pattern is the final section you will work on, and it serves to anchor the hat to the head. A popular choice for a Rainbow crochet hat – Pattern brim is a ribbed stitch, created by alternating front and back post stitches. This section is usually worked with a slightly smaller hook to ensure it remains snug, preventing the Rainbow crochet hat – Pattern from slipping down over the wearer’s eyes.
For those looking for a more advanced Rainbow crochet hat – Pattern, you can try the tapestry crochet technique. This allows you to work with multiple colors at once, carrying the unused yarn inside the stitches. Using this method, you can create a Rainbow crochet hat – Pattern with vertical stripes, chevron waves, or even small rainbow motifs scattered across a solid background, offering a unique twist on the classic horizontal stripe.
Tension control is paramount when working on a Rainbow crochet hat – Pattern because different yarn brands or even different colors within the same brand can have slightly different thicknesses. If one color is thinner than the others, it might make that specific stripe in the Rainbow crochet hat – Pattern look indented. Always feel the yarn as you go and adjust your stitch tightness to keep the surface of the hat smooth and uniform.
One of the most valuable aspects of a well-written Rainbow crochet hat – Pattern is its ability to be scaled for infants, children, teens, and adults. To adjust the size, you simply change the number of “increase rounds” at the beginning of the project. A baby-sized Rainbow crochet hat – Pattern might only require four rounds of increases, whereas a large adult size might need eight or nine rounds to reach the correct diameter.
Measuring the crown diameter is the most reliable way to ensure your Rainbow crochet hat – Pattern will fit. For an average adult, the flat circle should measure approximately 6.5 to 7 inches across before you stop increasing and start working “straight” down. If you follow the Rainbow crochet hat – Pattern instructions carefully and use a measuring tape, you can avoid the frustration of a hat that is too tight or far too slouchy.
The “height” of the Rainbow crochet hat – Pattern also varies by age. A newborn hat is usually quite shallow, while an adult “slouchy” style Rainbow crochet hat – Pattern requires many more rounds of color to achieve that relaxed, draped look at the back. When planning your color sequence, make sure you divide the total desired height by the number of colors you have to ensure all stripes in the Rainbow crochet hat – Pattern are of equal width.
If you are making the Rainbow crochet hat – Pattern as a gift and cannot measure the recipient’s head, refer to standard sizing charts. These charts provide the average head circumference for different age groups. A standard Rainbow crochet hat – Pattern for a toddler usually targets a 18-19 inch circumference, while an adult female usually fits a 21-22 inch hat. Always aim for about an inch of “negative ease” so the hat stays on securely.
Using a stretchier stitch like the half-double crochet (hdc) can make your Rainbow crochet hat – Pattern more forgiving in terms of size. The hdc stitch is a hybrid that offers more flexibility than a single crochet but more density than a double crochet. This makes it an ideal choice for a Rainbow crochet hat – Pattern intended for growing children, as the hat will stretch to accommodate their head size for more than one season.
Finally, consider adding an earflap modification to your Rainbow crochet hat – Pattern for extra winter protection. Earflaps are worked after the main body of the hat is finished and can be decorated with braided tassels using the same rainbow colors. This functional addition makes the Rainbow crochet hat – Pattern even more practical for cold climates while providing extra surface area to showcase your beautiful yarn colors.
Because a Rainbow crochet hat – Pattern often uses multiple colors, you must be careful about “color bleeding” during the first wash. This is especially true if you are using high-contrast colors like deep red and bright white. To protect your Rainbow crochet hat – Pattern, you can soak it in a mixture of cold water and a small amount of white vinegar, which helps “set” the dye in the yarn fibers.
Hand-washing is almost always the best way to preserve the shape and longevity of a Rainbow crochet hat – Pattern. Fill a basin with lukewarm water and a gentle wool wash, submerge the hat, and gently squeeze the suds through the stitches. Never wring or twist your Rainbow crochet hat – Pattern, as this can stretch the stitches permanently and ruin the beautiful symmetry of the Pattern you worked so hard to create.
To dry your Rainbow crochet hat – Pattern, lay it flat on a clean, dry towel and roll the towel up like a sleeping bag to absorb the excess moisture. Then, reshape the hat and lay it flat on a drying rack away from direct sunlight. Direct sun can fade the bright colors of your Rainbow crochet hat – Pattern over time, making the rainbow look dull and aged prematurely.
If your Rainbow crochet hat – Pattern starts to develop “pills” (small fuzzy balls of fiber), you can easily remove them with a fabric shaver or a small pair of scissors. Pilling is a natural result of friction and doesn’t mean your Rainbow crochet hat – Pattern is falling apart. Regular maintenance will keep the surface of the stitches looking smooth and the colors looking as vibrant as the day you finished the project.
Storing your Rainbow crochet hat – Pattern properly during the summer months is also important. Instead of hanging it on a hook, which can stretch out the crown, fold it gently and store it in a drawer or a breathable cotton bag. This keeps the Rainbow crochet hat – Pattern safe from dust and moths, ensuring it is ready to wear as soon as the first cold snap of autumn arrives.
Ultimately, the time and effort you put into following the Rainbow crochet hat – Pattern deserves to be protected. A well-cared-for crochet item can last for decades, often becoming a cherished family heirloom. Every time you wear your Rainbow crochet hat – Pattern, you are showing off your skills and your love for color, making the maintenance process a small but worthy price to pay for such a unique accessory.
1. How many colors do I need for a Rainbow crochet hat – Pattern?
While a traditional rainbow has seven colors, you can use as few as three or as many as you like. Most Rainbow crochet hat – Pattern designs look best with 5 to 7 colors to truly capture the gradient effect.
2. Can a beginner complete this Rainbow crochet hat – Pattern?
Absolutely! If you know how to do a chain, a single crochet, and a double crochet, you can easily follow a basic Rainbow crochet hat – Pattern. The most challenging part is simply managing the color changes.
3. How do I avoid a “jog” where the colors change?
To avoid a visible step or “jog” in your Rainbow crochet hat – Pattern, try using the “helix crochet” method or finish each round with a slip stitch and start the new color in a different stitch to hide the seam.
4. What yarn is best for a baby’s Rainbow crochet hat – Pattern?
A soft, “anti-pilling” acrylic or a cotton-bamboo blend is best. These are gentle on sensitive skin and can be washed frequently, which is essential for baby items made from a Rainbow crochet hat – Pattern.
5. How much yarn will I need in total?
For an adult size Rainbow crochet hat – Pattern, you typically need about 150-200 yards of yarn in total. Since you are using multiple colors, you will likely have plenty of leftover yarn for another small project.
6. Can I add a lining to my Rainbow crochet hat – Pattern?
Yes, sewing a fleece lining inside your Rainbow crochet hat – Pattern makes it much warmer for extreme winter weather and provides a soft barrier if the yarn you chose is slightly scratchy.
In this guide, we have explored the vibrant and creative world of the Rainbow crochet hat – Pattern, covering everything from essential material selection and sizing techniques to the nuances of color transitions and long-term care.
We learned that the Rainbow crochet hat – Pattern is not just a winter accessory but a canvas for your personal style, allowing you to experiment with different yarn weights and stitch textures. By following the steps outlined, from the magic circle to the final ribbed brim, you can create a professional-grade hat that brings a splash of color to any outfit.


