
Lily in Crochet - Pattern

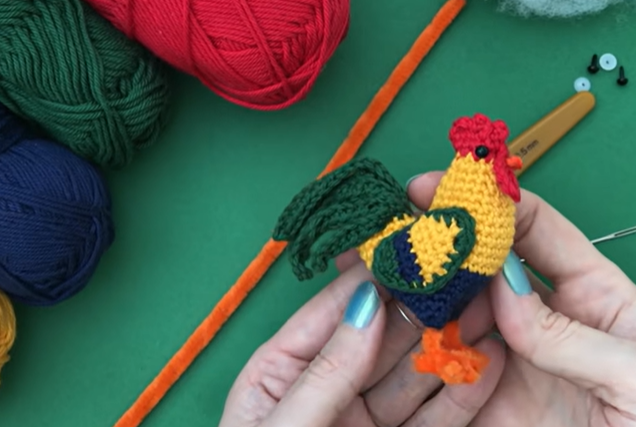
This Rooster Amigurumi Crochet Tutorial – Pattern is the ultimate guide for anyone looking to bring a touch of farmyard charm into their home through the art of crochet. Amigurumi, the Japanese craft of knitting or crocheting small, stuffed yarn creatures, has taken the crafting world by storm, and creating a rooster is one of the most vibrant projects you can undertake. Whether you are looking for a unique handmade gift or a quirky piece of kitchen decor, following a well-structured Rooster Amigurumi Crochet Tutorial – Pattern allows you to experiment with bold colors like deep reds, bright oranges, and forest greens.
Working through a Rooster Amigurumi Crochet Tutorial – Pattern is not just about the final product; it is about the meditative process of counting stitches and watching a character emerge from a simple ball of yarn. For beginners, this specific project is an excellent way to practice essential techniques such as the magic ring, single crochet increases, and invisible decreases. Each section of the rooster, from the sturdy body to the iconic floppy comb, provides a learning opportunity that builds your confidence as a fiber artist while ensuring the result is both sturdy and adorable.
To get the most out of your Rooster Amigurumi Crochet Tutorial – Pattern, it is important to understand the specific terminology and tools that will make your stitching experience smooth and professional. Using the right hook size and yarn weight is critical to ensure that the stuffing doesn’t peek through the stitches, a common challenge in 3D crochet projects. In the following sections, we will break down every aspect of this Rooster Amigurumi Crochet Tutorial – Pattern, providing you with the insights needed to create a high-quality plushie that looks like it came straight from a boutique craft store.
The first step in any Rooster Amigurumi Crochet Tutorial – Pattern is gathering high-quality materials that suit the project’s needs. For a rooster, a mercerized cotton yarn is highly recommended because it offers excellent stitch definition and a slight sheen that makes the feathers look vibrant. Cotton is also less “fuzzy” than acrylic, ensuring that your Rooster Amigurumi Crochet Tutorial – Pattern results in a clean finish that highlights the intricate handiwork.
Selecting the correct crochet hook is the next vital component of the Rooster Amigurumi Crochet Tutorial – Pattern setup. Generally, you should use a hook that is one or two sizes smaller than what the yarn label suggests; for example, a 2.5mm or 3.0mm hook is perfect for DK weight yarn. This creates a dense, tight fabric which is essential for amigurumi so that the polyester fiberfill remains securely hidden inside the body.
You will also need a few specialized notions to successfully complete your Rooster Amigurumi Crochet Tutorial – Pattern. A stitch marker is non-negotiable, as most amigurumi is worked in continuous rounds (spirals) without joining. Without a marker to indicate the start of a new row, it is incredibly easy to lose your place, which can lead to an asymmetrical rooster or a mismatched stitch count that throws off the entire design.
Safety is a priority if your creation is intended for a child, so your Rooster Amigurumi Crochet Tutorial – Pattern might call for safety eyes. These plastic components snap together with a washer on the inside of the fabric, making them very difficult to pull out. If you prefer a more traditional or eco-friendly look, you can always use black embroidery thread to stitch the eyes directly onto the face once the head is stuffed.
Don’t forget the small details that bring the Rooster Amigurumi Crochet Tutorial – Pattern to life, such as the comb and the wattle. For these parts, you might want a slightly softer yarn or even a different texture to provide contrast against the main body. Having a sharp pair of embroidery scissors and a blunt-ended tapestry needle is essential for weaving in ends and assembling the different pieces together at the end of the project.
Lastly, the choice of stuffing can change the feel of your finished bird. High-loft polyester stuffing is the standard for a Rooster Amigurumi Crochet Tutorial – Pattern because it is washable and resilient. Some crafters also like to add a small pouch of plastic pellets at the base of the rooster’s body to give it a bit of weight, allowing it to sit upright on a shelf without tipping over during a breeze.
The core of every Rooster Amigurumi Crochet Tutorial – Pattern begins with the magic ring (also known as a magic circle). This technique allows you to start a round with a completely closed center, preventing the unsightly hole often found in traditional crochet starts. Mastering the magic ring is the “secret sauce” of amigurumi, ensuring that the top of your rooster’s head and the tip of its tail look professional and tight.
Once the ring is established, the Rooster Amigurumi Crochet Tutorial – Pattern will primarily utilize the single crochet (sc) stitch. This is the workhorse of amigurumi because it creates a solid, durable fabric. As you follow the pattern, you will encounter increases (inc), where you work two stitches into a single loop, and decreases (dec), where you combine two stitches into one. These moves are what allow you to sculpt the round belly and the tapered neck of the bird.
A modern tip often found in a high-quality Rooster Amigurumi Crochet Tutorial – Pattern is the use of the invisible decrease. Instead of a standard decrease, you insert the hook into the front loops only of the next two stitches before completing the move. This technique is much less bulky than a traditional decrease and is virtually undetectable, which is crucial for maintaining a smooth surface on the chest and back of your rooster.
Understanding how to read a Rooster Amigurumi Crochet Tutorial – Pattern is a skill in itself. Most patterns use standard US or UK terminology and include a stitch count in parentheses at the end of each round. For example, a line might read “[sc 2, inc] x6 (24)“, which means you repeat the sequence of two single crochets followed by an increase six times, ending the round with 24 stitches. Consistent counting is the key to a successful amigurumi project.
Color changes are a major part of the Rooster Amigurumi Crochet Tutorial – Pattern, especially when transitioning from the body color to the tail feathers. To make a clean color change, introduce the new yarn color on the last pull-through of the final stitch in the old color. This ensures the new round starts with a crisp, straight line of color rather than a jagged transition, giving your rooster a much more polished and intentional appearance.
While working through the Rooster Amigurumi Crochet Tutorial – Pattern, it is helpful to “stuff as you go.” Once you have finished the wide part of the body and are starting to decrease toward the neck, add your filling. If you wait until the very end when the opening is tiny, it becomes much harder to distribute the stuffing evenly, which can result in a lumpy or misshapen rooster that doesn’t stand quite right.
Assembly is often considered the most challenging part of a Rooster Amigurumi Crochet Tutorial – Pattern, but it is also where the personality truly shines. You will have several separate pieces: the body/head (often one piece), two wings, two feet, the beak, the wattle, and the comb. Using glass-headed pins to position these parts before sewing is a vital step that allows you to check for symmetry and expression before making any permanent attachments.
When sewing the pieces of your Rooster Amigurumi Crochet Tutorial – Pattern together, use the whip stitch or a mattress stitch for the cleanest look. Always leave a long “tail” of yarn when finishing each individual piece; these tails are used for the assembly, ensuring that the thread color matches the piece you are attaching perfectly. This attention to detail is what separates a beginner project from a professional-looking Rooster Amigurumi Crochet Tutorial – Pattern masterpiece.
The rooster’s comb is perhaps its most defining feature. In this Rooster Amigurumi Crochet Tutorial – Pattern, the comb is usually worked as a flat piece with several “peaks” created by using different stitch heights (like half-double or double crochets). When attaching it to the top of the head, make sure it is centered perfectly between the eyes. A slightly tilted comb can give your rooster a “confused” or “sassy” look, which you might actually prefer for extra character!
The wings in a Rooster Amigurumi Crochet Tutorial – Pattern can be attached in two ways: either sewn flat against the body or attached only at the top so they can “flap.” If you want a more decorative, stationary rooster, sewing them firmly to the sides is best. If you choose a multi-colored approach for the wings, you can mimic the layered look of real feathers by using a variegated yarn or by changing colors every two rows.
Creating the legs and feet requires a bit of patience because the pieces are often quite small. In a Rooster Amigurumi Crochet Tutorial – Pattern, the feet are usually made of three “toes” joined together. If your rooster is meant to stand up, you can insert a piece of plastic-coated floral wire into the legs. However, if the rooster is a toy for a small child, skip the wire and simply stuff the legs firmly to ensure they are soft and safe.
Finally, the beak and wattle are the finishing touches of the Rooster Amigurumi Crochet Tutorial – Pattern. The beak is typically a small cone shape, while the wattle consists of two small teardrop shapes sewn just below the beak. Once these are in place, your rooster will have a full, expressive face. Take a moment to weave in all remaining yarn tails deeply into the body of the bird to hide them and prevent them from ever coming unraveled.
One of the best things about a Rooster Amigurumi Crochet Tutorial – Pattern is how easily it can be customized. You can change the “mood” of your rooster by simply adjusting the placement of the eyes or the curve of the beak. Some crafters like to add a “rustic” feel by using tweed yarn or by lightly brushing the finished crochet with a clean toothbrush to give it a slightly fuzzy, feathered texture that looks incredibly realistic.
If you want to turn your Rooster Amigurumi Crochet Tutorial – Pattern into a seasonal decoration, consider the accessories. A tiny crochet scarf for winter or a small straw hat for summer can transform the rooster into a festive centerpiece. You can also experiment with different sizes by following the same Rooster Amigurumi Crochet Tutorial – Pattern but using jumbo chenille yarn and a large hook to create a massive, huggable floor pillow version of the bird.
For those who enjoy a bit of extra detail, surface crochet can be used to add “feather” textures to the body after it has been stuffed. By joining yarn to the surface of the finished stitches and working small picots or loops, you can give your Rooster Amigurumi Crochet Tutorial – Pattern a 3D textured effect. This takes extra time but creates a stunning visual result that is sure to impress anyone who sees it.
Caring for your completed Rooster Amigurumi Crochet Tutorial – Pattern is important for its longevity. If you used cotton yarn, the rooster can generally be hand-washed in cool water with a mild detergent. Avoid wringing it out, as this can distort the shape and the stuffing; instead, roll it in a dry towel to remove excess moisture and then reshape it by hand while it is still damp.
Storing your amigurumi properly is also key, especially if it’s a seasonal item. Keep it in a breathable cotton bag rather than plastic to prevent any moisture buildup. If your Rooster Amigurumi Crochet Tutorial – Pattern project was made with wool yarn, be sure to store it with a bit of lavender or cedar to protect it from moths, ensuring your hard work stays in perfect condition for years to come.
Ultimately, the most important part of following a Rooster Amigurumi Crochet Tutorial – Pattern is the joy of the craft. Every stitch is a testament to your patience and creativity. Don’t be discouraged if your first attempt isn’t perfect; every “mistake” is a learning opportunity that makes your next project even better. The more roosters you make, the more you will develop your own unique style and flair within the world of crochet.
1. Is the Rooster Amigurumi Crochet Tutorial – Pattern suitable for beginners?
Yes, this project is suitable for “ambitious beginners.” While it requires knowledge of the magic ring and basic increases/decreases, the shapes are generally simple. If you have mastered the single crochet stitch, you can successfully complete this pattern with a bit of patience.
2. How long does it take to finish a rooster amigurumi?
For an average-sized rooster (about 6-8 inches tall), it usually takes between 4 to 8 hours of active crochet time, depending on your speed and the complexity of the feathers and tail you choose to create.
3. What yarn weight is best for this project?
Most Rooster Amigurumi Crochet Tutorial – Pattern guides recommend DK (Weight 3) or Worsted (Weight 4) yarn. Cotton or a cotton-acrylic blend is preferred for its durability and stitch clarity, which is vital for the 3D structure of the bird.
4. Why is my stuffing showing through my crochet stitches?
This usually happens because the crochet hook is too large for the yarn being used. To fix this, try dropping down a hook size (e.g., from 3.5mm to 2.5mm) to create a tighter fabric that holds the stuffing inside more effectively.
5. Can I sell the roosters I make from this pattern?
Most designers allow you to sell the physical items you make, but you should always check the specific copyright notice on the Rooster Amigurumi Crochet Tutorial – Pattern you are using. It is common practice to give credit to the pattern designer in your product listing.
6. Do I have to use safety eyes?
No, safety eyes are optional. You can also use black buttons, beads, or simply embroider the eyes with black yarn or embroidery floss. Embroidered eyes are the safest option if the toy is intended for a baby or a toddler.
In this article, we have explored the wonderful world of the Rooster Amigurumi Crochet Tutorial – Pattern, covering everything from the essential materials and hook sizes to the specialized stitches like the magic ring and invisible decrease.
We discussed the importance of precision during assembly and how to add those final character-defining features like the comb and wattle. Furthermore, we touched on customization tips and proper care instructions to ensure your handmade rooster remains a cherished item for a long time.


