
Lily in Crochet - Pattern

Shell Stitch – Pattern is one of the most beloved and versatile techniques in the world of crochet, offering a timeless aesthetic that mimics the organic curves of the ocean. Whether you are a beginner looking to expand your skill set or an experienced crafter seeking a classic texture for your next project, mastering the Shell Stitch – Pattern is a fundamental milestone. This specific design is created by grouping several stitches—typically double crochets—into a single foundation stitch, which then fans out to create a rounded, scalloped edge that looks both intricate and elegant.
The beauty of the Shell Stitch – Pattern lies in its rhythmic simplicity and the stunning visual impact it provides without requiring complex maneuvers. It is the perfect choice for creating lightweight blankets, feminine shawls, decorative borders, and even structured garments. Because the Shell Stitch – Pattern is essentially a repeat of clusters, it is very easy to memorize, making it a “zen” project that allows you to relax while your hands produce a beautiful, wavy fabric that feels soft and substantial.
In this comprehensive guide, we will explore the technical nuances of the Shell Stitch – Pattern, ensuring you have all the knowledge needed to incorporate this texture into your portfolio. We will discuss the best yarn choices for stitch definition, the mathematical logic behind the row repeats, and how to troubleshoot common issues like uneven edges. By focusing on the Shell Stitch – Pattern as our primary framework, we will show you how to transform a basic skein of yarn into a masterpiece of movement and grace that will be cherished for years to come.
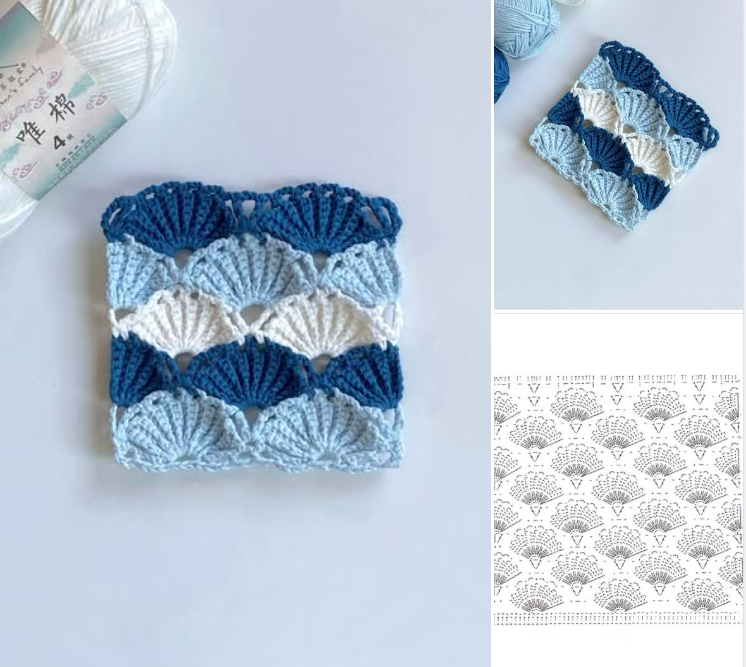
The core of any Shell Stitch – Pattern is the “fan” or “cluster,” which is traditionally formed by working five double crochets into a single stitch. This grouping forces the fabric to expand upward and outward, creating the rounded top of the shell. In the Shell Stitch – Pattern, these fans are usually separated by a “skipped” section of the foundation chain, which provides the space necessary for the shells to lay flat without bunching or overlapping.
To keep the fabric stable, a Shell Stitch – Pattern often alternates the fan clusters with a single crochet stitch. This shorter stitch acts as an anchor, pulling the edges of the shell back down to the baseline. This constant rise and fall—moving from a high cluster of double crochets to a low single crochet—is what creates the iconic scalloped wave. Understanding this “high-low” rhythm is essential for maintaining the structural integrity of your crochet project.
The mathematical foundation of a Shell Stitch – Pattern usually relies on a specific multiple of stitches, such as a multiple of 6 plus 1. This ensures that each row begins and ends symmetrically, preventing the lopsided look that can occur if the count is off. When you follow a professional pattern, the initial chain length is calculated to accommodate a set number of shells plus the necessary “turning chain” height, ensuring a perfectly rectangular finished piece.
In the second row of a Shell Stitch – Pattern, the placement of the shells usually shifts to create an “interlocking” effect. Instead of stacking the shells directly on top of each other, the pattern will instruct you to place the new shell into the single crochet anchor of the previous row. This “staggered” layout fills the gaps between the shells, resulting in a solid yet breathable fabric that is much warmer and more durable than simpler mesh designs.
Variation is a key feature of the Shell Stitch – Pattern, as you can change the “fullness” of the shell by adjusting the number of stitches in each cluster. A “small shell” might only use three double crochets, while a “giant shell” could use seven or nine treble crochets for a more dramatic, lacy look. The Shell Stitch – Pattern provides a flexible template that you can adapt to match the specific “vibe” of the garment or accessory you are creating.
Finally, the Shell Stitch – Pattern is highly effective for creating “scalloped borders” on existing projects. Even if the body of your quilt or blanket is made of simple stitches, adding a final row of shells can provide a high-end, finished look. By mastering the basic logic of the Shell Stitch – Pattern, you gain a versatile tool that can be used to add a touch of romance and sophistication to virtually any fiber arts project in your collection.
Choosing the right yarn for your Shell Stitch – Pattern is crucial because the beauty of the design depends on the clarity of the “fans.” A smooth, multi-ply yarn like mercerized cotton or a high-quality acrylic blend is often the best choice. These fibers offer excellent “stitch definition,” meaning the individual strands of the double crochets remain visible, allowing the Shell Stitch – Pattern to pop and catch the light rather than becoming a fuzzy, indistinct mass.
The weight of the yarn will dictate the scale and drape of your Shell Stitch – Pattern. Using a “fingering weight” yarn with a small hook will produce a delicate, vintage-style lace that is perfect for baby clothes or summer wraps. Conversely, using a “bulky” yarn with a large hook will turn the Shell Stitch – Pattern into a thick, cozy texture that works wonderfully for winter throws and heavy scarves, proving that this design is truly a “pattern for all seasons.”
Hook selection is a technical detail that can significantly impact the “lay” of your Shell Stitch – Pattern. If your hook is too small, the shells will be tight and may curl at the edges; if it is too large, the shells will look loose and may lose their rounded shape. Most Shell Stitch – Pattern guides suggest using the hook size recommended on the yarn label, but experienced crafters often go up half a size to give the shells more room to “breathe” and fan out naturally.
Color selection plays a major role in how the Shell Stitch – Pattern is perceived. Solid colors are the gold standard for this design because they don’t distract from the geometric beauty of the shells. However, “ombre” or “long-gradient” yarns can create a stunning effect, where each row of shells is a slightly different shade. This adds a layer of depth to the Shell Stitch – Pattern, making the fabric look like a professional watercolor painting of the sea.
You should avoid “highly textured” or “bouclé” yarns when working with a Shell Stitch – Pattern. Because these yarns are bumpy or fuzzy, they tend to hide the increases and decreases that form the shell shape. For the best results, stick to “clean” yarns that allow your technical skill to be the star of the show. A well-executed Shell Stitch – Pattern in a high-quality yarn is a testament to the maker’s patience and precision.
Lastly, don’t forget the importance of “blocking” tools when finishing a Shell Stitch – Pattern project. Because the shell clusters can sometimes cause the fabric to pull inward, pinning the damp finished piece into a straight rectangle is often necessary. This process relaxes the fibers and ensures that every shell in your pattern is perfectly aligned and flat, giving your handmade item a professional, boutique-quality finish that will last for years.
The first step in a successful Shell Stitch – Pattern is the “foundation row,” which sets the stage for the entire project. You will work a base of single crochets or a simple chain to establish the correct multiple. It is vital to count your stitches twice during this phase; if your foundation is off by even one stitch, the final shell in your pattern won’t align with the edge, leading to a frustrating “uneven” border that is difficult to fix later.
Once the foundation is ready, the Shell Stitch – Pattern begins with the “expansion phase.” You will skip two or three stitches, then work your cluster into the next. The “skip” is what allows the shell to have enough room to spread out. If you don’t skip enough stitches, the shells will “ruffle” and create an unwanted 3D effect. The pattern acts as your mathematical guide to ensure that the volume of the stitches exactly matches the space provided on the baseline.
Managing the “edges” of the Shell Stitch – Pattern is often the most challenging part for beginners. To keep the sides of your blanket or scarf straight, the pattern will usually alternate between starting a row with a “full shell” and starting with a “half shell.” A half shell (typically three double crochets) provides a flat vertical edge that prevents the project from growing wider or narrower as you work upward, ensuring the Shell Stitch – Pattern remains a perfect rectangle.
Tension is another key factor when working the Shell Stitch – Pattern. Because you are putting many stitches into one small hole, there is a tendency for that hole to stretch out. To prevent this, try to keep your “yarn over” loops consistent in height. If your stitches are too tight, the Shell Stitch – Pattern will feel stiff; if they are too loose, the shells will look “floppy” and lose their distinct scalloped definition.
As you move into the “repeat rounds” of the Shell Stitch – Pattern, you will be working into the “valleys” created by the previous row. By placing your shells into the single crochet anchors and your single crochets into the “peak” of the shells below, you create a beautiful “honeycomb” effect. This interlocking logic is what makes the Shell Stitch – Pattern so strong and visually interesting, as the eye follows the alternating curves across the surface of the fabric.
The final row of a Shell Stitch – Pattern project is where you can truly show off your craftsmanship. Many makers choose to finish with a row of shells to create a naturally decorative edge, while others prefer to work a row of single crochets to “fill in the gaps” and create a straight top border. Whichever you choose, the Shell Stitch – Pattern ensures that your project has a clean, intentional ending that reflects the care and effort you put into every previous stitch.
Once you have mastered the basic Shell Stitch – Pattern, you can explore the “Lacy Shell” variation. This involves adding a small chain stitch between the double crochets within the shell itself. This simple modification to the pattern creates a much more open, airy fabric that is ideal for spring clothing or decorative table runners. The “Lacy Shell” maintains the beautiful scalloped look while making the crochet design feel lighter and more contemporary.
Another exciting evolution is the “V-Stitch Shell,” where the Shell Stitch – Pattern is combined with V-stitches to create a more architectural look. In this version, the shells are framed by sharp angles, providing a contrast between the round “fans” and the pointed “V” shapes. This advanced pattern is often used in high-end shawls and throws, as it adds a level of complexity that appeals to those who enjoy more intricate, modern crochet textures.
Color-blocking is a fantastic way to modernize the Shell Stitch – Pattern. By changing colors every two rows, you can emphasize the “interlocking” nature of the shells. This creates a “harlequin” or “mermaid scale” effect that is incredibly popular for children’s blankets and colorful accessories. The Shell Stitch – Pattern provides a clear “color map,” making it easy to plan out your palette and ensure a harmonious transition between different shades.
The Shell Stitch – Pattern can also be worked “in the round” to create stunning hats, bags, and even circular rugs. When working in a circle, the pattern requires careful “increase” logic to ensure the shells don’t become too crowded as the diameter of the project grows. A “circular shell” design looks like a blooming flower, making it a favorite for decorative pillows and feminine accessories that require a bit of extra “flair.”
For a more tactile experience, you can try the “Front Post Shell,” where the Shell Stitch – Pattern is worked around the posts of the stitches below rather than into the top loops. This creates a highly textured, 3D fabric that is very thick and warm. This version of the pattern is excellent for heavy winter cardigans and textured cushions, as it adds a “ribbed” quality to the shells that feels wonderful to the touch.
Finally, the Shell Stitch – Pattern can be adapted for “fillet crochet” or “grid” styles, where the shells act as solid blocks against a mesh background. This allows you to “draw” shapes or borders using the shells. By combining the Shell Stitch – Pattern with other techniques, you can create customized, one-of-a-kind pieces that showcase the full range of your creative abilities, proving that the Shell Stitch is one of the most powerful tools in any crafter’s arsenal.
1. Is the Shell Stitch – Pattern hard for beginners?
No, it is actually considered one of the easier “decorative” stitches. If you can do a double crochet and a single crochet, you can do a Shell Stitch – Pattern. The only challenge is keeping an accurate stitch count.
2. How much more yarn does the Shell Stitch – Pattern use?
Because you are putting multiple stitches into one, the Shell Stitch – Pattern is a “yarn eater.” It typically uses about 20-30% more yarn than a simple row of double crochets. Always make sure to buy an extra skein for your project!
3. Why is my work curling at the ends?
Curling usually happens if your tension is too tight or if you aren’t skipping enough stitches between shells. Try using a larger hook for your foundation chain or relax your grip while working the Shell Stitch – Pattern.
4. Can I use this pattern for a baby blanket?
Absolutely! The Shell Stitch – Pattern is a classic choice for baby blankets because it is soft, decorative, and has a lovely “heft” to it. Use a soft cotton or a baby-safe acrylic for the best results.
5. How do I change colors in the middle of a Shell Stitch – Pattern?
The best way to change colors is to pull the new color through the very last loop of the last stitch of the row. This ensures a clean transition and keeps the edges of your Shell Stitch – Pattern looking professional.
6. Does the Shell Stitch – Pattern have a “right” and “wrong” side?
Yes, usually the side where the “fans” look most prominent is the right side. However, because the Shell Stitch – Pattern is worked in back-and-forth rows, it is often reversible, making it perfect for scarves and blankets where both sides will be visible.
In conclusion, the Shell Stitch – Pattern is a timeless and versatile technique that brings a sense of elegance and rhythmic beauty to any crochet project. Throughout this article, we have explored the geometric logic of “fans” and “anchors,” the importance of selecting high-quality mercerized cotton for stitch definition, and the technical steps needed to maintain straight edges and even tension.
We also discussed how the Shell Stitch – Pattern can be adapted for modern “lacy” styles, colorful “mermaid scales,” and even 3D “front post” textures. Whether you are creating a simple dishcloth or a complex heirloom shawl, the Shell Stitch – Pattern offers a rewarding and meditative crafting experience that results in a professional-grade finish.


