
Lily in Crochet - Pattern

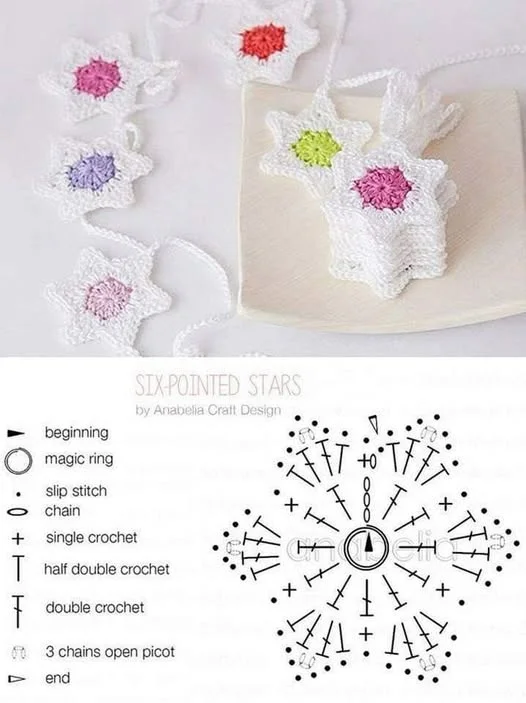
The Six-Pointed Star Garland Crochet – Pattern is a versatile and enchanting project that brings a celestial touch to any room, whether you are decorating for a festive holiday, a nursery, or a cozy reading nook. This specific crochet design is celebrated for its geometric balance and the way it captures the classic beauty of a star in a soft, tactile medium. By mastering the Six-Pointed Star Garland Crochet – Pattern, you gain a decorative skill that transcends seasons, allowing you to swap colors and textures to match any occasion from a winter wonderland to a bright summer celebration.
Choosing to work on a Six-Pointed Star Garland Crochet – Pattern is an excellent way for intermediate beginners to transition into more complex shapes. While a traditional five-pointed star is common, the six-pointed version offers a more symmetrical and “snowflake-like” appearance that is deeply satisfying to construct. The pattern typically involves working in rounds, starting from a central ring and expanding outward into distinct points using a combination of standard crochet stitches and strategic increases. This repetitive yet engaging process makes it a perfect “couch project” for those who enjoy productive relaxation.
In this comprehensive guide, we will explore everything you need to know to create your own Six-Pointed Star Garland Crochet – Pattern, including the best yarn selections, the technical logic of the star’s geometry, and how to assemble the individual units into a professional-looking garland. We will also touch upon the importance of blocking your crochet to ensure each star point is crisp and sharp. Whether you plan to gift this garland to a loved one or keep it to brighten your own home, this pattern offers a rewarding journey into the heart of handmade home decor.
The first step in achieving success with your Six-Pointed Star Garland Crochet – Pattern is picking a yarn that provides excellent stitch definition. For a garland that hangs well and doesn’t stretch excessively, mercerized cotton yarn is often the top choice among professionals. Mercerization gives the cotton a slight sheen and a structural stiffness that helps the six points of your star stay prominent rather than drooping over time.
Your choice of crochet hook size will determine the scale and “density” of your stars. If you are following a standard Six-Pointed Star Garland Crochet – Pattern using worsted weight yarn, a 4.0mm or 5.0mm hook is usually ideal. However, if you want a more delicate, “fairy-light” style garland, you could move down to a fine thread and a tiny steel hook. The smaller the hook and thread, the more intricate and lace-like your celestial display will appear.
Color palettes play a significant role in the mood of your finished Six-Pointed Star Garland Crochet – Pattern. For a modern farmhouse look, consider using neutral tones like cream, oatmeal, and slate grey. If you are creating a holiday garland, classic gold, silver, or deep burgundy with metallic thread woven in can add a festive sparkle. Using high-quality acrylic blends is also a great option if you want a softer, fuzzier texture for a baby’s room.
Don’t forget the importance of your tapestry needle and sharp embroidery scissors. Because a garland consists of many individual units, you will have several “yarn tails” to weave in. A sharp needle makes it much easier to hide these ends securely within the stitches, ensuring that your Six-Pointed Star Garland Crochet – Pattern looks polished from both the front and the back. This attention to detail is what separates a hobbyist’s project from a professional-grade heirloom.
For the “garland” part of the project, you will need a sturdy base cord. Some makers prefer to crochet a long foundation chain and attach the stars as they go, while others use hemp twine or velvet ribbon for a more rustic or luxurious contrast. Having your assembly material ready before you finish the stars helps you visualize the spacing and ensures you have enough length to cover your intended space, whether it’s a mantle or a window frame.
Lastly, consider adding embellishments like glass beads or small wooden stars between the crocheted units. This can elevate the Six-Pointed Star Garland Crochet – Pattern into a true mixed-media art piece. If you choose to add beads, make sure you have a needle thin enough to pass through the bead’s center. Preparation is key to enjoying the creative flow of this project without having to stop and search for missing supplies mid-way through.
The technical heart of the Six-Pointed Star Garland Crochet – Pattern lies in the hexagonal math of the first two rounds. Most patterns begin with a magic ring or a small chain loop, followed by a round of twelve or eighteen stitches. This number is crucial because it must be divisible by six to create the six even points of the star. Using a stitch marker at the beginning of each round is highly recommended to keep your counts accurate and your points perfectly aligned.
As you move into the second round of the Six-Pointed Star Garland Crochet – Pattern, you will be creating the “bases” for the points. This is usually done by alternating between high and low stitches—such as using single crochets to create the valleys and double or treble crochets to create the peaks. This height variation is what starts to pull the circular center into a star-like shape, providing the structural foundation for the sharper tips that follow in the final rounds.
The third round is where the “magic” of the Six-Pointed Star Garland Crochet – Pattern truly happens. To get those sharp, crisp points, you will likely use a picot stitch or a series of chains at the very tip of each point. A picot is made by chaining three and slip-stitching back into the first chain. This tiny loop creates a pointed “beak” at the end of each arm, giving the star its iconic celestial silhouette and a professional, finished look.
One common challenge with the Six-Pointed Star Garland Crochet – Pattern is “cupping,” where the star starts to look like a small bowl instead of laying flat. This usually happens if the stitch tension is too tight or if there aren’t enough increase stitches in the outer rounds. If your stars are cupping, try loosening your grip on the yarn or using a hook one size larger for the final round. A flat star is essential for a garland that hangs correctly against a wall.
Mastering the slip stitch join is also vital for this pattern. Because the star is a small, self-contained unit, the join where you finish the round needs to be as invisible as possible. Many quilters and crocheters use the “needle join” or “invisible join” technique, which mimics the look of a regular stitch top. This ensures that no matter which way the star spins on the garland cord, there is no obvious “seam” to detract from its beauty.
Once you have the rhythm of the Six-Pointed Star Garland Crochet – Pattern down, the process becomes incredibly meditative. You will find that you can finish a single star in 10 to 15 minutes, making it a great “scrap-buster” project. Utilizing small bits of leftover yarn from previous projects can result in a beautiful, multi-colored boho-style garland that tells the story of all your previous crafting adventures in one cohesive piece.
When you first pull a star off your hook, it may look slightly soft or rounded at the edges. To make your Six-Pointed Star Garland Crochet – Pattern truly shine, you must use a process called blocking. Blocking involves wetting the fibers and pinning them into their final shape on a foam mat. This “sets” the stitches and ensures that the six points are pulled out to their full potential, making the star look crisp, symmetrical, and intentional.
For a garland, you want the stars to hold their shape even if there is a breeze in the room. This is where fabric stiffener or a 50/50 mix of white glue and water comes into play. Dip each star from your Six-Pointed Star Garland Crochet – Pattern into the solution, squeeze out the excess (do not wring!), and then pin them to your blocking board. As they dry, they will become rigid, ensuring the points don’t curl or droop when the garland is hung.
Using rust-proof T-pins is a must during the blocking stage. Since the stars will be wet for several hours, regular sewing pins can leave tiny rust spots on your beautiful yarn. For the Six-Pointed Star Garland Crochet – Pattern, place one pin in the center of the star and one at the very tip of each of the six points. Use a ruler to ensure each point is the same distance from the center for perfect geometric accuracy.
If you are using a delicate cotton thread for your stars, you might consider “steam blocking” instead of wet blocking. This involves using a garment steamer or the steam setting on your iron to relax the fibers while you gently pull the points into shape with your fingers. This is a faster method, but it doesn’t provide the same permanent stiffness that a liquid stiffener does for a Six-Pointed Star Garland Crochet – Pattern.
Patience is the most important ingredient in this stage of the Six-Pointed Star Garland Crochet – Pattern. Let the stars dry completely—usually overnight—before unpinning them. If you unpin them while the centers are still even slightly damp, the weight of the damp yarn will cause the points to lose their “snap.” A fully dry, stiffened star will click like a piece of plastic and hold its shape for years of holiday use.
Finally, once the stars are dry and stiff, you can add a light coating of glitter spray or clear iridescent paint. This creates a “frosted” effect that looks stunning under Christmas tree lights or near a sunny window. This extra step turns a simple Six-Pointed Star Garland Crochet – Pattern into a high-end decorative item that looks like it was purchased from an expensive boutique or an artisanal craft market.
The final phase of the Six-Pointed Star Garland Crochet – Pattern is the assembly. To ensure your stars don’t slide around on the cord, you can use a small dab of hot glue on the back of each star or tie a small “stopper knot” in the cord on either side of the star. Spacing is a matter of personal preference, but most garlands look best with about 4 to 6 inches of space between each crocheted star unit.
For a traditional look, you can crochet the stars directly into a long chain-stitch cord. As you reach the point where you want a star, you simply slip-stitch through the top point of a finished star and then continue chaining. This creates a permanent, one-piece Six-Pointed Star Garland Crochet – Pattern that is very sturdy and easy to fold up and store at the end of the season without any pieces getting lost.
Vertical displays are a modern alternative to the horizontal garland. Instead of one long string, you can create several short strands of the Six-Pointed Star Garland Crochet – Pattern and hang them from a piece of driftwood or a decorative branch. This creates a “celestial mobile” effect that looks beautiful in a nursery or as a backdrop for a party’s photo booth, adding height and interest to your interior design.
If you want to incorporate lighting, you can zip-tie or tie your stars directly to a strand of LED fairy lights. The light will glow through the open lacework of the Six-Pointed Star Garland Crochet – Pattern, creating a magical atmosphere in the evenings. Because LEDs don’t get hot, they are perfectly safe to use with cotton or acrylic yarns, allowing your handmade stars to glow from within.
Storage is an often-overlooked part of the process. To keep your Six-Pointed Star Garland Crochet – Pattern from tangling, wrap the cord around a piece of flat cardboard or a wide “wreath form.” This prevents the stars from snagging on each other and ensures that the points stay flat and crisp for next year. A little bit of care during the off-season will make your handmade garland a cherished part of your family’s traditions for decades.
Finally, remember that the Six-Pointed Star Garland Crochet – Pattern can also be used as individual ornaments. If you find you have made too many for your garland, add a simple hanging loop to the extras and use them as gift toppers or Christmas tree decorations. The versatility of this pattern is what makes it a staple in any crocheter’s library, offering endless ways to spread a little bit of handmade stardust throughout your life.
1. Is this pattern suitable for beginners?
Yes! While it requires knowing how to work in the round and perform basic stitches like double crochet, the Six-Pointed Star Garland Crochet – Pattern is quite repetitive and logical. If you can make a basic granny square, you have the skills necessary to master this star design. It’s an excellent way to practice increasing and creating sharp corners.
2. How much yarn do I need for a 6-foot garland?
Typically, one 50g ball of worsted weight cotton is enough to make about 12 to 15 stars of medium size. For a 6-foot garland with 4-inch spacing, you will need approximately 12 stars. Therefore, one or two balls of yarn are usually more than enough to complete a standard Six-Pointed Star Garland Crochet – Pattern including the cord.
3. Do I have to stiffen the stars?
It is not strictly necessary, but highly recommended. Without stiffening, the points of the Six-Pointed Star Garland Crochet – Pattern tend to curl inward or sag when hanging. If you want that “sharp” celestial look, taking the time to use a fabric stiffener will make a massive difference in the professional quality of the final result.
4. Can I wash my star garland?
If you have stiffened the stars with glue or starch, washing will dissolve the stiffener. If the garland gets dusty, it’s best to gently shake it or use a vacuum attachment on a low setting. If you must wash it, be prepared to go through the stiffening and blocking process again once it is dry to restore the shape of the Six-Pointed Star Garland Crochet – Pattern.
5. How do I make the stars different sizes?
The easiest way to change the size of your Six-Pointed Star Garland Crochet – Pattern is to change your yarn and hook. Use a bulky yarn and an 8mm hook for giant stars, or a size 10 crochet thread and a 1.5mm hook for tiny stars. The stitch count stays exactly the same, but the physical scale of the finished star will vary significantly.
6. Can I use this pattern to make snowflakes?
Absolutely! By using white, light blue, or silver yarn and perhaps adding an extra round of more intricate “lace” loops, the Six-Pointed Star Garland Crochet – Pattern transforms perfectly into a beautiful snowflake. In nature, snowflakes always have six points due to the molecular structure of water, making this the most “accurate” pattern for winter decor.
In this article, we have explored the intricate and rewarding process of creating a Six-Pointed Star Garland Crochet – Pattern. From selecting the perfect mercerized cotton and 4.0mm hook to understanding the hexagonal geometry that ensures six perfect points, we’ve covered the technical and creative aspects of this celestial project.
We discussed the vital role of blocking and stiffening to achieve that boutique-quality finish and shared several ways to assemble and display your garland, whether on a mantle or integrated with LED fairy lights. This pattern is more than just a craft; it is a way to bring a touch of personalized, handmade beauty into your living space that can be enjoyed year-round.


