
Crochet Butterfly Bag - Pattern

Creating a Snake and crochet bracelet – Pattern is one of the most rewarding projects for jewelry enthusiasts who love the intersection of textile art and wearable fashion. This unique craft allows you to transform simple thread and beads into a sophisticated accessory that mimics the fluid movement and striking aesthetics of a serpent. Whether you are a seasoned crafter or a curious beginner, mastering the snake and crochet bracelet pattern requires a blend of patience, precision, and the right materials to ensure the final piece is both durable and beautiful.
The popularity of the Snake and crochet bracelet – Pattern has surged in recent years due to its versatility and the endless possibilities for customization. By choosing different color palettes or bead finishes, you can create anything from a realistic reptile-inspired design to a vibrant, abstract piece of art. This guide is designed to walk you through the essential techniques, providing a comprehensive step-by-step tutorial that focuses on the beaded crochet method, which is the gold standard for achieving that signature snake-like texture and flexibility.
In this article, we will delve deep into the mechanics of the Snake and crochet bracelet – Pattern, explaining the technical terms and the necessary tools you need to get started. We will explore how to select the best crochet hooks, the ideal thread thickness, and the most effective way to string your beads to avoid tangles. Our goal is to provide you with a high-quality, SEO-optimized guide that not only helps you finish a project but also inspires you to experiment with your own creative variations of the beaded snake jewelry style.
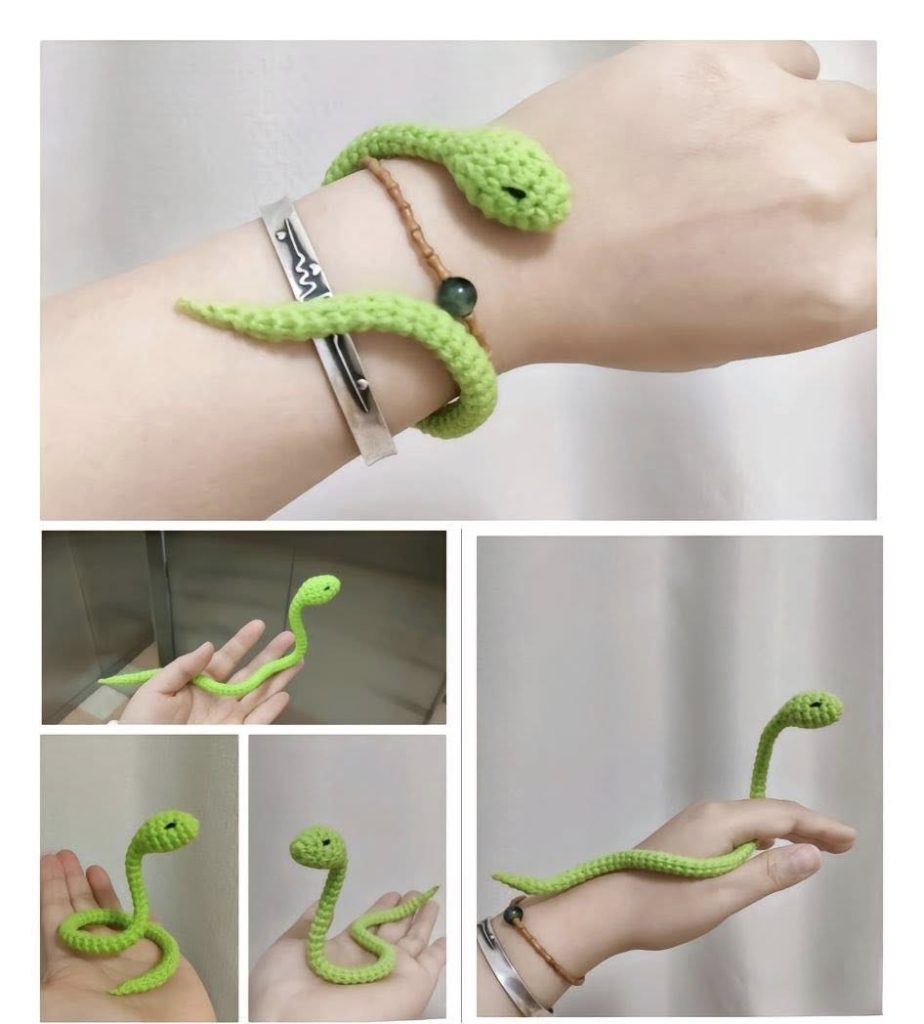
The core of any Snake and crochet bracelet – Pattern lies in the technique known as bead crochet rope. This method involves pre-stringing hundreds of small seed beads onto a continuous spool of thread before you even pick up your hook. When you begin the crochet process, each stitch captures a single bead, locking it into a spiral formation that eventually creates a hollow, flexible tube.
To achieve a professional look, you must pay close attention to the tension of your stitches. If your tension is too loose, the beads will flop around and reveal the thread underneath; if it is too tight, the snake bracelet will be stiff and uncomfortable to wear. Finding that “Goldilocks” zone of tension is the first major milestone in mastering this crochet pattern.
Selecting the right bead size is equally crucial for your Snake and crochet bracelet – Pattern. Most artists prefer Size 11/0 or 8/0 seed beads, with brands like Miyuki or Toho being the top choices due to their incredible uniformity. Uniform beads ensure that the “scales” of your snake look even and aligned throughout the entire length of the handmade jewelry piece.
The thread choice should complement the color of your beads to prevent high-contrast “peeking.” Using a specialized bonded nylon thread or a high-quality mercerized cotton provides the strength needed to support the weight of the beads while remaining thin enough to pass through the eye of a crochet hook. This foundation is vital for a long-lasting beaded accessory.
When reading a Snake and crochet bracelet – Pattern, you will often see a “circumference” or “beads per row” count. This number determines how thick your snake will be. A 6-bead-around rope is perfect for a delicate, subtle look, while a 12-bead-around rope creates a chunky, statement piece that truly captures the presence of a real snake.
Finally, the pattern chart is your roadmap. These charts tell you exactly which color bead to string in what order. Following the sequence correctly is what allows the intricate snake skin motifs—like diamonds, stripes, or gradients—to emerge perfectly as you work your way through the crochet cycles.
Before you dive into your Snake and crochet bracelet – Pattern, gathering the right equipment will save you hours of frustration. You will need a fine crochet hook, typically ranging from 0.60mm to 1.25mm. The hook size should be small enough to work the thread tightly but sturdy enough to handle the repetitive motion of bead crochet.
A big-eye needle or a collapsible eye needle is your best friend during the stringing phase. Since you have to load thousands of beads onto the thread to complete a full bracelet pattern, using a needle that allows the thread to sit flush is essential for sliding the beads onto the spool without snagging or fraying the fiber.
For the “snake” aesthetic, the clasp selection is a defining feature. Many crafters use magnetic snake-head clasps that allow the tail of the bracelet to tuck into the head, completing the visual metaphor. These jewelry findings are available in various metals like silver, gold, and antique bronze to match your specific bead color palette.
Don’t forget a quality pair of micro-tip scissors and a bit of clear jewelry glue (like E6000 or GS Hypo Cement). The glue is used to secure the ends of the crochet rope into the metal caps of the clasp, ensuring that your handcrafted snake bracelet doesn’t come apart under the stress of daily wear.
Using a bead mat or a piece of velvet fabric is a simple but effective SEO-friendly tip for your workspace. It prevents your seed beads from rolling away while you are stringing them according to the Snake and crochet bracelet – Pattern instructions. Organization is the key to maintaining focus during the repetitive nature of this craft.
Lastly, consider using a row counter or a digital app to keep track of your progress. Since the bead crochet technique can be quite hypnotic, it is easy to lose track of how many repetitions of the pattern sequence you have completed. Keeping an accurate count ensures that your bracelet is the perfect length for your wrist.
To start your Snake and crochet bracelet – Pattern, you begin with a foundation chain. After stringing your beads, you create a small loop of chain stitches (the number of stitches matching the number of beads per row in your pattern). This loop forms the base of the “tube” that will become your serpent-style jewelry.
The first few rows are often the most difficult part of the Snake and crochet bracelet – Pattern. You must carefully place each bead so that it sits on the outside of the stitch, with the “hole” of the bead facing upward. This orientation is what creates the seamless beaded texture that makes the bracelet look like genuine snake scales.
As you progress, you will use the slip stitch bead crochet method. In this technique, you insert your hook into the stitch under the bead from the previous row, slide a new bead up to the hook, and pull the thread through. This keeps the beads locked in a spiral orientation, which is the hallmark of a high-quality crochet rope.
Maintaining a consistent rhythm is essential for the Snake and crochet bracelet – Pattern. If you stop and start frequently, your tension might change, leading to visible gaps or lumps in the rope. Many professionals recommend completing at least one full pattern repeat in a single sitting to keep the appearance of the beaded work uniform.
If you run out of thread or find a knot, don’t panic. Learning how to seamlessly join new thread is a vital skill for any crochet enthusiast. By hiding the knots inside the hollow center of the bead rope, you maintain the structural integrity and the aesthetic beauty of your Snake and crochet bracelet – Pattern.
Once you reach the desired length—usually around 7 to 8 inches for a standard wrist—you finish the piece with a few rows of plain crochet (without beads). This creates a “tab” of fabric that is easily glued into your jewelry clasp, providing a secure and professional finish to your DIY snake bracelet.
One common issue when following a Snake and crochet bracelet – Pattern is “bead tilting.” This happens when the beads don’t stand up straight. Usually, this is caused by using a hook that is too large or thread that is too thin. Adjusting your crochet tools to match your specific bead size will solve this problem instantly.
If your crochet rope feels too floppy, you can insert a plastic core or a thick cord inside the tube as you work. This gives the snake bracelet more “body” and helps it retain its circular shape on the wrist. This technique is especially useful for thick patterns (10+ beads around).
Customizing your Snake and crochet bracelet – Pattern is where the real fun begins. You can experiment with matte vs. shiny beads to create a 3D effect. For example, using matte black beads for the body and shiny gold beads for the diamond pattern makes the design pop and gives it a luxurious, high-end feel.
Another way to add flair is by incorporating different bead shapes. While round seed beads are the standard, adding charms or small crystals at the “eyes” of the snake head clasp can elevate the Snake and crochet bracelet – Pattern from a simple craft project to a piece of boutique-quality jewelry.
If you notice a mistake in your bead sequence (a “wrong” color bead in the middle of a row), you don’t always have to frog the whole project. You can carefully crush the incorrect bead with a pair of pliers (protecting the thread!) and then sew the correct bead into the gap using a beading needle and matching thread.
Finally, always remember to measure twice and crochet once. Because the bead crochet rope is dense, it doesn’t stretch much. Check the length of your Snake and crochet bracelet – Pattern against your wrist frequently to ensure a perfect fit before you apply the permanent glue to the clasps.
What is the best thread for a Snake and crochet bracelet – Pattern?
The most recommended thread is a size 20 or 40 mercerized cotton or a specialized bonded nylon like C-Lon or S-Lon (Tex 210). These threads are strong, don’t stretch over time, and are thin enough to allow beads to slide easily during the crochet process.
How many beads do I need for a full bracelet?
For a standard 7-inch snake bracelet with a 6-bead circumference, you will need approximately 1,200 to 1,500 beads. If you are making a thicker Snake and crochet bracelet – Pattern (e.g., 12 beads around), you may need over 3,000 beads.
Can a beginner try the Snake and crochet bracelet – Pattern?
Yes, but it is recommended to start with a plain bead crochet rope using larger beads (size 8/0) and only 2 colors. Once you understand how the beads sit and how to maintain tension, you can move on to the more complex snake scale patterns and smaller size 11/0 beads.
Why is my crochet rope twisting?
Bead crochet naturally spirals. If your Snake and crochet bracelet – Pattern looks like it’s twisting, that’s actually a sign you are doing it correctly! The “twist” is what creates the beautiful spiral effect of the beaded design.
How do I clean my beaded snake bracelet?
The best way to clean your handcrafted jewelry is to wipe it with a damp, soft cloth. Avoid soaking the bracelet in water, as this can weaken the thread and potentially cause the metal clasps to tarnish or the glue to fail.
What should I do if my beads are getting stuck on the thread?
This usually happens if the thread is too thick or if there are “burrs” inside the beads. Make sure you are using high-quality Japanese seed beads (Miyuki or Toho), as they have larger holes and smoother finishes than cheaper alternatives, making the crochet experience much smoother.
Mastering the Snake and crochet bracelet – Pattern is a journey that combines technical skill with artistic vision. In this article, we have explored everything from the fundamental bead crochet techniques and essential materials to troubleshooting common issues and customizing your serpent-inspired designs.
By understanding the importance of thread tension, bead uniformity, and proper clasp finishing, you can create stunning pieces of wearable art that are as durable as they are beautiful. This craft offers a meditative and rewarding experience for anyone looking to expand their crochet repertoire and dive into the world of beaded jewelry making.


