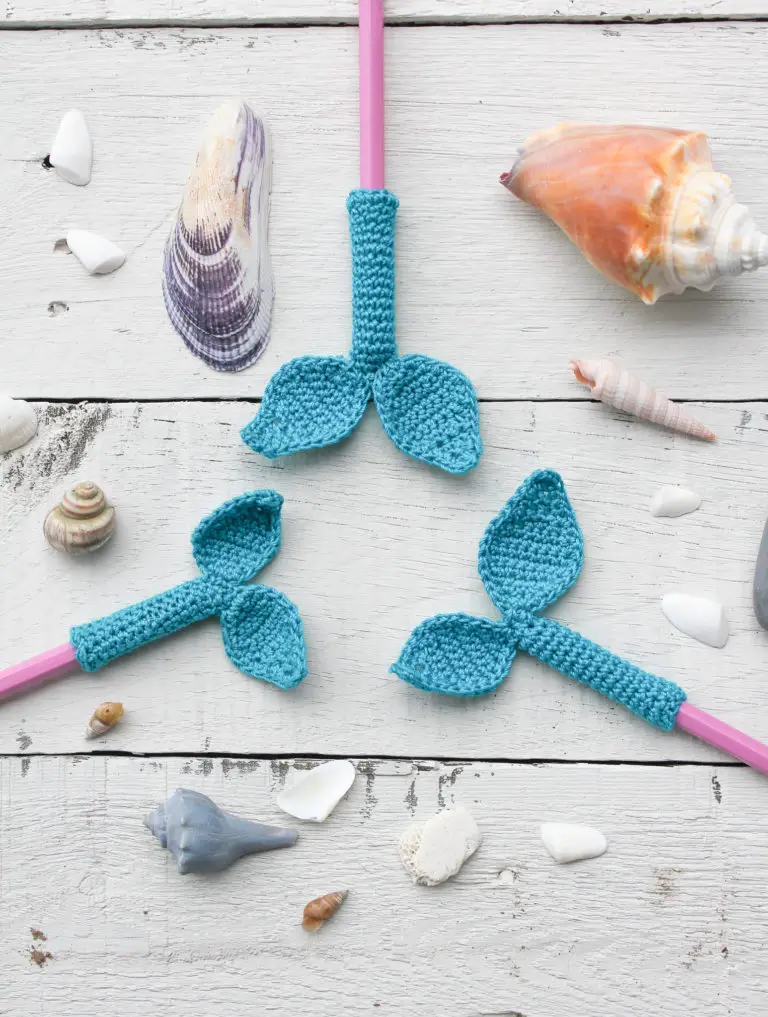
Mermaid Tail Pencil Topper Crochet - Pattern

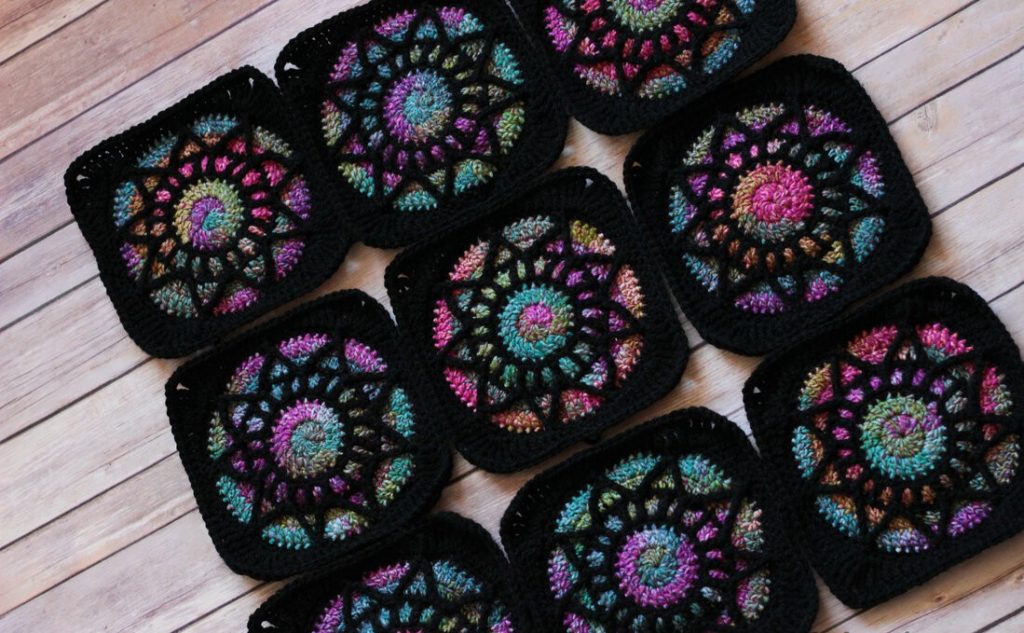
The Stained Glass Square – Pattern is one of the most visually arresting designs in the world of fiber arts, mimicking the ancient beauty of cathedral windows through the clever use of yarn and geometry. This technique allows crafters to create a vibrant mosaic effect by contrasting bold, multi-colored sections against a solid, dark border—typically black—to make the colors pop. Whether you are a seasoned pro or a curious beginner, mastering this unique crochet design offers a satisfying way to use up scrap yarn while producing a high-end look for blankets, pillows, and wall hangings.
Understanding the mechanics of a Stained Glass Square – Pattern requires a basic grasp of color theory and stitch placement. The “stained glass” look is traditionally achieved using a technique called mosaic crochet or by working with post stitches that overlay a base of variegated colors. Because the dark “lead” lines are the defining characteristic, choosing the right weight and texture of yarn is essential to ensure the intricate details of the pattern remain crisp and legible throughout your project.
As you embark on creating your first Stained Glass Square – Pattern, you will find that the rhythm of the stitches becomes almost meditative. This specific geometric motif is highly versatile, allowing for endless customization based on the color palette you choose, from jewel tones that evoke a gothic church to pastels for a modern nursery. In the following sections, we will dive deep into the essential elements, techniques, and SEO-friendly tips for perfecting this classic yet contemporary crochet pattern.
Selecting the perfect yarn is the foundational step for a successful Stained Glass Square – Pattern. To achieve that authentic window look, you need a high-contrast pairing: a variegated yarn with short color changes or several bright solids, and a dark, solid “leading” color. Medium-weight acrylic or cotton yarn is often recommended because it provides the stitch definition necessary for the geometric lines to stand out clearly.
The crochet hook size should correspond to your yarn weight, but many artists prefer a slightly smaller hook than usual for a Stained Glass Square – Pattern. This creates a tighter, more structured fabric that prevents the background colors from peeking through the dark borders. A size H/5.0mm or I/5.5mm hook is a standard starting point for worsted weight projects, ensuring your handcrafted square retains its shape over time.
Don’t forget the importance of notions and tools like stitch markers and a sharp tapestry needle. Because the Stained Glass Square – Pattern often involves complex repeats, markers help you keep track of where your “lead” lines begin and end. Weaving in ends can be a daunting task with multiple color changes, so having a high-quality needle makes the finishing process much smoother and more professional.
The texture of the yarn also plays a significant role in the visual impact of the final piece. A slight sheen, often found in mercerized cotton, can mimic the reflective quality of glass, enhancing the aesthetic appeal of your work. Avoid overly “fuzzy” yarns like mohair, as they can obscure the clean lines that define this specific mosaic crochet style.
When planning a large project like a stained glass afghan, consistency is key to a polished result. Ensure you buy enough yarn from the same dye lot for your primary border color to avoid subtle shifts in shade. Since the Stained Glass Square – Pattern relies on that deep black or navy contrast, any variation in the “lead” lines will be immediately noticeable across the joined blocks.
Lastly, consider the weight of the finished project, as mosaic techniques often create a denser, heavier fabric than standard granny squares. This makes the Stained Glass Square – Pattern ideal for winter throws or heavy-duty cushions that require extra durability. By prioritizing quality materials, you set yourself up for a masterpiece that looks like it belongs in a gallery rather than just on a sofa.
To execute a Stained Glass Square – Pattern correctly, you must be comfortable with working in the back loops only (BLO) and using long stitches. Most variations of this design use the BLO technique for the colorful sections to create a ridge where the dark yarn can later be attached. This layered construction is what gives the pattern its signature 3D depth and stained glass appearance.
The most common “lead” stitch is the front post double crochet (FPDC) or the treble crochet, depending on the height needed to bridge rows. These stitches “jump” over the colored rows, creating the vertical and diagonal lines that frame the vivid colors. Learning to maintain even tension while working these long stitches is vital so the Stained Glass Square – Pattern doesn’t pucker or pull inward.
Another essential technique is the standing stitch, which allows you to join new colors seamlessly without a messy turning chain. When working on a Stained Glass Square – Pattern, you will likely change colors every two rows. Using a standing single crochet or double crochet keeps the edges of your squares straight, making it much easier to join motifs together later in the assembly phase.
Understanding stitch anatomy is also crucial when following a complex Stained Glass Square – Pattern chart or written instructions. You need to identify the “legs” of the stitches from two rows below, as this is often where your contrasting color will be anchored. This precision is what transforms a simple multi-colored block into a sophisticated work of art with clear, defined boundaries.
For those who prefer a simpler approach, the Larksfoot stitch or modified granny spikes can also simulate a Stained Glass Square – Pattern. These variations involve dropping a stitch down into a previous row to create a “spike,” which acts as the dark divider. While less structured than true mosaic crochet, these methods are excellent for beginners who want the stained glass look without the complexity.
Finally, blocking your finished squares is a non-negotiable step for this specific crochet pattern. Because of the tension differences between the post stitches and the base stitches, the squares may naturally curl at the corners. Using a blocking board and steam, you can “set” the Stained Glass Square – Pattern into a perfect 12×12 inch (or desired size) shape, ensuring every line is perfectly straight.
The soul of a Stained Glass Square – Pattern lies in its color palette, which should evoke the feeling of light passing through colored glass. Utilizing a color wheel can help you choose complementary or analogous colors that flow beautifully together. For a traditional look, try a rainbow gradient; for a modern vibe, consider monochromatic shades of teal or sunset oranges against a charcoal background.
One popular method for the Stained Glass Square – Pattern is using “cake” yarns or long-striping variegated skeins. This eliminates the need for frequent manual color changes, as the yarn does the work of transitioning through the spectrum for you. When paired with a solid black border, these automatic transitions create a mesmerizing, professional-grade visual flow within each square.
Contrast is the most important element to consider when selecting your “lead” color for the Stained Glass Square – Pattern. While black is the classic choice, deep navy, forest green, or even a very dark chocolate brown can work beautifully. The goal is to provide a neutral frame that allows the inner colors to vibrate with intensity, mimicking the leaded cames of real stained glass windows.
If you want a more subtle effect, you can reverse the traditional Stained Glass Square – Pattern logic by using a light cream or white for the borders. This creates a “frosted glass” or modern geometric look that works well for minimalist home decor. However, keep in mind that the visual “pop” of the bright colors will be softer and more blended than with a dark frame.
Experimenting with color temperature can also change the mood of your Stained Glass Square – Pattern. Warm tones like reds, yellows, and magentas create an energetic, cozy feel, perfect for a living room throw. Cool tones like blues, purples, and greens offer a calming atmosphere, making them ideal for bedroom accessories or meditative wall hangings.
Always do a test swatch of your chosen colors before committing to a full-sized Stained Glass Square – Pattern project. Some variegated yarns have color repeats that are too long, which can result in “pooling” that disrupts the mosaic effect. By checking the color distribution in a small sample, you can ensure the geometric symmetry of the pattern remains the star of the show.
One common issue when working on a Stained Glass Square – Pattern is the “leaning” of the square, where it begins to look more like a rhombus. This usually happens due to tension changes or missing a stitch at the corners. To fix this, count your stitches at the end of every round and ensure your corner increases are consistent, usually consisting of a “2 dc, ch 2, 2 dc” sequence.
If you find that your Stained Glass Square – Pattern is rippling or waving at the edges, your tension might be too loose, or you may be adding too many stitches. In mosaic crochet, the long stitches can sometimes pull the fabric, so it’s a delicate balance. Adjusting your hook size down for the border rounds can help tighten the edges and provide a more stable structure to the square.
Hidden ends are another challenge with the Stained Glass Square – Pattern. Since you are switching colors frequently, the back of your work can become a “nest” of yarn tails. To manage this, try crocheting over your ends as you go, or use the “envelope border” technique if you are making a blanket, which hides all the yarn tails inside a double-layered edge for a clean finish.
Joining multiple Stained Glass Square – Pattern blocks requires a method that doesn’t distract from the design. The invisible mattress stitch or a flat slip-stitch join are excellent choices because they create a seamless transition between squares. This ensures that the leaded window effect continues uninterrupted across the entire surface of your finished crochet afghan.
For a truly professional touch, consider adding a final border that mirrors the “leading” lines used in the Stained Glass Square – Pattern. A few rounds of simple stitches in your dark contrast color, followed by a crab stitch (reverse single crochet), provides a sophisticated edge that frames the entire project. This final step “anchors” the vibrant colors and gives the piece a weighted, high-quality feel.
Finally, always remember to document your creative process. Taking photos of your Stained Glass Square – Pattern in different lighting—especially natural sunlight—can reveal the true beauty of your color choices. Sharing your progress in crochet communities not only inspires others but also helps you track your growth as an artist as you master this intricate and rewarding pattern style.
1. What is the best yarn for a Stained Glass Square – Pattern?
The best yarn is generally a worsted weight (Category 4) acrylic or cotton blend. These yarns offer the durability and stitch definition needed to make the “stained glass” lines look sharp. Brands that offer a wide range of solid colors are ideal for creating the custom gradients required for this design.
2. Is the Stained Glass Square – Pattern suitable for beginners?
While it looks incredibly complex, an intermediate beginner can certainly tackle a Stained Glass Square – Pattern. If you know how to double crochet, work in the back loops, and follow a basic count, you can master this. It’s recommended to start with a small coaster-sized square to practice the color changes first.
3. How do I prevent my squares from curling?
Curling is common in mosaic crochet due to the tension of the post stitches. The best solution is wet blocking. Pin your finished Stained Glass Square – Pattern to a foam board, spray it with water, and let it dry completely. This relaxes the fibers and ensures the square stays perfectly flat.
4. Can I use this pattern to make a full-sized blanket?
Absolutely! The Stained Glass Square – Pattern is designed to be modular. You can make dozens of individual squares and join them together. Because each square is a self-contained unit, it’s a great “on-the-go” project that eventually culminates in a stunning, large-scale afghan.
5. Why is my “lead” color not standing out?
If your dark lines look thin or get “lost,” you might need to use a slightly thicker yarn for the borders or increase your stitch height. Ensure you are using a high-contrast color like True Black or Charcoal to provide the necessary visual separation between the bright mosaic colors.
6. Do I have to cut the yarn at every color change?
Not necessarily. If you are working in rounds, you can sometimes “carry” the yarn up the back, but for a Stained Glass Square – Pattern, cutting and weaving is usually preferred to avoid bulk. Alternatively, the envelope border method is a popular way to hide the many yarn tails without weaving every single one.
In this article, we explored the fascinating world of the Stained Glass Square – Pattern, a crochet technique that blends art and geometry into a stunning fabric. We covered the essential materials needed to begin, the technical stitches like FPDC and BLO that create the mosaic effect, and the importance of color theory in mimicking real stained glass.
We also addressed common troubleshooting tips, from fixing tension issues to the importance of blocking your work for a professional finish. Mastering this Stained Glass Square – Pattern allows you to create heirlooms that are as durable as they are beautiful, turning simple yarn into a vibrant tapestry of light and shadow.


