
Lily in Crochet - Pattern

Learning the Tulip stitch in crochet – Pattern is one of the most rewarding milestones for any fiber artist looking to add texture, color, and a touch of nature to their handmade projects. This specific stitch is beloved in the crafting community because it mimics the appearance of tiny flower buds nestled between green leaves, creating a stunning visual effect that looks far more complex than it actually is. Whether you are aiming to create a spring-themed baby blanket, a floral scarf, or a decorative pillow cover, mastering this pattern will instantly elevate your crochet repertoire.
The beauty of the Tulip stitch in crochet lies in its versatility and the way it utilizes basic stitches like the double crochet and the puff stitch (or popcorn stitch, depending on the variation) to build rows of “flowers.” To achieve the classic look, you typically alternate between three different yarn colors: a base color for the background, green for the stems and leaves, and a vibrant pink, red, or yellow for the tulip heads. This rhythmic color switching makes the Tulip stitch in crochet – Pattern an engaging project that keeps you motivated as you watch your garden grow row by row.
Before diving into the technical details of the Tulip stitch in crochet – Pattern, it is important to ensure you have the right materials and a basic understanding of stitch height and tension. Using a smooth, worsted weight yarn is often recommended for beginners because it provides excellent stitch definition, allowing you to see exactly where your hook needs to go to form the “petals.” In this guide, we will break down the process step-by-step, ensuring you can replicate this pattern with confidence and create high-quality pieces that stand out.
To begin your journey with the Tulip stitch in crochet, you must first understand the mathematical foundation of the pattern. Most variations of this stitch require a foundation chain that is a multiple of 3, plus an additional 2 or 3 chains for the turning stitch, depending on your personal tension. This ensures that the clusters of “flowers” and “leaves” align perfectly across your fabric without leaving awkward gaps at the edges.
Starting with a solid foundation is crucial for any pattern involving decorative clusters. If your initial chain is too tight, the bottom of your work will curl, ruining the delicate look of the Tulip stitch in crochet. I always suggest using a hook one size larger than your project calls for just for the foundation chain to keep things flexible and even.
The first few rows of the Tulip stitch in crochet – Pattern usually consist of a simple base, often made of single or double crochet. This provides a sturdy “soil” for your tulips to sit upon. It is vital to keep your stitch count consistent during these early stages, as a single missing stitch can throw off the alignment of the entire floral row later on.
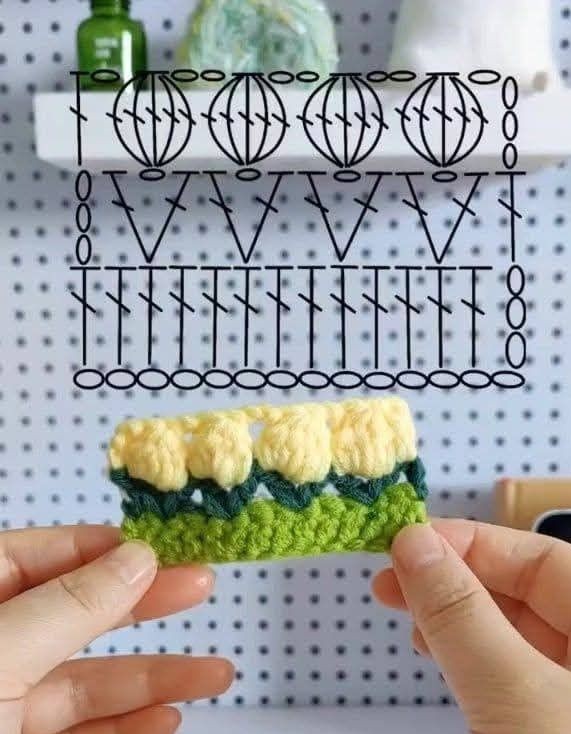
When discussing the Tulip stitch in crochet, we focus on the interplay between the “V-stitches” and the “clusters.” The green row, which represents the leaves, is almost always created using a V-stitch (one double crochet, one chain, and another double crochet in the same space). This creates a perfect little cradle for the colorful tulip bud that follows in the next row.
As you work through the pattern, you will notice that the Tulip stitch in crochet is essentially a three-row repeat. Once you memorize the sequence of the background row, the leaf row, and the petal row, the process becomes incredibly meditative. It’s the kind of crochet work that allows you to relax while still producing something that looks intricate and professional.
Finally, remember that the Tulip stitch in crochet – Pattern thrives on color contrast. If the colors are too similar, the flower shape will get lost in the texture. For the best SEO results and aesthetic appeal in your finished photos, choose high-contrast yarns that make the “tulips” pop against the “leaves,” highlighting the unique geometry of the stitch.
Choosing the right yarn is the most important decision you will make when starting a Tulip stitch in crochet project. While you can technically use any weight, a DK weight or worsted weight yarn is ideal for showcasing the detail of the flowers. Natural fibers like cotton provide great structure, while acrylic blends offer softness and a bit of stretch that can be more forgiving for beginners.
You will also need a crochet hook that matches your yarn choice, typically ranging from 4.0mm to 5.5mm. For the Tulip stitch in crochet – Pattern, having a hook with a comfortable grip is helpful because you will be working several stitches into the same space, which can sometimes feel bulky. A smooth hook allows you to slide through the “tulip” clusters without snagging the yarn.
Since this pattern involves frequent color changes, you will definitely need a sharp pair of embroidery scissors and a tapestry needle. Managing your yarn tails is a big part of the Tulip stitch in crochet experience. I recommend weaving in your ends as you go, rather than waiting until the end of a large blanket, to keep the process organized and stress-free.
Stitch markers can be incredibly helpful when working the Tulip stitch in crochet – Pattern, especially at the beginning of rows. Because the edges can sometimes look a bit different due to the clusters, a marker ensures you always insert your hook into the correct turning chain. This keeps the sides of your work straight and professional-looking.
In terms of technical terms, the Tulip stitch in crochet often utilizes the 3-double crochet cluster or a popcorn stitch. Understanding these terms is essential. A cluster is when you partially complete several stitches and then pull the yarn through all loops at once, creating the rounded shape of a tulip bud that is central to this pattern.
Lastly, don’t forget a measuring tape. While the Tulip stitch in crochet – Pattern is beautiful, the clusters can use more yarn than standard rows, potentially affecting the final dimensions of your project. Keeping track of your gauge ensures that your finished piece matches your vision and that you don’t run out of your favorite “flower” color halfway through.
To execute the Tulip stitch in crochet, start by chaining your multiple of 3 + 2 in your background color. Row 1 is usually a simple row of single crochet to establish the edge. This provides a clean border and makes it easier to count your stitches before you begin the more complex parts of the pattern and the floral elements.
For Row 2, you will switch to your green yarn to create the leaves. You will skip two stitches and work a V-stitch (dc, ch 1, dc) into the next stitch. Repeat this across the row. This “V” shape is the backbone of the Tulip stitch in crochet – Pattern, as it provides the gap where your colorful petals will eventually sit.
Row 3 is where the magic happens and you see the Tulip stitch in crochet come to life. Attach your flower color and work a cluster of 3 or 5 double crochets into the “ch-1” space of the green V-stitch from the previous row. Between each tulip, you will usually chain two to give the flowers room to breathe and maintain a flat fabric.
When working the clusters in the Tulip stitch in crochet – Pattern, consistency in tension is key. If you pull the loops too tight, the tulips will look small and pinched; if they are too loose, the flowers will look messy. The goal is a plump, rounded bud that sits neatly inside the green “leaves,” creating that iconic botanical look.
After finishing the flower row, you will switch back to your main background color for Row 4. This row typically consists of double crochets worked into the tops of the tulips and the chain spaces between them. This row “locks” the flowers in place and prepares the surface for the next set of leaves in the Tulip stitch in crochet sequence.
The cycle then repeats. By alternating these rows, you create a field of flowers. The Tulip stitch in crochet – Pattern is highly addictive because each row change brings a new color and a new visual reward. It is a fantastic way to use up “scrap” yarn for the tulip heads, making each row of flowers a different vibrant hue.
One of the most common issues when learning the Tulip stitch in crochet is “puckering,” where the fabric starts to pull inward. This usually happens if the chain spaces between the tulips are too tight. If you notice your work curving, try adding an extra chain between your clusters to give the pattern more horizontal space to expand.
Another expert tip for the Tulip stitch in crochet – Pattern is to use “standing stitches” when joining new colors. Instead of the traditional slip stitch and chain, a standing double crochet creates a much cleaner edge. This makes the color transitions in your Tulip stitch in crochet look seamless and high-end, perfect for items intended as gifts or for sale.
Blocking your finished work is almost mandatory for the Tulip stitch in crochet – Pattern. Because of the density of the clusters, the fabric can be a bit stiff. Wet blocking or steam blocking allows the stitches to settle into their final shape, opening up the “leaves” and making the “tulips” stand out prominently against the background.
When searching for inspiration for the Tulip stitch in crochet, consider varying the heights of your stitches. Some advanced versions of the pattern use treble crochets for the leaves to make them appear longer and more elegant. Experimenting with these variations can help you develop a unique style within the world of floral crochet.
To optimize your project for longevity, always secure your color changes with a small, hidden knot or by crocheting over the tails for several inches. Since the Tulip stitch in crochet – Pattern involves so many yarn swaps, ensuring these joins are secure will prevent your beautiful garden from unraveling after a trip through the washing machine.
Finally, keep a project journal for your Tulip stitch in crochet endeavors. Note down which hook size and yarn brand produced the best results. The pattern can look very different depending on whether you use a fuzzy mohair or a crisp mercerized cotton. Documenting your process ensures that your next floral project is even more successful than the last.
Is the Tulip stitch in crochet difficult for beginners?
Not at all! While it looks complex, if you know how to do a double crochet and a chain stitch, you can master this pattern. The most challenging part is simply managing the color changes and keeping track of the row repeats.
How much yarn does the Tulip stitch in crochet – Pattern use?
Because of the cluster stitches used to create the tulip buds, this stitch is considered a “yarn eater.” It uses about 20-30% more yarn than a standard row of double crochet, so make sure to buy an extra skein of your flower and leaf colors.
Can I use this stitch for a full-sized blanket?
Yes, the Tulip stitch in crochet is a popular choice for afghans and throws. It creates a thick, warm fabric with a wonderful texture. Just be prepared for the project to take a bit longer due to the detail involved in each row.
How do I change colors without having a million ends to weave in?
While you can’t avoid some ends, you can “carry” the background yarn up the side of your work if you are making a border later. However, for the pink and green rows in the Tulip stitch in crochet – Pattern, it is usually best to cut the yarn to keep the tension even.
What is the best yarn for the Tulip stitch in crochet?
A cotton or cotton-blend yarn is often considered the best because it has the “crispness” needed to make the floral shapes look defined. However, a soft acrylic works great for baby blankets where comfort is the priority.
Does the Tulip stitch in crochet look the same on both sides?
The “tulips” have a definite “right side” where they look most plump and 3D. While the back of the pattern is still neat and attractive, it is generally considered a one-sided stitch, which is perfect for blankets or garments.
In this tutorial, we have explored the intricate and beautiful world of the Tulip stitch in crochet – Pattern. We covered everything from choosing the right yarn and hook to the specific row-by-row instructions needed to create your own crochet garden.
You learned that by combining V-stitches and clusters, you can create a textured, floral fabric that is perfect for blankets, accessories, and home decor. The key to success with the Tulip stitch in crochet is maintaining consistent tension and choosing colors that offer a bold contrast to bring the flowers to life.


