
American-style placemat with a fruit theme - Pattern

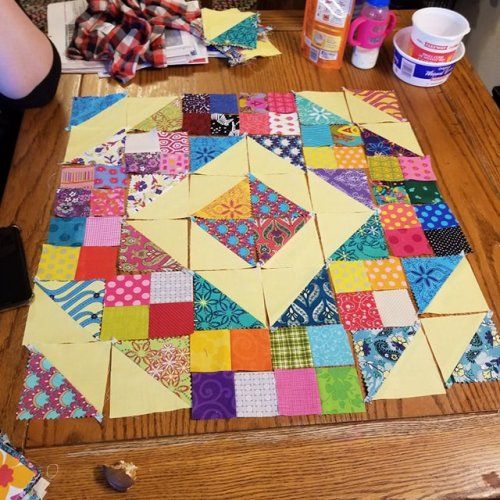
A Baby Quilt Top – Pattern is one of the most heartwarming and fulfilling projects a quilter can embark upon, as it represents the welcoming of a new life with a handmade layer of warmth and security. Creating a high-quality A Baby Quilt Top – Pattern is not just about sewing pieces of fabric together; it is about choosing colors and textures that will stimulate a child’s senses while providing a durable keepsake that can be passed down through generations. For beginners and experts alike, the A Baby Quilt Top – Pattern serves as a perfect canvas for practicing precision piecing and exploring creative layouts without the overwhelming commitment of a full-sized bed quilt.
In the modern world of nursery decor, the A Baby Quilt Top – Pattern has evolved into a versatile design tool, allowing parents and gift-givers to move beyond traditional pastels and embrace bold, geometric, or whimsical themes. By following a structured A Baby Quilt Top – Pattern, you ensure that the dimensions are safe for crib use and that the construction is sturdy enough to withstand the frequent laundering that baby items inevitably require. Many enthusiasts find that working on A Baby Quilt Top – Pattern is a therapeutic process, offering a rhythmic escape from daily stress while producing a tangible token of love and craftsmanship.
This comprehensive guide is designed to help you navigate the intricacies of creating A Baby Quilt Top – Pattern, from the initial fabric selection to the final pressing of the seams. We will delve into the technical aspects of achieving a perfect quarter-inch seam, the artistic choices behind color palettes, and the essential tools needed to make your A Baby Quilt Top – Pattern a professional-looking masterpiece. Whether you are sewing for your own little one or preparing a thoughtful baby shower gift, understanding the logic behind a well-drafted A Baby Quilt Top – Pattern is the first step toward a successful and enjoyable quilting journey.
The foundation of every successful A Baby Quilt Top – Pattern is the fabric, which must be soft enough for a baby’s delicate skin yet durable enough for everyday use. Most experts recommend using 100% high-quality quilting cotton for your A Baby Quilt Top – Pattern because it is breathable, easy to handle during sewing, and holds up well over time. When selecting materials for A Baby Quilt Top – Pattern, it is wise to consider “low-volume” prints for the background to make the primary design elements pop with clarity and visual interest.
Color choice in A Baby Quilt Top – Pattern plays a significant role in early childhood development, as high-contrast patterns can help stimulate a newborn’s developing vision. While soft mints and lemons are classic, don’t be afraid to incorporate black, white, and primary colors into your A Baby Quilt Top – Pattern for a modern and cognitively engaging look. It is also important to ensure that the fabrics used in A Baby Quilt Top – Pattern are colorfast, so the deep reds or navies do not bleed into the lighter areas during the first wash.
Pre-washing fabric is a debated topic, but for A Baby Quilt Top – Pattern, it is generally recommended to remove any chemical residues or “sizing” used during manufacturing. Shrinkage is another factor to consider; if you don’t pre-wash, your A Baby Quilt Top – Pattern may develop a charming, crinkled “antique” look after its first trip through the dryer. Whichever path you choose, consistency is key—either pre-wash all fabrics for your A Baby Quilt Top – Pattern or none of them to ensure even tension throughout the project.
Flannel is another popular alternative for A Baby Quilt Top – Pattern, especially for winter babies, as it provides an extra layer of coziness and a slightly fuzzy texture. However, flannel tends to fray more than standard cotton, so when following A Baby Quilt Top – Pattern with this material, you might want to increase your seam allowance slightly for extra security. Mixing textures, such as adding a few blocks of minky or silk to your A Baby Quilt Top – Pattern, can also create a wonderful sensory experience for a growing infant.
Sustainability is becoming a priority in the quilting world, and using organic cotton for your A Baby Quilt Top – Pattern is an excellent way to ensure no harmful pesticides come into contact with the child. Many modern A Baby Quilt Top – Pattern designs are now specifically tailored for “fat quarters,” which are pre-cut pieces of fabric that make it easy to coordinate a wide variety of prints without buying excessive yardage. This approach keeps the A Baby Quilt Top – Pattern affordable and reduces waste during the cutting phase.
Finally, always check the “grainline” of your fabric before you begin cutting pieces for your A Baby Quilt Top – Pattern. Cutting along the grain prevents the fabric from stretching out of shape as you sew the blocks together, which is vital for maintaining the squareness of the A Baby Quilt Top – Pattern. By taking the time to select the right fibers and colors, you set yourself up for a smooth sewing process and a finished A Baby Quilt Top – Pattern that is both beautiful and safe for its tiny recipient.
Accuracy in the cutting stage is the secret to a professional-looking A Baby Quilt Top – Pattern, as even a slight deviation can lead to misaligned corners and “wonky” seams. Using a sharp rotary cutter and a specialized acrylic ruler is essential for A Baby Quilt Top – Pattern to ensure every square and triangle is exactly the size specified in the instructions. When you are following A Baby Quilt Top – Pattern, it is helpful to cut all your pieces at once and organize them into labeled piles to streamline the assembly process.
The “scant quarter-inch seam” is a term every quilter working on A Baby Quilt Top – Pattern should master, as it accounts for the space the fabric takes up when it is folded over. To test your accuracy, sew three small scrap strips together and measure the middle strip; if it isn’t exactly the width intended by the A Baby Quilt Top – Pattern, adjust your needle position accordingly. This level of precision ensures that the final dimensions of your A Baby Quilt Top – Pattern match the design exactly, preventing frustration during the later stages.
Pressing is often confused with ironing, but in the context of A Baby Quilt Top – Pattern, you should lift and set the iron rather than sliding it across the fabric. Sliding the iron can stretch the delicate seams of your A Baby Quilt Top – Pattern, leading to a distorted top that won’t lay flat. Most A Baby Quilt Top – Pattern guides suggest pressing seams to one side—usually toward the darker fabric—to create “nesting” seams that lock together perfectly when joining blocks.
If your A Baby Quilt Top – Pattern includes “half-square triangles” or other angled pieces, using a bit of fabric starch can be a lifesaver. Starch gives the fabric extra stability, preventing the bias edges of the A Baby Quilt Top – Pattern pieces from stretching during handling. This is particularly important for smaller, more intricate A Baby Quilt Top – Pattern designs where precision is paramount to the overall success of the geometric motif.
Organization of your workspace also contributes to the quality of your A Baby Quilt Top – Pattern. Keep a “design wall” or a large flat surface nearby where you can lay out the pieces of your A Baby Quilt Top – Pattern to check for color balance and pattern orientation. Seeing the A Baby Quilt Top – Pattern come together visually before you sew the rows allows you to make adjustments and ensure that no two identical prints are touching, creating a more harmonious look.
Lastly, remember to change your sewing machine needle before starting a new A Baby Quilt Top – Pattern. A dull needle can cause skipped stitches or damage the fibers of your high-quality quilting cotton, affecting the longevity of the A Baby Quilt Top – Pattern. By treating the preparation phase with the same care as the sewing phase, you ensure that your A Baby Quilt Top – Pattern is built on a foundation of accuracy and structural integrity that will stand the test of time.
Assembling the blocks of A Baby Quilt Top – Pattern is where the design truly starts to sing, and “chain-piecing” is a technique that can save you hours of time. Chain-piecing involves sewing pairs of fabric for your A Baby Quilt Top – Pattern one after another without cutting the thread in between, creating a long “chain” of units. This method not only speeds up the construction of the A Baby Quilt Top – Pattern but also helps maintain a consistent seam allowance across all the pieces.
Pinning is a non-negotiable step for many quilters when working on A Baby Quilt Top – Pattern, especially when trying to match “points” or intersections. By placing a pin exactly where two seams meet in the A Baby Quilt Top – Pattern, you prevent the fabric from shifting as it goes under the presser foot. This attention to detail results in crisp, sharp corners that make your A Baby Quilt Top – Pattern look like it was made by a seasoned professional rather than a hobbyist.
Row-by-row assembly is the most common way to finish A Baby Quilt Top – Pattern, where blocks are joined into horizontal strips and then the strips are sewn together. When joining long rows in your A Baby Quilt Top – Pattern, it is helpful to sew from the center out or to pin the ends and the middle first to avoid “creeping” or uneven lengths at the edges. This ensures that the outer perimeter of the A Baby Quilt Top – Pattern remains straight and easy to bind later.
If you find that your A Baby Quilt Top – Pattern is starting to look a bit “wavy,” it might be due to uneven tension or stretching. One way to fix this in A Baby Quilt Top – Pattern is to stay-stitch around the edge of the finished top to lock everything in place before moving on to the quilting phase. This prevents the outer seams of the A Baby Quilt Top – Pattern from opening up or stretching as you handle the “quilt sandwich” during the final steps.
For those who want to add a unique flair to their A Baby Quilt Top – Pattern, fussy cutting is a fantastic technique to explore. Fussy cutting involves cutting a specific motif from a fabric—like a small animal or a flower—to be the center of a block in your A Baby Quilt Top – Pattern. This adds a storytelling element to the A Baby Quilt Top – Pattern, making it a personalized piece of art that a child will love to examine and touch as they grow.
Final inspection of the A Baby Quilt Top – Pattern should involve checking for any “thread nests” or loose stitches on the back of the top. Trimming away excess threads and ensuring all seams are securely closed is essential for a high-quality A Baby Quilt Top – Pattern. A clean back is just as important as a beautiful front, as it ensures that no dark threads show through the lighter fabrics of the A Baby Quilt Top – Pattern once the batting and backing are added.
Once the main piecing of A Baby Quilt Top – Pattern is complete, adding borders can provide a beautiful frame and bring the quilt to its final desired size. Some A Baby Quilt Top – Pattern designs utilize “sashing,” which are strips of fabric between the blocks, to give the design some breathing room and a more traditional look. Choosing a contrasting color for the borders of your A Baby Quilt Top – Pattern can pull the whole theme together and highlight the colors used in the center blocks.
The “quilt sandwich”—consisting of your finished A Baby Quilt Top – Pattern, the batting, and the backing fabric—is where the top becomes a functional blanket. For a baby quilt, choosing a lightweight cotton or bamboo batting is ideal because it is warm without being too heavy or bulky for a small child. Basting the layers together with safety pins or a temporary spray ensures that the A Baby Quilt Top – Pattern stays smooth and wrinkle-free during the actual quilting process.
Quilting the A Baby Quilt Top – Pattern can be done with simple straight lines, “stitch-in-the-ditch,” or free-motion designs like stippling or clouds. Straight-line quilting is very popular for modern A Baby Quilt Top – Pattern designs because it emphasizes the geometric shapes and is very beginner-friendly. The goal is to secure the layers while adding a layer of texture that enhances the overall aesthetic of the A Baby Quilt Top – Pattern without making the fabric too stiff.
Binding is the final step that seals the edges of your A Baby Quilt Top – Pattern and protects it from fraying over years of use. For A Baby Quilt Top – Pattern, a double-fold “French binding” is the most durable choice, providing a thick, cushioned edge that feels soft to the touch. You can use the same fabric as the border or a high-contrast stripe to give your A Baby Quilt Top – Pattern a playful and professional finish that really stands out.
Adding a personalized label to the back of your A Baby Quilt Top – Pattern is a wonderful way to record the history of the project. Include the name of the baby, the date the A Baby Quilt Top – Pattern was finished, and your own name to mark it as a genuine heirloom. This turns the A Baby Quilt Top – Pattern from a simple household item into a piece of family history that tells the story of the time and effort invested in its creation.
Finally, proper care will ensure that your A Baby Quilt Top – Pattern lasts through many years of snuggles and play. Always wash handmade quilts from A Baby Quilt Top – Pattern in cold water on a gentle cycle and dry on low heat to prevent excessive shrinkage or fading. By following these professional steps and putting your own creative spin on the A Baby Quilt Top – Pattern, you create a meaningful gift that provides both physical warmth and a lasting memory of love.
What is the standard size for A Baby Quilt Top – Pattern?
Most A Baby Quilt Top – Pattern designs fall between 30″ x 40″ and 40″ x 52″. This size is ideal because it is small enough to be portable for strollers but large enough to cover a toddler in a crib. Always check the specific A Baby Quilt Top – Pattern you are following for exact dimensions.
Can I make A Baby Quilt Top – Pattern without a sewing machine?
Yes, you can certainly hand-piece A Baby Quilt Top – Pattern. While it takes much longer, hand-sewing offers a level of portability and a soft, flexible finish that machine-sewing can sometimes lack. Many quilters find hand-sewing an A Baby Quilt Top – Pattern to be a very relaxing and meditative hobby.
How much fabric do I need for a basic A Baby Quilt Top – Pattern?
A simple A Baby Quilt Top – Pattern usually requires about 2 to 3 yards of fabric in total, split between several different colors or prints. If the A Baby Quilt Top – Pattern involves complex piecing or many small scraps, you might need a bit more to account for the numerous seam allowances.
Why is my A Baby Quilt Top – Pattern not laying flat?
This is often caused by sewing seams with inconsistent tension or not pressing correctly. If the blocks of your A Baby Quilt Top – Pattern are stretched during assembly, they will ripple. To fix this, try steam-pressing the A Baby Quilt Top – Pattern gently and ensuring you are not pulling the fabric through the sewing machine.
Is batting necessary for A Baby Quilt Top – Pattern?
While batting provides the traditional “quilt” feel and warmth, some people choose to make a “summer quilt” by using a layer of flannel instead of batting inside the A Baby Quilt Top – Pattern. This makes the A Baby Quilt Top – Pattern lighter and more breathable for warmer climates while still maintaining the quilted look.
In conclusion, creating A Baby Quilt Top – Pattern is a journey of both technical skill and emotional expression, resulting in a gift that is as practical as it is beautiful. Throughout this article, we have discussed the critical importance of selecting high-quality, safe fabrics and using high-contrast colors to aid infant development. We explored the necessity of precision cutting and the “scant quarter-inch” seam to ensure that your A Baby Quilt Top – Pattern units fit together perfectly.
Furthermore, we covered assembly strategies like chain-piecing and the final steps of basting, quilting, and binding that turn a pieced top into a finished heirloom. By mastering the fundamentals of A Baby Quilt Top – Pattern, you gain the ability to create customized, sustainable, and deeply personal items that will comfort a child for years to come. Whether you are a novice sewer or an experienced quilter, the A Baby Quilt Top – Pattern offers an endless opportunity for creativity and the pure joy of handmade craft.


