
American-style placemat with a fruit theme - Pattern

The Arrow Tail Quilt – Pattern is a timeless design that captures the essence of movement and direction through its geometric precision and striking visual appeal. Whether you are a seasoned quilter or a curious beginner, understanding the nuances of the Arrow Tail Quilt – Pattern allows you to create a piece of art that feels both modern and traditional simultaneously. This specific design relies on the clever arrangement of triangles and rectangles to mimic the fletching of an arrow, making it a popular choice for those who love clean lines and dynamic quilting layouts.
When you decide to embark on a project featuring the Arrow Tail Quilt – Pattern, you are engaging with a versatile template that adapts beautifully to various color palettes. From monochromatic minimalist aesthetics to vibrant, multi-colored scrap quilts, the Arrow Tail Quilt – Pattern serves as a perfect canvas for personal expression. In the world of modern quilting, this pattern stands out because it balances negative space with intricate piecing, ensuring that the final product is eye-catching without being overly cluttered.
Mastering the Arrow Tail Quilt – Pattern requires a blend of accurate cutting, consistent seam allowances, and a bit of creative flair. As you dive into this guide, we will explore the essential techniques needed to bring this geometric quilt design to life, focusing on how to optimize your workflow and achieve professional results. By focusing on the quilt construction process, you can ensure that your finished project is not only beautiful but also durable enough to be passed down through generations as a cherished heirloom.
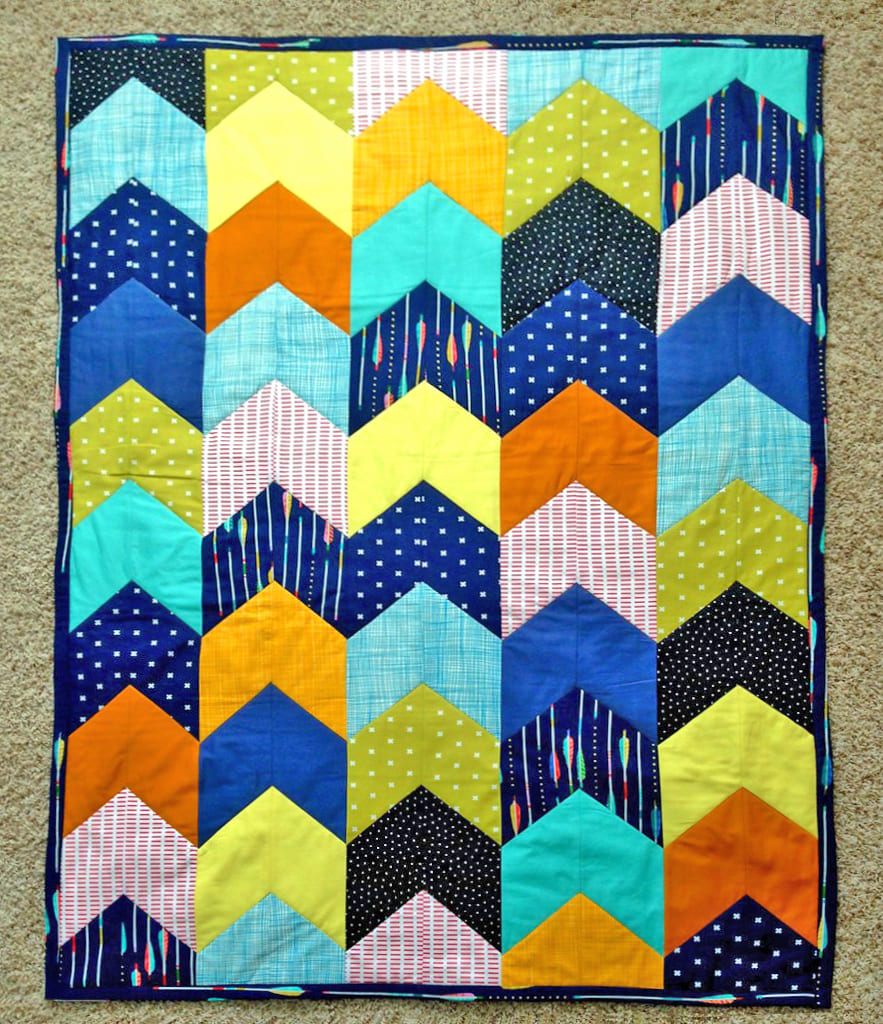
The Arrow Tail Quilt – Pattern is primarily built upon the foundation of half-square triangles (HSTs) and rectangular strips. To start your project, you must first select high-quality quilting cotton fabrics that provide the necessary stability for intricate piecing. Choosing a high-contrast color scheme is often recommended for the Arrow Tail Quilt – Pattern because it emphasizes the “arrow” shape, making the directionality of the design pop against the background.
Precision is the most critical element when working with the Arrow Tail Quilt – Pattern. Using a rotary cutter and a non-slip quilting ruler will help you achieve the exact dimensions required for the blocks. Since the “tail” of the arrow involves diagonal seams, ensuring your pieces are cut on the straight grain of the fabric will prevent stretching and distortion during the sewing process.
The Arrow Tail Quilt – Pattern often utilizes a “block-based” approach, where individual units are constructed and then joined together. This method allows you to manage the project in smaller, more digestible steps, which is ideal for maintaining sewing accuracy. Many quilters prefer to use a scant 1/4 inch seam allowance to account for the fabric fold, ensuring the blocks finish at the intended size.
Incorporating negative space is a hallmark of contemporary versions of the Arrow Tail Quilt – Pattern. By using a solid neutral color for the background, you allow the “arrow” motifs to lead the eye across the quilt top. This technique not only highlights the textural quilting stitches later on but also gives the overall design a fresh, sophisticated look that fits perfectly in modern home decor.
Organizing your fabric pieces before you sit down at the sewing machine can save hours of frustration. For the Arrow Tail Quilt – Pattern, it is helpful to label your cut pieces according to the section of the arrow they represent. This quilt organization strategy prevents accidental misplacements of fabric, especially if you are working with a variety of similar prints or shades.
Finally, pressing your seams is a non-negotiable step for a successful Arrow Tail Quilt – Pattern outcome. Most experts suggest pressing seams to the side (toward the darker fabric) to reduce bulk at the intersections. However, some prefer pressing seams open to achieve a perfectly flat quilt top, which can make the longarm quilting process much smoother once the top is completed.
The first phase of constructing the Arrow Tail Quilt – Pattern involves creating the half-square triangles that form the “points” or “tails.” You can use the “two-at-a-time” method, which is an efficient quilting technique that involves sewing two squares together and cutting them diagonally. This method minimizes fabric waste and speeds up the production of the core components of the Arrow Tail Quilt – Pattern.
Once your HSTs are ready, the next step in the Arrow Tail Quilt – Pattern is to assemble the central shaft of the arrow. This usually consists of a long rectangular strip that connects the head of the arrow to the tail. Achieving a seamless transition between these pieces is vital for maintaining the illusion of a single, continuous arrow moving through the fabric.
As you begin to join the units into a full block, pay close attention to the alignment of the points. In the Arrow Tail Quilt – Pattern, “chopping off” the points of your triangles can detract from the crispness of the design. Using fine quilting pins to match your intersections precisely will help you maintain those sharp angles that make the Arrow Tail Quilt – Pattern so visually striking.
Consistency is key throughout the entire Arrow Tail Quilt – Pattern assembly. If one block is slightly off, it can cause a ripple effect that makes the borders difficult to attach later. Regularly measuring your blocks as you go is a pro-quilting tip that ensures your quilt top remains square and flat, preventing the dreaded “wavy edges” that occur when pieces don’t align.
Color placement plays a massive role in how the Arrow Tail Quilt – Pattern is perceived. You can create a “gradient effect” by transitioning from dark to light fabrics along the length of the arrow. This color theory application adds a layer of depth and sophistication to the pattern, transforming a simple geometric shape into a complex work of visual art.
Once the individual blocks are finished, the layout of the Arrow Tail Quilt – Pattern can be customized. You can arrange the arrows in a uniform direction for a sense of order, or rotate them in different directions to create a kaleidoscopic effect. This flexibility is one reason why the Arrow Tail Quilt – Pattern remains a favorite among designers who enjoy experimenting with movement.
Selecting the right thread is just as important as selecting the fabric for your Arrow Tail Quilt – Pattern. A high-quality 50wt cotton thread is usually the best choice, as it is strong enough to hold the seams but thin enough not to add unnecessary bulk. Matching your thread color to your background fabric can help hide any minor imperfections in your piecing technique.
The Arrow Tail Quilt – Pattern benefits greatly from the use of specialized tools like a HST ruler or a “Tucker Trimmer.” these tools allow you to trim your triangle units to the exact size with perfect 45-degree angles. Using these precision quilting tools ensures that every component of your Arrow Tail Quilt – Pattern fits together like a puzzle, resulting in a professional finish.
Batting choice will also influence the final look of your Arrow Tail Quilt – Pattern. If you want a flat, modern appearance, a cotton/poly blend batting offers great definition for the stitches without being too puffy. For a more traditional, “crinkly” look after washing, 100% cotton batting is the preferred choice for those who love a vintage quilt aesthetic.
Don’t overlook the importance of a fresh sewing machine needle. When working on the Arrow Tail Quilt – Pattern, a Microtex or Sharps needle in size 80/12 is ideal for piercing through multiple layers of fabric and seams. A sharp needle prevents skipped stitches and ensures that the intricate details of your pattern remain clean and well-defined.
For the backing of your Arrow Tail Quilt – Pattern, consider using a “wide-back” fabric to avoid unnecessary seams on the reverse side. Many quilters choose a complementary print that mirrors the directional design of the front. This attention to detail makes the quilt “reversible” in spirit and adds to the overall value of the finished handmade project.
Lastly, having a large, flat surface for the quilt basting process is essential for the Arrow Tail Quilt – Pattern. Whether you prefer pin basting or spray basting, making sure the three layers (top, batting, and back) are taut and wrinkle-free will prevent puckering during the final quilting stage. This preparation is what separates a good quilt from a masterpiece quilt.
To take your Arrow Tail Quilt – Pattern to the next level, consider adding “fussy cut” elements. This involves cutting your fabric so that a specific motif—like a flower or an animal—is centered within the arrow tail. This fussy cutting technique adds a personalized and whimsical touch to the Arrow Tail Quilt – Pattern, making it truly unique.
Another advanced strategy is to play with the scale of the pattern. You can make a “Giant Arrow” quilt by scaling up the dimensions of the blocks, or a “Miniature Arrow” quilt for a wall hanging. Adjusting the scale of the Arrow Tail Quilt – Pattern allows you to adapt the design for different purposes, from baby blankets to king-sized bedspreads.
The quilting motif you choose for the finishing touches can enhance the Arrow Tail Quilt – Pattern significantly. Straight-line quilting that follows the direction of the arrows reinforces the sense of movement. Alternatively, “orange peel” or swirling stitches can provide a beautiful contrast to the sharp angles of the Arrow Tail Quilt – Pattern, adding softness to the design.
If you are looking to make your Arrow Tail Quilt – Pattern even more modern, try using “low volume” fabrics for the background. These are white or cream fabrics with very subtle, light-colored prints. This creates a textured background that is more interesting than a flat solid but still allows the main arrow design to remain the focal point of the piece.
For those interested in the business of quilting, creating a series of quilts based on the Arrow Tail Quilt – Pattern can help build a cohesive portfolio. Collectors and buyers often look for recognizable styles, and the Arrow Tail Quilt – Pattern provides a strong structural foundation that can be reinvented in endless ways through color and fabric choice.
Finally, always document your process. Taking photos of your Arrow Tail Quilt – Pattern at various stages—from fabric selection to the final stitch—is great for sharing on social media and for your own records. Tracking your progress helps you refine your quilting skills and provides inspiration for your next version of the Arrow Tail Quilt – Pattern.
What is the best fabric for an Arrow Tail Quilt – Pattern?
The best fabric is 100% quilting weight cotton. It is easy to handle, doesn’t slip during sewing, and holds its shape well. For a modern look, consider using solids or small-scale prints that don’t distract from the geometric arrow shape.
Is the Arrow Tail Quilt – Pattern suitable for beginners?
Yes! While it looks complex, it is composed of basic shapes like triangles and rectangles. As long as a beginner focuses on accurate seam allowances and careful pressing, they can successfully complete an Arrow Tail Quilt – Pattern.
How much fabric do I need for a throw-sized Arrow Tail Quilt – Pattern?
Generally, you will need about 3 to 4 yards of background fabric and a variety of fat quarters or scrap pieces for the arrows. Always check the specific requirements of your quilt pattern instructions before purchasing fabric.
Can I use a jelly roll for this pattern?
Absolutely. Many versions of the Arrow Tail Quilt – Pattern are “jelly roll friendly.” The 2.5-inch strips are perfect for creating the shafts of the arrows and can be easily cut into smaller segments for the tails.
How do I prevent my points from being cut off?
The secret is to sew exactly 1/4 inch from the edge. When you see the “X” created by previous seams, aim to sew right through the center of that “X” to ensure your points remain sharp after the blocks are joined.
What is the best way to quilt the finished top?
For the Arrow Tail Quilt – Pattern, “stitch in the ditch” or simple diagonal lines are very effective. If you are using a professional longarm quilter, ask for a linear pantograph to complement the straight lines of the design.
In this article, we have explored the intricate and beautiful world of the Arrow Tail Quilt – Pattern. We covered everything from the foundational elements of half-square triangles to advanced techniques like fussy cutting and scale manipulation.
We’ve also discussed the importance of tool selection, fabric quality, and the precision sewing required to make the design truly shine. By following these steps and focusing on the details, you can create a stunning Arrow Tail Quilt – Pattern that showcases your creativity and technical skill.


