
American-style placemat with a fruit theme - Pattern

The Autumn Wonders Block Quilt – Pattern is a celebratory project that captures the fleeting beauty of the harvest season, transforming the rich hues of falling leaves and crisp October air into a tangible heirloom. As the temperatures drop and we seek the comfort of indoor activities, quilting stands out as the perfect medium to express our appreciation for nature’s transition. This specific design focuses on the warm palette of the forest floor, utilizing deep burgundies, burnt oranges, and golden yellows to create a visual masterpiece that provides both physical warmth and aesthetic delight.
Embracing the Autumn Wonders Block Quilt – Pattern means diving into a world of texture and traditional geometric precision. Whether you are a seasoned quilter with years of experience or a motivated beginner looking for a seasonal challenge, this pattern offers a structured yet creative path toward finishing a high-quality quilt. The beauty of the “block” style is its modular nature, allowing you to focus on one small section at a time, which makes the construction of a full-sized blanket feel achievable and organized rather than overwhelming.
In this comprehensive guide, we will explore every technical aspect of the Autumn Wonders Block Quilt – Pattern, ensuring that your journey from fabric selection to the final binding is seamless and professional. We will discuss the importance of fabric contrast, the precision of quarter-inch seams, and the best ways to maintain quilt block symmetry. By the end of this article, you will have a deep understanding of the architecture of this autumn-themed project, empowering you to create a cozy sanctuary in your home through the timeless art of modern quilting.
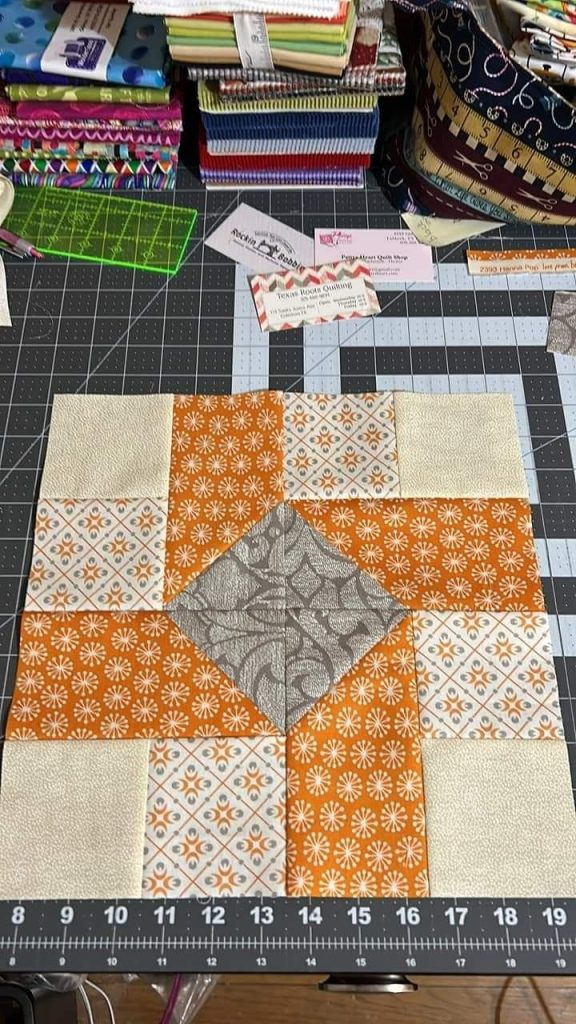
The foundation of a stunning Autumn Wonders Block Quilt – Pattern starts with a carefully curated fabric pull. To truly capture the essence of the season, look for high-quality quilting cottons that feature rustic prints, such as acorns, wheat stalks, or subtle wood-grain textures. Mixing these thematic prints with “blenders”—fabrics that are almost solid in color but have a slight visual movement—ensures that the complex blocks of the autumn pattern don’t become visually cluttered or distracting.
When selecting your palette for the Autumn Wonders Block Quilt – Pattern, consider the “value” of your colors. Value refers to how light or dark a color is regardless of its hue. A successful block quilt needs a balance of light, medium, and dark fabrics to create depth. If all your autumn oranges and browns are the same value, the beautiful geometric shapes you sew will disappear into a single muddy tone. Using a cream or light tan background fabric is a classic way to make your seasonal colors pop.
Precision in cutting is the next critical step for the Autumn Wonders Block Quilt – Pattern. Investing in a sharp rotary cutter and a non-slip acrylic ruler is non-negotiable for achieving the crisp edges required for block assembly. Since this pattern relies on multiple small pieces coming together to form a larger image, even a 1/8-inch error in cutting can multiply across the row, leading to a finished block that is “wonky” or difficult to square up with its neighbors.
Before you begin sewing your Autumn Wonders Block Quilt – Pattern, it is highly beneficial to starch your fabrics. Fabric starch provides a temporary stiffness that prevents the cotton from stretching or distorting, especially when you are cutting on the “bias” (the diagonal grain of the fabric). Starching ensures that your points remain sharp and your squares stay square, which is the hallmark of a professional-grade handmade quilt that will look store-bought in its perfection.
You must also choose the right notions, which is the term for all the small tools used in the process. For the Autumn Wonders Block Quilt – Pattern, a high-quality 50-weight cotton thread in a neutral color like “parchment” or “dove grey” is ideal. This weight of thread is strong enough to hold the seams together through years of use but thin enough to not add unnecessary bulk at the intersections of your quilt blocks, allowing them to lay perfectly flat.
Lastly, organize your workspace to reflect the modular nature of the Autumn Wonders Block Quilt – Pattern. Use small trays or “design boards” to keep the pieces for each individual block separated. Labeling your piles by “Block A,” “Block B,” and so on, will save you hours of confusion during the assembly phase. A clean, organized environment fosters the “flow state” that makes DIY quilting such a relaxing and therapeutic hobby during the busy holiday months.
The heart of the Autumn Wonders Block Quilt – Pattern is the construction of the individual units, which often include half-square triangles (HSTs) and flying geese. These are the fundamental building blocks of most traditional quilts, and they are perfect for representing the sharp angles of leaves and the flight of migrating birds. Mastering these units requires a steady hand and a commitment to the “Scant 1/4 inch” seam, which accounts for the space the fabric takes when it is folded over.
When working on the Autumn Wonders Block Quilt – Pattern, the “Stitch and Flip” method is frequently used to create complex angles without difficult templates. You place a smaller square on the corner of a larger rectangle, sew diagonally, and flip the corner up. This technique is incredibly efficient for producing the “cap” of an acorn or the jagged edge of a maple leaf, allowing you to achieve intricate results with simple, straight-line sewing on your machine.
Chain piecing is a vital productivity hack for the Autumn Wonders Block Quilt – Pattern. Instead of cutting your thread after every single pair of fabric pieces, you feed them through the sewing machine one after another in a continuous “chain.” This not only saves an incredible amount of thread but also keeps your pieces in the correct order for assembly. It turns the technical work of the quilt pattern into a rhythmic, almost meditative activity that speeds up the project significantly.
One common challenge in the Autumn Wonders Block Quilt – Pattern is managing “seam bulk” where multiple corners meet. To solve this, always follow the pressing instructions provided in the pattern. Generally, you want to press your seams toward the darker fabric to prevent them from showing through the lighter background. For very complex intersections, “spinning the seams” at the back of the block allows the fabric to lay in a flat, four-way clover shape, reducing the bump in the middle.
As you finish each unit of the Autumn Wonders Block Quilt – Pattern, you must square up your blocks. Even with perfect cutting and sewing, fabric can shift. Using a square ruler to trim each block to its final dimension ensures that they will all fit together perfectly when you assemble the rows. This step is the “secret sauce” of successful quilting; it guarantees that your Autumn Wonders project will be straight, flat, and easy to quilt when the time comes.
Symmetry is the visual goal of the Autumn Wonders Block Quilt – Pattern. Whether your blocks are traditional stars or stylized autumn motifs, the eye is naturally drawn to balance. If you find a block is slightly off, don’t be afraid to use the “seam ripper”—often called the quilter’s best friend. Taking the time to fix a mismatched point now will result in a much higher sense of pride when you display the finished handmade blanket in your living room.
Once your individual units are complete, the assembly of the Autumn Wonders Block Quilt – Pattern top begins. This stage involves joining the blocks into rows and then joining the rows into a “flimsy” (the completed top before it is quilted). The term nesting seams is crucial here; it involves pressing the seams of Row 1 in the opposite direction of Row 2 so that the intersections “lock” together, providing a perfectly aligned and professional finish.
The “Design Wall” is an essential tool during this phase of the Autumn Wonders Block Quilt – Pattern. Whether it’s a piece of batting taped to a wall or a dedicated flannel board, seeing your blocks laid out from a distance allows you to check the color balance. You might realize that two dark blocks are sitting right next to each other, and you can easily swap them before they are permanently sewn together. This visual check ensures the “wonders” of your autumn quilt are evenly distributed.
If the Autumn Wonders Block Quilt – Pattern includes sashing, these are the strips of fabric that act as “frames” between the blocks. Sashing provides a place for the eye to rest and can help a smaller quilt reach a larger, more usable size. When sewing sashing, it is important to pin generously. Because these strips are long, they are prone to stretching, which can lead to a bowed or “wavy” quilt top that won’t lay flat on a bed.
The borders are the final frame for your Autumn Wonders Block Quilt – Pattern. Many quilters make the mistake of simply sewing a long strip of fabric to the side and cutting off the excess. To prevent wavy borders, you must measure your quilt through the center in three places and take the average. Cut your border strips to this specific measurement and “pin to fit.” This technique pulls the quilt into a perfect rectangle, ensuring it stays square for the quilting process.
Choosing a border fabric for the Autumn Wonders Block Quilt – Pattern is a great opportunity to use a larger, bolder print that might have been too overwhelming for the small blocks. A dark, forest-green border or a rich chocolate brown can act as a definitive boundary, “containing” the vibrant colors of the interior blocks. This contrast gives the quilt top a finished, professional appearance that highlights the effort put into the intricate seasonal motifs.
Finally, give the entire Autumn Wonders Block Quilt – Pattern top a thorough final press. Check for any “loose threads” or “skipped stitches” along the edges. Applying a stay-stitch (a line of stitching 1/8 inch from the edge) around the entire perimeter of the top will prevent the seams from popping open during the next stage. Your completed flimsy is now a work of art, ready to be joined with its batting and backing to become a functional piece of warmth.
The “Quilting” phase is where the Autumn Wonders Block Quilt – Pattern truly comes to life. This is the process of sewing through the three layers: the top, the batting, and the backing. For an autumn theme, quilting motifs like “oak leaves,” “curling vines,” or “swirling wind” patterns are highly appropriate. These designs add a secondary layer of visual interest and provide the necessary structural integrity to hold the quilt sandwich together through years of laundering.
If you are quilting the Autumn Wonders Block Quilt – Pattern on a home machine, a walking foot is your best ally. A walking foot feeds the top and bottom layers of the quilt through the machine at the same speed, preventing the “shifting” that causes puckers and wrinkles. “Straight-line quilting” or “stitching in the ditch” (sewing exactly on the seams) are elegant, modern choices that emphasize the geometric beauty of the autumn blocks.
The “Batting” choice for the Autumn Wonders Block Quilt – Pattern depends on how much “loft” or fluffiness you desire. An 80/20 cotton-polyester blend is a favorite among modern quilters because it offers the breathability of cotton with the durability and slight puff of polyester. For a truly authentic autumn feel, some prefer 100% wool batting, which is incredibly warm, lightweight, and has a beautiful “drape” that feels luxurious around the shoulders.
Binding is the final edge of your Autumn Wonders Block Quilt – Pattern. This is a double-fold strip of fabric that covers the raw edges of the quilt sandwich. A “biased binding” is often used if your quilt has curved edges, but for this rectangular block pattern, a straight-grain binding is perfectly sufficient. Many crafters choose a striped or checkered fabric for the binding to add a playful “frame” to their handmade seasonal project.
Don’t forget the quilt label! Every Autumn Wonders Block Quilt – Pattern deserves a permanent record of its creator. A label should include your name, the date, and the location where it was made. You can use a permanent fabric pen on a scrap of light cotton and sew it to the back corner. This small detail ensures that fifty years from now, the story of this autumn heirloom remains intact for the next generation.
The final “crinkle” is the last step. After you finish the binding, many quilters choose to wash their Autumn Wonders Block Quilt – Pattern. Because cotton shrinks slightly in the wash, it creates a beautiful, cozy texture known as the “crinkle.” It softens the seams and gives the quilt that classic, well-loved look that invites everyone to curl up with a hot cup of tea and enjoy the wonders of autumn from the comfort of their sofa.
1. Is the Autumn Wonders Block Quilt – Pattern suitable for a beginner?
Yes! While it looks intricate, the “block” style allows you to take it one step at a time. If you can sew a straight line and maintain a consistent seam allowance, you can successfully finish this quilt. Start with a smaller “lap size” to build your confidence before moving on to a queen-sized version.
2. How much fabric do I need for this autumn pattern?
For a standard throw quilt (approx. 50″ x 60″), you will generally need about 5-7 yards of fabric total, including the background and the various colors for the blocks. Always check the specific requirements of the Autumn Wonders Block Quilt – Pattern you are following, as borders and backing can add significant yardage.
3. What is the best way to wash a handmade quilt?
To preserve the life of your Autumn Wonders Block Quilt – Pattern, wash it on a “delicate” or “hand-wash” cycle with cold water and a mild detergent. Using “color catchers” in the first wash is highly recommended to prevent the deep autumnal reds and oranges from bleeding into the lighter background fabrics.
4. Can I use flannel instead of quilting cotton?
Absolutely! Flannel makes an incredibly cozy Autumn Wonders Block Quilt – Pattern. Just be aware that flannel shrinks more than cotton and can be “stretchier,” so using a lot of fabric starch during the cutting and sewing process is essential to keep your blocks from distorting.
5. How do I choose the best quilting design for these blocks?
If the blocks are very busy with lots of small pieces, a simple “all-over” design like a stipple or large loops works best. If the blocks have large open spaces, you can use those areas to showcase more decorative quilting, like an embroidered leaf or a personalized motif that complements the Autumn Wonders theme.
6. Why are my blocks ending up smaller than the pattern says?
This is the most common quilting frustration! It usually means your seam allowance is slightly too wide. Even a 1/16th of an inch difference can make a block significantly smaller. Practice sewing a “scant 1/4 inch” and measure your units frequently to ensure you stay on track with the quilt pattern.
Creating an Autumn Wonders Block Quilt – Pattern is a fulfilling way to embrace the change of seasons through craftsmanship. We have journeyed through the essential phases of fabric selection, the precision of geometric assembly, the importance of nesting seams, and the final artistic touches of quilting and binding. This project is more than just a blanket; it is a seasonal narrative told through thread and fabric, designed to bring warmth and beauty into your home for many years.
By following the modular “block” approach, you’ve learned how to manage a large-scale project with ease, building your skills in tension control and precision cutting along the way. The rich, earthy tones of the Autumn Wonders palette provide a timeless appeal that never goes out of style, making your finished quilt a perfect gift or a cherished personal heirloom. We hope this guide has provided you with the clarity and inspiration needed to start your own harvest-themed masterpiece.


