
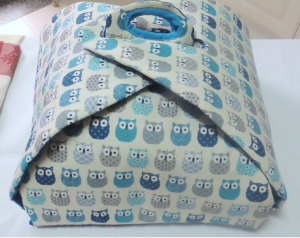
American-style placemat with a fruit theme - Pattern

The Back Porch Blooms quilt block – Pattern is a breath of fresh air for anyone looking to capture the nostalgic beauty of a summer garden within the geometric precision of a quilt. This specific design evokes the feeling of sitting on a shaded porch, surrounded by the vibrant colors of hydrangeas, roses, and daisies that seem to thrive in the afternoon sun. It is a pattern that celebrates the intersection of nature and craftsmanship, offering quilters a chance to play with floral prints and soft, earthy tones to create a piece that feels both timeless and deeply personal.
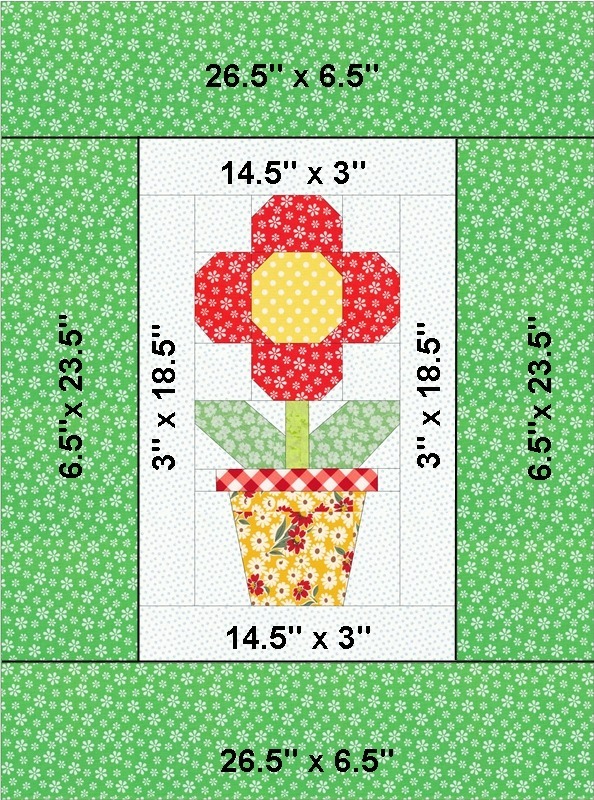
As a versatile and visually engaging project, the Back Porch Blooms quilt block – Pattern is perfect for those who want to move beyond basic squares and explore more intricate floral-inspired layouts. The block typically features a central “bloom” surrounded by “petals” and “leaves,” often utilizing a combination of half-square triangles and fussy cutting to highlight specific motifs within the fabric. This approach allows the maker to tell a story with their textile choices, making each block a unique representation of a botanical sanctuary.
Whether you are planning to create a full-sized bed quilt or a set of decorative placemats for your patio table, the Back Porch Blooms quilt block – Pattern provides the structural framework necessary for a high-quality finish. In this comprehensive guide, we will break down the essential steps for mastering this design, focusing on color theory, precision cutting, and assembly techniques that ensure your “blooms” stay crisp and beautiful. By the end of this tutorial, you will have the confidence to tackle this pattern and bring a touch of the outdoors into your home through your handmade quilting.
When you begin your journey with the Back Porch Blooms quilt block – Pattern, the selection of fabric is the most influential decision you will make. To achieve that authentic “back porch” feel, consider using reproduction fabrics or modern floral prints that feature soft greens, dusty blues, and warm coral tones. The goal is to create a harmonious blend that mimics the natural variation found in a real garden, so avoid colors that are too jarring or neon, as they can overwhelm the delicate nature of the quilt design.
A key element in the Back Porch Blooms quilt block – Pattern is the use of a high-contrast background. Most traditional versions of this block use a “low volume” print or a crisp white cotton to act as the sky or the porch lattice behind the flowers. This contrast is vital because it allows the intricate shapes of the petals to pop, ensuring that the floral geometry of the block is visible from across the room. Without this negative space, the beautiful “blooms” would simply blend into a cluttered field of color.
Texture also plays a significant role in the Back Porch Blooms quilt block – Pattern. Integrating small-scale prints like dots, stripes, or ginghams can represent the textures of leaves and stems, adding depth to the visual experience. If you are feeling adventurous, mixing in a few linen-blend fabrics can provide a tactile quality that feels organic and rustic, perfectly aligning with the “porch” theme of the pattern. Remember to pre-wash your fabrics if you are mixing different types to avoid uneven shrinkage later.
Fussy cutting is a technique that shines exceptionally well with the Back Porch Blooms quilt block – Pattern. This involves cutting your fabric in a way that centers a specific flower or motif within a square or triangle of the block. By doing this, you can make it look like there is a “real” flower living inside your patchwork bloom. While it requires more fabric than standard cutting, the artistic result is well worth the extra yardage, turning a standard pattern into a customized work of art.
Don’t forget to consider the “season” of your quilt when picking colors for the Back Porch Blooms quilt block – Pattern. A spring version might use soft lavender and mint, while an autumn-inspired porch bloom could feature deep burgundies and mustard yellows. Because the quilt block layout is so adaptable, you can create a series of blocks that represent different times of the year, ultimately joining them together for a seasonal “garden” quilt that transitions through the months.
Finally, always ensure you have enough binding and backing fabric that complements your blooms. A classic striped binding in a garden-green shade can act as the perfect “fence” around your floral display. When you are following the Back Porch Blooms quilt block – Pattern, organizing your fabric into “petals,” “centers,” and “leaves” before you start cutting will save you a significant amount of time and reduce the likelihood of making mistakes during the assembly phase of your quilt project.
Accuracy in the cutting phase is what separates a good quilt from a great one, especially when working on the Back Porch Blooms quilt block – Pattern. You will need a sharp rotary cutter and a specialized quilting ruler to ensure every edge is perfectly straight. The pattern relies on many small pieces coming together, so even a difference of 1/8th of an inch can cause the entire block to become skewed. Take your time during this stage to measure twice and cut once, as precision here pays off during the sewing process.
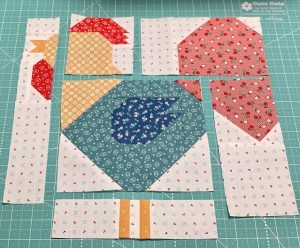
The Back Porch Blooms quilt block – Pattern often utilizes “stitch and flip” techniques or square-in-a-square units to create the points of the petals. Before you begin sewing, it is helpful to group your cut pieces by their function within the block. Keep your “petals” in one stack and your “background” pieces in another. This organization prevents you from accidentally using a leaf piece where a petal should go, maintaining the botanical integrity of the design as you move through the steps.
If your version of the Back Porch Blooms quilt block – Pattern includes Half-Square Triangles (HSTs), consider making them slightly oversized and then trimming them down to the exact size needed. This is a common “pro-tip” in the quilting community that ensures your blocks are perfectly square. Trimming might seem like an extra step, but it eliminates the “wobbly” edges that can occur when sewing on the bias, which is essential for keeping your quilt points sharp and professional.
Starching your fabric before cutting is another excellent strategy for the Back Porch Blooms quilt block – Pattern. Because many of the cuts are small and can involve diagonal seams, the fabric has a tendency to stretch. A bit of quilting starch gives the cotton a paper-like stability, making it much easier to handle under the sewing machine foot. This is particularly helpful for the center of the bloom, where multiple seams meet and the fabric can become bulky or distorted without proper stabilization.
Marking your diagonal lines on the back of the fabric with a fine-point water-soluble pen can also increase your accuracy with the Back Porch Blooms quilt block – Pattern. This gives you a clear “track” to sew along, ensuring that your petal angles are consistent across all sixteen or twenty blocks of your quilt. Consistency is the secret to a high-quality handmade quilt, and these small preparation steps are what allow the beauty of the floral pattern to truly shine without distractions from misaligned seams.
Lastly, check your seam allowance before you start the main assembly. The Back Porch Blooms quilt block – Pattern is designed for a scant 1/4-inch seam. You can test this by sewing three 2.5-inch squares together; the middle square should measure exactly 2 inches wide after pressing. If it doesn’t, adjust your needle position or your guide. This calibration step ensures that when you finally join your “bloom” to its “leaves,” the transition is seamless and the quilt block remains the correct size.
The assembly of the Back Porch Blooms quilt block – Pattern usually begins from the center and works outward. The center of the bloom is the focal point, and it often consists of a single bold square or a tiny four-patch unit. As you sew the first round of petals to the center, focus on keeping your seams flat. Use a “dry” iron (no steam) at first to prevent the fabric from stretching, pressing toward the darker fabric whenever possible to keep the quilt top looking clean and crisp.
As you add the outer layers of the Back Porch Blooms quilt block – Pattern, you will start to see the flower take shape. This is where the “petals” begin to extend toward the corners of the block. If your pattern uses flying geese units for the petals, make sure you are not cutting off the “nose” of the goose. Leaving that small 1/4-inch space above the point ensures that when you sew the blocks together, the tips of your flowers don’t disappear into the seam allowance.
One of the most satisfying parts of the Back Porch Blooms quilt block – Pattern is seeing the secondary patterns emerge. Depending on how you rotate your blocks, the “leaves” of one block might meet the “leaves” of another, creating a lattice effect that mimics a garden trellis. Pay close attention to the block orientation during this stage. It can be helpful to keep a photo of the finished pattern nearby to ensure you are following the intended layout and not accidentally flipping any units.
For those who want to add a bit of “flair” to their Back Porch Blooms quilt block – Pattern, you can incorporate applique techniques for the very center of the flower. A small circle of fabric appliqued onto the center square can represent the heart of a sunflower or a daisy. This adds a lovely 3D texture to the quilt and allows for even more customization. Whether you use a machine blanket stitch or a hand-sewn needle-turn method, it enhances the artisan quality of the piece.
As you complete each section of the Back Porch Blooms quilt block – Pattern, give it a good press. Flat blocks are much easier to join than those with “hills and valleys.” If you find that the center of your block is getting too thick with seams, try “spinning” the seams at the intersections. This involves opening the stitches just a tiny bit at the very center so the seam allowances can lay in a circular pattern, significantly reducing bulk and making the quilt quilting process much smoother later on.
The final step of the block assembly is adding the leaf units to the corners. In the Back Porch Blooms quilt block – Pattern, these green units provide the necessary “frame” for the flower. Ensure the green fabric you chose has enough contrast with the background so the leaves are distinct. Once these are attached, your Back Porch Bloom is complete! You should now have a perfectly square, 12-inch (or specified size) block that is ready to be incorporated into your larger quilt design.
Once you have created enough blocks using the Back Porch Blooms quilt block – Pattern, it is time for the “grand reveal” on your design wall. This is the moment where you decide on the final arrangement. You can set the blocks in a straight grid for a traditional look, or “on point” (tilted 45 degrees) for a more dynamic and modern appearance. The Back Porch Blooms pattern is very forgiving and looks beautiful in almost any configuration, allowing for maximum creative freedom.
Sashing is an optional but highly recommended addition for the Back Porch Blooms quilt block – Pattern. Adding thin strips of fabric between the blocks acts like a frame for each individual flower, preventing the prints from “bleeding” into each other. You can even add small “cornerstones” (squares at the intersections of the sashing) in a contrasting color to mimic the look of garden stepping stones. This extra detail elevates the quilt aesthetics and makes it look like a high-end designer piece.
When it comes to the actual quilting of the Back Porch Blooms quilt block – Pattern, you have several options. A “free-motion” quilting design that follows the shape of the petals can make the flowers look like they are popping off the fabric. Alternatively, a simple “echo” quilting—where you sew lines a quarter-inch away from the seams—highlights the geometric construction of the block. If you want a more rustic feel, hand-quilting with a thicker thread can add a beautiful, vintage charm to the finished project.
The choice of batting is also important for the Back Porch Blooms quilt block – Pattern. If you want a flat, modern look, a 100% cotton batting is best. If you prefer a “puffy” look that emphasizes the texture of the blooms, a wool or polyester blend batting will provide more loft. Consider how the quilt will be used; a wall hanging might benefit from a stiffer batting, while a cozy throw for the porch should be as soft and drapable as possible to ensure maximum comfort.
Don’t forget the “Back Porch” part of the theme when choosing your backing! A soft flannel or a wide-back floral print can make the underside of the quilt just as beautiful as the top. When you are finishing a project as detailed as the Back Porch Blooms quilt block – Pattern, the backing is the final opportunity to add a “secret” pop of color or a fun pattern that only the user will see. It’s like a hidden garden waiting to be discovered on the reverse side of the quilt.
Finally, label your work. Every quilt made from the Back Porch Blooms quilt block – Pattern is a labor of love and a piece of history. Include your name, the date, and the location where it was made on a small fabric label sewn into the corner. Years from now, someone will look at those blooming stars and appreciate the time and artistry you put into every stitch. Your quilt is now ready to be used, loved, and perhaps even passed down as a cherished family heirloom.
Is the Back Porch Blooms quilt block – Pattern beginner-friendly?
Yes, it is! While it looks intricate, the Back Porch Blooms quilt block – Pattern is built using basic units like squares and triangles. If you can sew a straight line and follow a cutting guide, you can successfully complete this block.
What size is the standard block for this pattern?
The standard size is usually a 12.5-inch unfinished block (which becomes 12 inches when sewn into the quilt), but the Back Porch Blooms quilt block – Pattern can easily be scaled up to 18 inches or down to 6 inches depending on your needs.
How much fabric do I need for a single block?
For a single 12-inch block, you generally need about 1/4 yard of background fabric and small scraps (or fat eighths) for the petals, center, and leaves. It is a fantastic scrap-busting project!
Can I use solid fabrics instead of florals?
Absolutely! Using solid colors with the Back Porch Blooms quilt block – Pattern creates a very modern, graphic look that highlights the “flower” shape through shadow and light rather than print.
Do I need any special tools for the flower centers?
No special tools are required for the standard pattern. However, if you choose the applique center option, a circle template or a compass can help you get a perfectly round shape for your bloom’s heart.
How do I prevent the corners from becoming too bulky?
The best way to manage bulk in the Back Porch Blooms quilt block – Pattern is to press your seams open or “spin” the intersections. Using a thin, high-quality thread also helps the seams lay flatter.
In this article, we have explored the delightful journey of creating the Back Porch Blooms quilt block – Pattern, a design that perfectly captures the serenity of a garden in bloom. We discussed the importance of choosing a high-contrast fabric palette, the necessity of precision cutting and preparation, and the step-by-step assembly of the floral units. We also touched upon the final layout and quilting choices that can turn a collection of blocks into a cohesive masterpiece.
This pattern is more than just a sewing project; it is an invitation to slow down and appreciate the small, beautiful details that make quilting such a rewarding craft. Whether you are a seasoned expert or a curious beginner, this block offers a wonderful opportunity to grow your skills and create something truly spectacular.


