
Bird-shaped Pincushion - Pattern

The Boardwalk Quilt – Pattern is a breath of fresh air for textile enthusiasts, capturing the rhythmic beauty and relaxed atmosphere of a coastal stroll right within the fibers of a blanket. This specific design is widely celebrated for its clean lines and the way it utilizes long, parallel strips to create a sense of movement and perspective, much like the wooden planks of a real seaside walkway. If you have been searching for a project that balances modern minimalism with traditional warmth, mastering this pattern is an excellent way to broaden your quilting horizons and create a piece that feels both architectural and cozy.
When you decide to embark on a journey with the Boardwalk Quilt – Pattern, you are choosing a design that prioritizes visual flow and structural integrity. The layout typically relies on varying widths of fabric strips, often arranged in a way that draws the eye toward a central point or across a wide horizon. It is a fantastic choice for those who love playing with “solids” or “near-solids,” as the lack of complex curves allows the quality of the fabric and the precision of the stitching to take center stage. Because of its linear nature, it is also a very forgiving project for those who are still perfecting their ability to match points and intersections.
In the following sections, we will explore the nuances that make the Boardwalk Quilt – Pattern a standout choice for contemporary homes. We will discuss the essential materials needed to bring this coastal vision to life, the technical steps required for a flawless finish, and the creative ways you can personalize the design to fit your unique aesthetic. By understanding the logic behind the layout and the importance of color placement, you will be able to transform a simple stack of fabric into a sophisticated work of art that tells a story of serenity and craftsmanship.
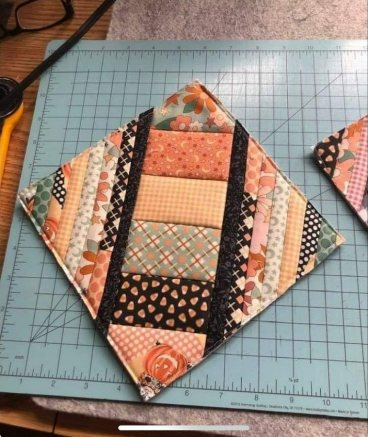
The brilliance of the Boardwalk Quilt – Pattern lies in its geometric simplicity, which mimics the sturdy and repetitive nature of boardwalk planks. To start this project, you must first understand the concept of strip piecing, which is the primary method used to build the quilt’s “planks.” This technique involves sewing long lengths of fabric together before cutting them into smaller segments, which significantly reduces the time spent at the sewing machine. It ensures that your lines remain perfectly parallel, creating that iconic linear look that defines the pattern.
When choosing fabrics for your Boardwalk Quilt – Pattern, it is helpful to think about the “texture” of the oceanfront. Designers often recommend a palette of sandy beiges, weathered grays, and deep navy blues to evoke the feeling of a pier over the Atlantic. However, you can also take a bold approach by using vibrant, tropical colors to simulate a neon-lit boardwalk at night. The versatility of the design means that the fabric selection completely dictates the “mood” of the finished product, allowing for endless customization.
Accuracy in your seam allowance is perhaps the most critical technical aspect of this pattern. Because the design relies on long, straight lines, even a tiny mistake in the width of your seams can lead to a “bowing” effect across the quilt top. To prevent this, many experienced quilters use a specialized quarter-inch foot and frequently check their measurements with a high-quality ruler. Consistency is what keeps the “planks” of your boardwalk looking straight and professional rather than crooked or wavy.
The Boardwalk Quilt – Pattern also offers a great opportunity to practice your rotary cutting skills. Since you will be working with many long strips, having a sharp blade and a steady hand is essential. Many modern patterns provide a “cutting map” to help you maximize your fabric usage and minimize waste. Taking the time to prep your fabric with a light starch can also help keep the long edges from stretching or distorting during the cutting and sewing phases of the project.
Another fascinating element of the Boardwalk Quilt – Pattern is the use of negative space. Unlike busy traditional patterns where every inch is covered in print, this design often incorporates wide areas of a single background color. This “breathing room” allows the eye to appreciate the individual strips and the overall geometry of the quilt. It also provides a wonderful canvas for the final quilting stage, where you can add intricate stitching patterns that contrast with the straight lines of the piecing.
Finally, the Boardwalk Quilt – Pattern is highly adaptable in terms of size. You can easily turn this into a baby quilt by using narrower strips and fewer rows, or scale it up to a king-sized bedspread by increasing the length and number of the “planks.” Because the logic of the construction is repetitive, it becomes a meditative process once you get into the rhythm. It is a project that grows with you, offering a sense of accomplishment as each new section of the boardwalk is “laid” down.
The visual impact of the Boardwalk Quilt – Pattern depends heavily on how you manage color value. Value refers to how light or dark a color is, regardless of the actual hue. To make the “planks” of your quilt look like they have depth and dimension, you should arrange your strips from darkest to lightest. This creates an ombre effect that simulates the way light hits a wooden surface, giving your quilt a three-dimensional quality that is truly captivating to look at.
In a Boardwalk Quilt – Pattern, you can also play with focal points. By placing a single, bright “accent” strip among more muted tones, you create a point of interest that breaks up the repetition. This is a common technique in modern quilting, where a “pop” of neon yellow or hot pink can modernize a traditional layout. It draws the viewer’s eye into the design and adds a layer of sophistication that makes the quilt feel like a piece of contemporary gallery art.
Understanding the “direction” of the print is also important when working with the Boardwalk Quilt – Pattern. If you are using patterned fabrics instead of solids, you need to decide if the motifs should all face the same way. For a coastal theme, directional prints featuring waves, anchors, or beach huts need to be oriented correctly so they don’t appear upside down in the final assembly. This requires a bit of extra planning during the cutting phase but results in a much more polished look.
Many quilters enjoy using gradient fabrics or “jelly rolls” for this specific pattern. A jelly roll is a pre-cut bundle of 2.5-inch strips that are already color-coordinated. Using these for a Boardwalk Quilt – Pattern takes the guesswork out of color matching and ensures that all your strips are perfectly uniform in width. It is a fantastic shortcut for those who want to jump straight into the sewing without spending hours at the cutting mat.
The background fabric, often referred to as the background neutral, acts as the “sand” or the “sky” around your boardwalk. Choosing a high-quality Kona cotton or a linen-cotton blend can add a luxurious feel to the quilt. The weight of the background fabric should match the weight of your strips to ensure that the quilt hangs evenly. If the background is too light, the seams of the darker strips might show through, so always do a “transparency test” before you start sewing.
Don’t be afraid to experiment with asymmetry in your Boardwalk Quilt – Pattern. While many choose to center their design, shifting the “boardwalk” to one side can create a more modern, edgy feel. This approach is very popular in the “Modern Quilt” movement and works particularly well for wall hangings. It challenges the traditional notions of quilt symmetry and allows you to express your individual artistic voice through the medium of fabric and thread.
To achieve the best results with the Boardwalk Quilt – Pattern, you need to have a well-organized workspace. A large cutting mat is indispensable, as it allows you to lay out your long strips without having to shift the fabric constantly. Similarly, a long acrylic ruler (at least 24 inches) will help you make those long, continuous cuts with confidence. Having the right tools from the start prevents frustration and ensures that your pieces fit together perfectly.
The pressing process is where the magic really happens in a Boardwalk Quilt – Pattern. You should always press your seams toward the darker fabric to prevent a “shadow” from appearing under the lighter strips. Many professionals recommend “nesting” the seams where the planks meet the background, which reduces bulk and makes the quilt lay perfectly flat. Using a tailor’s clapper can help you achieve those ultra-flat seams that are the hallmark of a high-quality handmade quilt.
When it comes to the actual sewing, using a walking foot can be a game-changer for the Boardwalk Quilt – Pattern. A walking foot ensures that the top and bottom layers of fabric move through the machine at the exact same speed. This prevents the “shifting” that often occurs with long seams, which can cause the end of your strips to be uneven. It is a small investment that makes a massive difference in the precision of your final quilt top.
If you find that your strips are stretching as you sew, you might need to adjust your presser foot pressure. Some fabrics, especially those with a looser weave, are prone to “growing” under the needle. By lightening the pressure, you allow the fabric to glide through without being distorted. This is a common troubleshooting step for the Boardwalk Quilt – Pattern, where the length of the seams makes any stretching more apparent than in smaller blocks.
The pinning strategy for this pattern should be “frequent and precise.” While it might be tempting to just “sew and go” on long straight lines, pinning every few inches ensures that your strips stay aligned from start to finish. For the Boardwalk Quilt – Pattern, use fine glass-headed pins that won’t leave holes in your fabric and can be ironed over if necessary. This extra step ensures that your “planks” don’t shift mid-seam.
Finally, once the top is finished, the squaring up process is vital. Over the course of sewing many long strips, a quilt top can sometimes become slightly skewed. Use your largest square ruler to trim the edges so that the corners are a perfect 90 degrees. This ensures that when you add the binding, the quilt hangs straight on a wall or sits perfectly on a bed. It is the final “quality control” check for your Boardwalk Quilt – Pattern.
Once your Boardwalk Quilt – Pattern top is complete, the quilting itself offers another layer of design potential. For a traditional look, “straight line quilting” that follows the direction of the planks is a popular choice. It reinforces the boardwalk theme and adds a rhythmic texture that is very pleasing to the touch. You can use a contrasting thread color to make the stitches stand out, or a matching thread for a more subtle, textured appearance.
If you want to add a bit of contrast to the straight lines of the Boardwalk Quilt – Pattern, consider a “wavy line” quilting design. This can represent the water lapping against the side of the boardwalk, adding an organic element to the geometric piecing. Most modern sewing machines have a built-in wavy stitch, or you can do it free-motion for a more artisanal, hand-drawn look. This mix of straight and curved lines is very visually stimulating.
The choice of batting will also affect the final look and feel of your Boardwalk Quilt – Pattern. A 100% cotton batting will give the quilt a “crinkly,” vintage look after its first wash, while a polyester or wool batting will provide more “loft” and make the quilted lines pop more significantly. Think about how the quilt will be used; a thinner, more breathable batting is perfect for a summer beach throw, while a thicker one is better for a cozy winter blanket.
For the backing fabric, you can continue the coastal theme with a wide-back fabric featuring a beachy print. Alternatively, using a solid color that matches one of your accent strips can create a “reversible” look that is very practical. Since the Boardwalk Quilt – Pattern is often quite modern, a bold, wide stripe on the back can also look fantastic and complement the linear design of the front.
The binding is the final frame for your masterpiece. For a Boardwalk Quilt – Pattern, a “scrappy binding” made from the leftovers of your strips can tie the whole design together beautifully. Alternatively, a solid black or navy binding creates a crisp, clean edge that makes the colors of the quilt vibrate. Make sure to double-fold your binding for durability, as the edges of a quilt are usually the first parts to show wear and tear.
Lastly, don’t forget to add a quilt label to the back. A label that includes the name of the pattern, your name, the date, and the location provides a wonderful historical record for future generations. For a Boardwalk Quilt – Pattern, you might even include a small embroidered shell or a seaside quote. It is the final touch of love on a project that represents many hours of careful planning and stitching.
1. Is the Boardwalk Quilt – Pattern suitable for absolute beginners?
Yes, it is! Because it primarily uses straight lines and strip piecing, it is a very accessible pattern. It teaches the fundamentals of cutting, sewing a consistent seam, and pressing, which are the building blocks of all quilting projects.
2. How much fabric do I need for a lap-sized Boardwalk Quilt?
Typically, you will need about 3 to 4 yards of fabric for the quilt top, depending on how many different colors you choose. If you are using a jelly roll, one roll is usually enough for a decent-sized lap quilt when combined with some background yardage.
3. Can I use flannel fabric for this pattern?
Absolutely. Flannel makes a very cozy Boardwalk Quilt – Pattern. Just be aware that flannel stretches more than standard quilting cotton, so you may want to use more starch and pins to keep your lines straight.
4. What is the best way to wash a quilt made from this pattern?
Always wash your finished quilt on a cold, gentle cycle with a mild detergent. Using “color catchers” is highly recommended, especially if you have high-contrast colors like navy and white, to prevent any dye from running.
5. How do I make the “planks” look more realistic?
To achieve a realistic wood-look, try to find “grunge” or “mottled” fabrics that have a bit of texture. Avoid flat, solid colors if you want a more rustic, weathered boardwalk appearance.
6. Do I have to quilt in straight lines?
Not at all! While straight lines complement the Boardwalk Quilt – Pattern, you can use any quilting design you like. Swirls, pebbles, or even floral motifs can look stunning and provide a beautiful contrast to the geometric top.
The Boardwalk Quilt – Pattern is more than just a collection of fabric strips; it is an exploration of line, light, and perspective.
In this guide, we have covered the essential foundations of the design, from the importance of strip piecing and color value to the technical tools like the walking foot that ensure a professional result. We have seen how the simple concept of a seaside walkway can be translated into a versatile and modern quilt that fits into any home decor style.
.


