
Bird-shaped Pincushion - Pattern

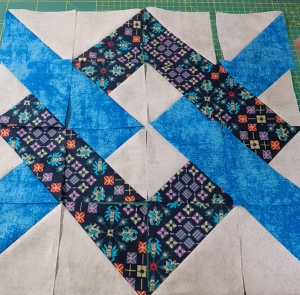
The Braided Heart Patchwork Block – Pattern is one of the most charming and versatile designs in the world of quilting, combining the romantic symbolism of a heart with the intricate visual texture of a braid. This specific patchwork technique allows quilters to play with color gradients and fabric scraps, creating a visual effect that looks far more complex than it actually is to assemble. Whether you are looking to create a Valentine’s Day wall hanging or a sentimental heirloom quilt, mastering the Braided Heart Patchwork Block – Pattern is an excellent way to elevate your sewing skills and produce a stunning piece of textile art.
Crafting a Braided Heart Patchwork Block – Pattern requires a blend of precision cutting and creative fabric selection to ensure the “braid” sections flow seamlessly into the heart shape. For many enthusiasts, the appeal of this quilting pattern lies in its ability to tell a story through fabric choices, utilizing different prints to represent layers of memory or emotion. By following a structured Braided Heart Patchwork Block – Pattern, even intermediate sewists can achieve a professional finish that highlights the delicate intersections of the fabric strips and the overall silhouette of the heart.
As you begin your journey with the Braided Heart Patchwork Block – Pattern, it is essential to understand that organization is just as important as the sewing itself. This quilt block relies on a specific sequence of attachment, often referred to as “flip and sew” or foundation paper piecing, depending on the specific variation of the Braided Heart Patchwork Block – Pattern you choose to follow. In this comprehensive guide, we will explore the essential components, the step-by-step construction, and the best practices for ensuring your quilted heart looks perfect from every angle.

The foundation of a successful Braided Heart Patchwork Block – Pattern begins with understanding the geometry behind the design. Unlike standard squares, this patchwork block utilizes diagonal lines to simulate a woven or braided appearance, which gives the heart a dynamic sense of movement. Using a Braided Heart Patchwork Block – Pattern ensures that your angles remain consistent, preventing the heart from looking lopsided or distorted after the final pressing.
When selecting materials for your Braided Heart Patchwork Block – Pattern, consider the contrast between the heart itself and the background fabric. Most quilters prefer using a solid or low-volume fabric for the background to make the braided heart pop. The “braid” sections are typically made from fabric strips of varying widths, and the Braided Heart Patchwork Block – Pattern will dictate exactly how many pieces of each color you need to achieve the desired gradient or scrappy look.
Accuracy in cutting is the most critical step when working with any Braided Heart Patchwork Block – Pattern. Because the pieces are joined at angles, even a slight deviation in your seam allowance can cause the block to become skewed. High-quality rotary cutters and clear acrylic rulers are indispensable tools for anyone attempting the Braided Heart Patchwork Block – Pattern, as they allow for the precise measurements required for those sharp, clean points.
The Braided Heart Patchwork Block – Pattern often incorporates a technique known as strip piecing, where long strips are sewn together and then cut into segments. This method saves time and increases the consistency of the braid effect across multiple blocks. If you are a beginner, look for a Braided Heart Patchwork Block – Pattern that includes a 1:1 scale template, as this will help you verify your progress as you add each new layer of fabric to the design.
Ironing is another vital component of the Braided Heart Patchwork Block – Pattern workflow. To keep the block flat and the seams crisp, you should press your seams toward the darker fabric or open them entirely, depending on the instructions in your Braided Heart Patchwork Block – Pattern. Proper pressing prevents “bulkiness” at the intersections, which is especially important when you start joining several Braided Heart Patchwork Block – Pattern units together to form a full quilt top.
Finally, remember that the Braided Heart Patchwork Block – Pattern is highly customizable. While traditional hearts are red or pink, modern quilting trends encourage the use of teals, greys, or even monochromatic palettes. By mastering the core Braided Heart Patchwork Block – Pattern, you gain the freedom to experiment with different aesthetics, making each project a unique reflection of your personal style and creative vision.
To achieve the best results with your Braided Heart Patchwork Block – Pattern, you must start with high-quality 100% cotton fabric. This type of fabric is preferred in patchwork because it holds its shape well, doesn’t slip during sewing, and takes a crisp crease when pressed. Before you cut into your beautiful stash, ensure that your fabric is pre-washed if you worry about shrinkage, or starch it heavily to give it the stability needed for the Braided Heart Patchwork Block – Pattern.
Your tool kit for the Braided Heart Patchwork Block – Pattern should include a reliable sewing machine with a quarter-inch foot. The 1/4-inch seam allowance is the industry standard for quilting, and it is the secret to making sure all the pieces of your Braided Heart Patchwork Block – Pattern fit together like a perfect puzzle. Without this consistent margin, the points of your heart might disappear into the seams, losing the distinct “braid” look.
In addition to the fabric and machine, you will need a sharp seam ripper, as even the most experienced quilters make mistakes when following a Braided Heart Patchwork Block – Pattern. Precision is key, and sometimes a strip might be placed at the wrong angle. Having your sewing notions organized and ready will make the process of constructing the Braided Heart Patchwork Block – Pattern much more enjoyable and less stressful.
Thread choice is often overlooked but is essential for the Braided Heart Patchwork Block – Pattern. Use a fine, strong cotton thread in a neutral color like cream, light grey, or tan. These colors tend to blend in with most fabrics, ensuring that your stitches don’t distract from the intricate beauty of the Braided Heart Patchwork Block – Pattern. A 50-weight thread is usually the “sweet spot” for maintaining strength without adding unnecessary bulk to the seams.
Before making your first cut, spend some time “auditioning” your fabrics. Lay out the strips in the order you plan to sew them to see how the colors interact. The Braided Heart Patchwork Block – Pattern relies on color value—the lightness or darkness of a color—to create the 3D braided effect. If all your fabrics are the same value, the braid will disappear; try to mix light, medium, and dark tones for the best result.
Lastly, make sure you have a clean, flat workspace. The Braided Heart Patchwork Block – Pattern involves many small pieces that can easily get lost or mixed up. Using numbered pins or small clips to keep your strips organized according to the Braided Heart Patchwork Block – Pattern instructions will save you a lot of headache during the assembly phase. Preparation is truly 50% of the work in successful patchwork quilting.
The first step in the actual assembly of the Braided Heart Patchwork Block – Pattern is creating the center spine or the “v” shape of the heart. Most patterns suggest starting from the bottom point and working your way up. You will sew small rectangles or strips at 45-degree angles to a center guide line. This diagonal orientation is what creates the “braid” in the Braided Heart Patchwork Block – Pattern, so checking your alignment frequently is paramount.
As you move up the sides of the heart, the Braided Heart Patchwork Block – Pattern will require you to alternate sides—left, then right, then left again. This mirroring technique ensures symmetry. Each time you add a strip, you are essentially building the “lobes” of the heart. It is helpful to use a walking foot if your fabric layers start to shift, though for a single Braided Heart Patchwork Block – Pattern, a standard piecing foot is usually sufficient.
Once the main braided sections are complete, the Braided Heart Patchwork Block – Pattern will instruct you on how to square up the block. This is where the “corners” are added to turn the heart shape into a perfect square. Usually, this involves adding triangle patches to the four corners. This transition from a heart shape to a square block makes it much easier to incorporate the Braided Heart Patchwork Block – Pattern into larger projects like blankets or cushions.
Trimming is a step that requires nerves of steel but is vital for the Braided Heart Patchwork Block – Pattern. Once the background pieces are attached, you will use your square ruler to trim the block to its final size (common sizes include 10″ or 12″ squares). Ensure that you leave a 1/4-inch “buffer” outside the points of the heart so that they don’t get cut off when you sew the Braided Heart Patchwork Block – Pattern to other blocks.
The top of the heart—the two rounded “humps”—is often the trickiest part of the Braided Heart Patchwork Block – Pattern. Some designs use curved piecing, while others use clever diagonal seams to create the illusion of a curve. If your Braided Heart Patchwork Block – Pattern uses the latter, pay close attention to the “snowballing” technique, which involves sewing a small square on the corner and flipping it to create a triangle.
After the block is fully assembled, give it a final “loving” press. Use a bit of fabric sizing or spray starch to give the Braided Heart Patchwork Block – Pattern some stiffness. This makes the finished block look professional and prevents it from stretching out of shape. You now have a completed Braided Heart Patchwork Block – Pattern ready to be showcased or combined with more blocks to create a full-scale quilting masterpiece.
Once you have mastered the basic Braided Heart Patchwork Block – Pattern, you can start experimenting with advanced variations. For instance, you could try a “Scrappy Braid” where every single strip is a different fabric. This turns the Braided Heart Patchwork Block – Pattern into a vibrant, eclectic piece that is perfect for using up your smallest fabric scraps. It’s a sustainable way to quilt while creating something visually stunning.
Another variation is the “Ombre Heart,” where you choose fabrics that transition from a dark shade at the bottom of the heart to a very light shade at the top. This gives the Braided Heart Patchwork Block – Pattern a glowing, luminous effect. To pull this off, you’ll need a wide range of fabric values within the same color family, which can be found in fat quarter bundles or “jelly rolls” specifically curated for ombre quilting.
For those who enjoy a challenge, consider shrinking the Braided Heart Patchwork Block – Pattern to create miniature blocks. Miniature quilting is a popular trend that requires extreme precision but results in adorable projects like pincushions or mug rugs. Reducing the size of the Braided Heart Patchwork Block – Pattern means working with 1/2-inch or 1-inch strips, which is a great way to test your patience and your machine’s accuracy.
You can also incorporate embroidery or applique into your Braided Heart Patchwork Block – Pattern. Adding a name or a date in the center of the heart transforms the block into a personalized gift for a wedding or a new baby. Some quilters even add fussy-cut fabrics—where a specific image from the fabric, like a flower or a bird, is centered within the braid—to add an extra layer of detail to the Braided Heart Patchwork Block – Pattern.
Don’t forget about the quilting design that goes over the block. Once your Braided Heart Patchwork Block – Pattern is finished and made into a quilt sandwich, you can use “echo quilting” to follow the shape of the heart. This stitching emphasizes the braid and makes the heart the undisputed star of the show. Free-motion quilting feathers or swirls around the heart can also add a touch of elegance to the final piece.
Finally, think about the layout. You don’t have to sew all your Braided Heart Patchwork Block – Pattern units in straight rows. Try rotating them or separating them with sashing and cornerstones. Using the Braided Heart Patchwork Block – Pattern as a center medallion surrounded by simpler blocks is another way to create a high-impact design without having to make dozens of complex braided hearts. The possibilities are truly endless when you have a solid quilting pattern as your guide.
1. Is the Braided Heart Patchwork Block – Pattern suitable for beginners? Yes, but it requires patience. While the concept of sewing strips is simple, the diagonal angles and alignment require careful attention. If you are a beginner, it is recommended to start with a larger version of the Braided Heart Patchwork Block – Pattern before attempting a miniature one.
2. What is the best fabric for this pattern? High-quality quilting cotton is the best choice. It is easy to handle, doesn’t stretch excessively, and comes in a massive variety of colors and prints, which is perfect for the Braided Heart Patchwork Block – Pattern.
3. Can I use a Jelly Roll for this pattern? Absolutely! A Jelly Roll (pre-cut 2.5-inch strips) is actually perfect for the Braided Heart Patchwork Block – Pattern as it saves you a significant amount of cutting time and provides a coordinated color palette.
4. How do I make the “braid” look more defined? The secret is contrast. Use fabrics that have different values (light, medium, and dark). If the fabrics are too similar in color and brightness, the “woven” look of the Braided Heart Patchwork Block – Pattern will be lost.
5. Do I need a special ruler for the Braided Heart Patchwork Block – Pattern? While a standard acrylic quilting ruler works fine, a 45-degree line on your ruler is very helpful. Some quilters prefer using a “braid ruler” specifically designed for these types of patchwork patterns to speed up the cutting process.
6. Can I wash a quilt made with these blocks? Yes, as long as you used quality cotton and finished the edges properly. It is often recommended to use a “color catcher” sheet in the first wash to prevent dark colors (like red) from bleeding into the lighter sections of your Braided Heart Patchwork Block – Pattern.
In this article, we have explored the intricate and beautiful world of the Braided Heart Patchwork Block – Pattern. We covered everything from the essential materials and preparation steps to the detailed construction process and creative variations.
You’ve learned that while this patchwork pattern looks complex, it is achievable through precise cutting, consistent seam allowances, and thoughtful fabric selection. By mastering the “braid” technique, you can create stunning quilt blocks that serve as the perfect centerpiece for gifts or home decor.


