
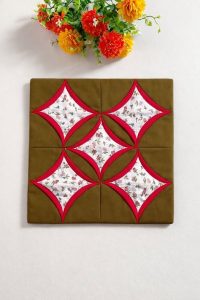
Broken Arrow Quilt - Pattern

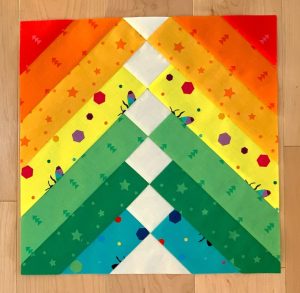
The Broken Arrow Quilt – Pattern is a visually striking and dynamic design that has captured the hearts of traditional and modern quilters alike, offering a unique way to play with movement and direction in textile art. This specific pattern is renowned for its ability to guide the viewer’s eye across the quilt top through a series of geometric “arrows” that appear to break and shift, creating a sense of energy and rhythm. Whether you are aiming for a rustic, Southwestern aesthetic or a bold, minimalist look, mastering the Broken Arrow Quilt – Pattern provides a fantastic opportunity to sharpen your piecing skills while experimenting with high-contrast color palettes.
At its core, the Broken Arrow Quilt – Pattern relies on the clever arrangement of triangles and squares to form its iconic jagged path. Historically, this design has been used to symbolize transitions or paths taken, but in the modern quilting studio, it serves as an excellent canvas for exploring negative space and color gradients. Because the “arrow” units are modular, you can easily scale the Broken Arrow Quilt – Pattern to fit anything from a small wall hanging to a sprawling king-sized bedspread, making it a highly versatile addition to your quilting repertoire.
Throughout this guide, we will explore the technical nuances that make a Broken Arrow Quilt – Pattern successful, from the initial fabric selection to the final quilting stitches. We will focus on techniques that ensure your points remain sharp and your seams align perfectly, which is essential for maintaining the geometric integrity of the arrow shapes. By understanding the underlying structure of the patchwork blocks, you will be able to customize this pattern to reflect your own creative vision. Let us prepare our cutting mats and dive into the fascinating geometry of this timeless quilt design.
The first step in executing a professional Broken Arrow Quilt – Pattern is selecting fabrics that offer strong visual contrast to highlight the arrow shapes. Typically, this pattern uses a “dark” fabric for the arrows and a “light” or neutral fabric for the background, though you can reverse this for a “glow” effect. Choosing high-quality 100% cotton quilting fabric is essential because it has a stable weave that prevents the bias edges of your triangles from stretching during the assembly of your Broken Arrow Quilt – Pattern.
One of the most important terms to understand when starting your Broken Arrow Quilt – Pattern is Color Value. Value refers to how light or dark a color is regardless of its hue; if your arrow fabric and background fabric are too close in value, the “broken” effect of the design will disappear into a muddy mess. To ensure your quilt design pops, try taking a black-and-white photo of your fabric choices; if you can still clearly see the difference between the fabrics, you have chosen a successful color palette for your patchwork project.
Fabric Grain is a technical term that every quilter must respect when working with the Broken Arrow Quilt – Pattern. Because the arrows are formed by many diagonal lines, you will be working with bias edges, which are prone to stretching. Cutting your pieces along the “straight of grain” whenever possible provides the structural stability needed to keep the arrows straight. If you aren’t careful with the grain, your finished Broken Arrow Quilt – Pattern might end up wavy or distorted rather than flat and crisp.
The Cutting List for a Broken Arrow Quilt – Pattern often involves a combination of squares and rectangles that are later transformed into triangles. Using a rotary cutter and a non-slip acrylic ruler is the best way to ensure that every single piece is identical in size. In geometric patterns like this, even an error of one-eighth of an inch can accumulate across the quilt top, leading to misaligned arrows. Precision in the cutting phase is the “secret ingredient” to a stress-free sewing experience.
Another concept to consider is Fussy Cutting, which can add a whimsical touch to your Broken Arrow Quilt – Pattern. This involves centering a specific motif from your fabric—like a small bird or a geometric shape—within the center of one of the arrow units. While it requires more fabric and careful planning, fussy cutting turns a standard geometric quilt into a personalized piece of storytelling. It is a fantastic way to utilize “fame” fabrics or special prints within the structured layout of the broken arrow.
Lastly, we must discuss Fabric Pre-shrinking. While many modern quilters skip this step, it can be beneficial for the Broken Arrow Quilt – Pattern if you are using high-contrast colors like navy blue and white. Pre-washing your fabrics ensures that they won’t “bleed” or shrink at different rates after the quilt is finished. This protects the crisp lines of your arrow blocks and ensures that the white background remains pristine throughout the life of the handmade quilt.
The architectural strength of the Broken Arrow Quilt – Pattern lies in the Half-Square Triangle (HST), a basic unit made by sewing two triangles together to form a square. Most of the “breaks” in the arrow are achieved by rotating these HST units in different directions. Mastering the “Eight-at-a-Time” method for making HSTs can significantly speed up the production of your Broken Arrow Quilt – Pattern, allowing you to create all the necessary components for a block in a single sewing session.
Seam Allowance is perhaps the most critical technical term in the assembly of a Broken Arrow Quilt – Pattern. You must use a scant quarter-inch seam to ensure that your points are not “chopped off” when you join the blocks together. A “scant” seam is just a thread’s width narrower than a true quarter-inch, which accounts for the space the fabric takes when it folds over. This tiny adjustment is what allows the points of your arrows to meet perfectly at the intersections of your quilt top.
The term Nesting Seams refers to the technique of pressing your seam allowances in opposite directions so that they “lock” together when you sew two units. In a Broken Arrow Quilt – Pattern, where many seams meet at a single point, nesting is essential for reducing bulk and ensuring alignment. When your seams nest correctly, the sewing machine can glide over the intersections without shifting the fabric, resulting in the sharp, clean lines that characterize a professional Broken Arrow Quilt – Pattern.
As you assemble the rows of your Broken Arrow Quilt – Pattern, you will practice Chain Piecing. This involves feeding your pairs of fabric through the machine one after the other without cutting the thread in between. This not only saves thread and time but also helps you maintain a consistent sewing rhythm, which naturally leads to more accurate seams. For a pattern with as many components as the broken arrow, chain piecing is an indispensable skill for maintaining your sanity and productivity.
Pressing to the Dark Side is a traditional quilting rule that is particularly relevant for the Broken Arrow Quilt – Pattern. By pressing the seam allowance toward the darker fabric (usually the arrow fabric), you ensure that the seam doesn’t show through the lighter background fabric. Flat, well-pressed seams are the foundation of a square quilt block. Using a tailor’s clapper after pressing can help get your seams incredibly flat, which is a pro-tip for anyone aiming for a boutique-quality finish on their Broken Arrow Quilt – Pattern.
Finally, let’s talk about Squaring Up. After you have created your HST units for the Broken Arrow Quilt – Pattern, you must use a square ruler to trim them to the exact size required by the pattern. This removes any minor “wonkiness” and ensures that every sub-unit is a perfect square. If you skip this step, the small errors in each unit will add up, making it impossible to get the final quilt blocks to fit together correctly. Squaring up is the final check-and-balance in your quilting workflow.
The way you arrange your blocks in a Broken Arrow Quilt – Pattern can completely change the visual “vibe” of the project. A Symmetrical Layout creates a sense of order and calm, with all the arrows pointing toward the center or radiating outward. Alternatively, an Exploded Layout uses varying amounts of background fabric between the arrows to make them look like they are floating or flying across the quilt. This flexibility is what makes the Broken Arrow Quilt – Pattern a favorite for modern designers.
Secondary Patterns are an exciting phenomenon that occurs when the “negative space” between your arrows forms a new shape, like a diamond or a star. In a well-planned Broken Arrow Quilt – Pattern, these secondary shapes add a layer of complexity that makes the quilt look much more difficult to make than it actually is. By carefully choosing the color of your sashing (the strips of fabric between blocks), you can either highlight or hide these secondary designs to suit your personal style.
The term Negative Space refers to the background areas of the Broken Arrow Quilt – Pattern where there is no arrow. Modern quilters often use a “modern minimalist” approach by making the arrows very small and the negative space very large. This draws all the attention to the geometric “break” in the arrow and provides a massive canvas for elaborate quilting stitches. Understanding how to balance your arrows with negative space is key to a sophisticated quilt composition.
Directionality is a crucial concept when working with the Broken Arrow Quilt – Pattern. Because the arrows point in specific directions, you have to be very careful when pinning your rows together. It is incredibly easy to accidentally flip an arrow unit upside down, which “breaks” the pattern in an unintentional way. Many quilters use a Design Wall—a large piece of flannel or batting pinned to a wall—to step back and view the entire Broken Arrow Quilt – Pattern layout before any final sewing takes place.
You can also experiment with Color Gradients or “Ombre” effects within your Broken Arrow Quilt – Pattern. By using a light blue for the top arrows and gradually moving to a deep navy for the bottom arrows, you can create a “waterfall” effect. This adds a sense of depth and three-dimensionality to the quilt top, making the geometric shapes feel more organic and fluid. Using a “gradient” of fabrics is a great way to update this classic patchwork pattern for a 21st-century home.
Lastly, consider the Border. A solid border can “contain” the energy of the Broken Arrow Quilt – Pattern, while no border (a “modern finish”) allows the arrows to feel like they are flying off the edges of the bed. Some quilters even use a Pieced Border that incorporates smaller versions of the arrows, creating a recursive design that is truly impressive. The border is the final “frame” for your textile masterpiece, so choose a style that reflects the energy you want the quilt to radiate.
Once your Broken Arrow Quilt – Pattern top is finished, it is time to create the “Quilt Sandwich” by layering the top, the batting, and the backing fabric. The choice of batting (the middle layer) affects the “loft” or fluffiness of the quilt. For a geometric pattern like the Broken Arrow, a low-loft cotton or bamboo batting is often preferred because it allows the sharp lines of the patchwork to remain the primary focus without the “puffiness” of polyester.
Basting is the process of temporarily holding the layers together before the final quilting begins. You can use safety pins or a temporary spray adhesive. For the Broken Arrow Quilt – Pattern, it is essential to baste from the center outward to ensure there are no wrinkles or shifts in the fabric. A well-basted quilt ensures that your quilting stitches remain even and that the back of the quilt looks just as beautiful as the front.
When it comes to the actual quilting stitches, Stitch in the Ditch is a popular choice for the Broken Arrow Quilt – Pattern. This involves sewing directly into the seams of the arrows, which secures the quilt while remaining almost invisible. This technique “pops” the arrow shapes, making them look slightly raised from the background. It is a clean, classic way to finish a geometric quilt that emphasizes the precision of your piecing.
If you want to add more texture, Matchstick Quilting—very close, parallel straight lines—is a stunning modern option for the Broken Arrow Quilt – Pattern. These lines can run parallel to the arrows to emphasize their direction or perpendicular to them to create a “clashing” texture. This type of dense quilting makes the fabric feel more like a tapestry and is perfect for wall hangings or decorative throws where you want a stiff, structured feel.
The Binding is the fabric strip that wraps around the raw edges of your Broken Arrow Quilt – Pattern. Choosing a binding that matches the arrow color creates a “unified” look, while a contrasting binding acts like a bold frame. Most quilters use a double-fold bias binding for durability. Learning how to create “mitered corners” during the binding process is the final step in achieving a professional, competition-ready finish on your handmade quilt.
Finally, don’t forget the Quilt Label. A Broken Arrow Quilt – Pattern is a significant investment of time and creativity, and a label ensures that your work is documented for future generations. Include the name of the pattern, your name, and the date. You can even include a small “story” about why you chose these colors. A label turns a beautiful blanket into a cherished heirloom, marking the successful completion of your Broken Arrow Quilt – Pattern journey.
1. Is the Broken Arrow Quilt – Pattern suitable for a beginner?
It is generally considered an intermediate pattern. While the stitches are straight, the accuracy required for the points and the handling of bias edges can be challenging. However, a patient beginner who uses plenty of starch and pins can certainly succeed with this patchwork design.
2. How much fabric do I need for a lap-sized Broken Arrow Quilt?
For a standard lap quilt (approx. 60″ x 60″), you will typically need about 3 yards of background fabric and 2 yards of contrasting fabric for the arrows. Always check your specific pattern’s fabric requirements before shopping, as sashing and borders can add to these totals.
3. Why are my arrow points getting cut off?
This usually happens because the seam allowance is a true quarter-inch or slightly larger. Switching to a scant quarter-inch and ensuring your needle is exactly in the right position will preserve those sharp tips. Also, make sure you aren’t “squaring up” too aggressively and trimming away the seam allowance.
4. Can I make a “scrappy” Broken Arrow Quilt – Pattern?
Yes! A scrappy broken arrow can look amazing. You can use a different fabric for every single arrow unit while keeping the background consistent. This is a great way to use up your fabric stash while still maintaining the overall geometric structure of the Broken Arrow Quilt – Pattern.
5. What is the best way to handle bias edges in this pattern?
The best defense against stretching is Fabric Starch. Spraying your fabric with a heavy starch before cutting makes the cotton feel like paper, which prevents the diagonal edges from pulling out of shape. Also, avoid “sliding” your iron; always use a pressing motion instead.
6. How do I calculate the size of a Broken Arrow Quilt – Pattern?
Most patterns are based on a standard block size (like 12 inches). To make a larger quilt, you simply add more blocks in rows and columns. For example, a 5×7 grid of 12-inch blocks will give you a 60″ x 84″ quilt. Don’t forget to account for seam allowances when doing your math!
In this article, we have thoroughly explored the dynamic and geometric world of the Broken Arrow Quilt – Pattern. From the vital first steps of selecting high-contrast fabrics with the right color value to the technical precision required for half-square triangles and nesting seams, we have covered the essential skills for success. We also discussed how to play with negative space and directionality to create movement in your layout, and the final professional touches like matchstick quilting and mitered binding. This pattern is a true celebration of the “path” in quilting—a journey from simple fabric pieces to a stunning, energetic work of art.
We hope this guide has inspired you to start your own Broken Arrow Quilt – Pattern today. Whether you are aiming for a traditional heirloom or a bold modern statement piece, the process of piecing these arrows is as rewarding as the final result.


