
Bird-shaped Pincushion - Pattern

The Butterfly Quilt Block- Pattern is a whimsical and enduring design that brings the vibrant beauty of nature into the world of traditional quilting. For generations, quilters have turned to this specific motif to celebrate the coming of spring, the joy of transformation, and the opportunity to use up colorful fabric scraps. This pattern is beloved not just for its symbolic meaning but also for its geometric versatility, allowing the maker to experiment with sharp angles, soft curves, and a kaleidoscopic array of colors that mimic the delicate wings of a butterfly in flight.
Creating a project with a Butterfly Quilt Block- Pattern offers a refreshing break from standard grid-based designs, providing a canvas for high-contrast color play and intricate piecing. Whether you are aiming for a vintage aesthetic using 1930s reproduction prints or a modern look with bold, monochromatic solids, this block adapts to your vision perfectly. The structure of the butterfly wings allows for unique “fussy cutting” opportunities, where specific floral motifs or patterns can be centered to give the illusion of organic texture and movement within the quilt top.
In this comprehensive guide, we are going to explore every facet of the Butterfly Quilt Block- Pattern, from the initial fabric selection to the final assembly techniques that ensure your points stay sharp. We will discuss the differences between pieced wings and appliquéd details, and how to choose the right tools to make the process as seamless as possible. By the time you finish reading, you will have the confidence and inspiration to incorporate this stunning quilt block into your next masterpiece, creating a textile treasure that will be cherished for years to come.
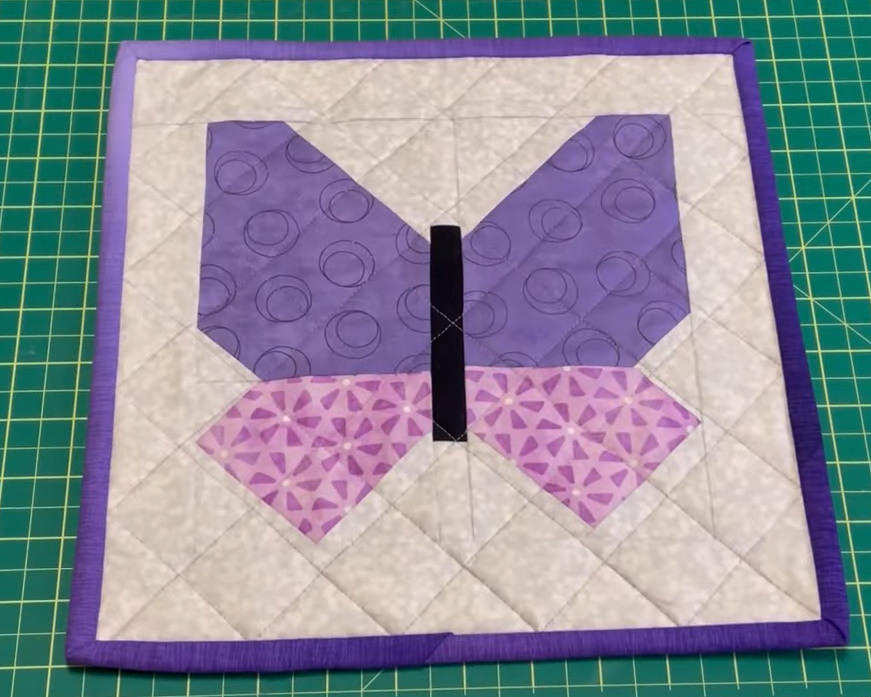
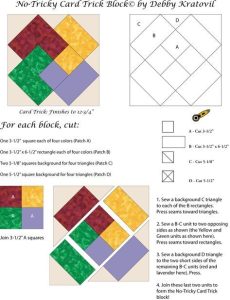
The core appeal of the Butterfly Quilt Block- Pattern lies in its clever use of triangles and squares to create a symmetrical, recognizable silhouette. Most variations of this block rely on half-square triangles (HSTs) to form the outer edges of the wings, giving them their characteristic “lift.” Understanding how these geometric shapes interact is the first step toward mastering the pattern, as it requires a keen eye for directional sewing to ensure the wings mirror each other perfectly across the central body of the insect.
When working with a Butterfly Quilt Block- Pattern, the body of the butterfly often acts as the anchor for the entire design. This central strip can be a simple solid rectangle, or it can be embellished with embroidery or specialized stitches to represent the antennae and segments. The relationship between the wing size and the body width is crucial; if the body is too wide, the butterfly looks heavy, but if it is too narrow, the block loses its structural integrity during the piecing process.
Accuracy in your seam allowance is particularly important for this block because of the multiple diagonal seams. A standard quarter-inch seam is required to ensure that the “tips” of the butterfly wings don’t get cut off when you join the blocks together. Many professional quilters recommend using a “scant” quarter-inch seam, which accounts for the tiny amount of space the fabric takes up when it is folded over the thread, keeping your Butterfly Quilt Block- Pattern perfectly square.
Fabric value plays a massive role in the success of the Butterfly Quilt Block- Pattern. To make the butterfly stand out, you generally need a background fabric that provides a high level of contrast. Light-colored backgrounds like cream, white, or pale gray are traditional choices, but using a dark “midnight” navy or charcoal can make a bright, colorful butterfly look as though it is glowing. This use of color theory is what transforms a simple pattern into a dramatic work of art.
There are two primary ways to approach the wings in a Butterfly Quilt Block- Pattern: traditional piecing or appliqué. Traditional piecing uses straight-line sewing to create a more stylized, geometric butterfly, which is often easier for those who prefer working with a rotary cutter. Appliqué, on the other hand, allows for more realistic, rounded wings and is perfect for those who enjoy hand-sewing or using a zigzag stitch on their machine to finish the edges of the fabric.
Finally, the scale of your Butterfly Quilt Block- Pattern can change the entire mood of the quilt. Small 6-inch blocks create a delicate, “fluttery” effect when scattered across a quilt top, while a single, massive 24-inch butterfly can serve as a stunning center medallion for a wall hanging. Regardless of the size you choose, maintaining consistent fabric grain while cutting will prevent the wings from stretching out of shape during the assembly phase.
The choice of fabric is the soul of your Butterfly Quilt Block- Pattern. Since butterflies in nature are famous for their intricate patterns, this is the perfect time to use your “fussy cutting” skills. Look for fabrics with small floral prints, dots, or even metallic accents that can be placed strategically on the wings. Using 100% quilting cotton is highly recommended because it holds its shape well and provides the crispness needed for the many points and corners found in this design.
To execute the Butterfly Quilt Block- Pattern with precision, a few specialized tools are incredibly helpful. A rotating cutting mat allows you to trim your half-square triangles without moving the fabric, which reduces the risk of errors. Additionally, a clear acrylic ruler with 45-degree markings is essential for checking the accuracy of your wing angles. These tools ensure that every butterfly in your quilt is a perfect clone of the last, leading to a much more professional finished quilt.
Thread choice might seem secondary, but for the Butterfly Quilt Block- Pattern, it can make or break the design. If you are using the appliqué method, a fine 50-weight or 80-weight silk or cotton thread will help your stitches disappear into the fabric. If you are piecing the block, a strong polyester-core thread will provide the durability needed for a quilt that will be used and washed frequently. Matching the thread color to the background fabric is usually the safest bet for a clean look.
Interfacing or stabilizers can be a lifesaver when working with the small pieces required for a Butterfly Quilt Block- Pattern. If you find that the “points” of your wings are being “eaten” by your sewing machine’s feed dogs, try placing a piece of tissue paper or lightweight tear-away stabilizer under the fabric as you sew. This provides the necessary support to keep the fabric flat and prevents the machine from pulling the corners down into the bobbin area.
Don’t forget the importance of a high-quality iron when making your Butterfly Quilt Block- Pattern. Pressing is not the same as ironing; you should press the iron down firmly and lift it up, rather than sliding it across the fabric. Sliding can stretch the diagonal seams of the wings, resulting in a distorted butterfly. Using a tailor’s clapper after pressing can help keep those bulky seam intersections flat, which is vital when you start quilting the layers together.
Lastly, consider the “body” of the butterfly as an opportunity for customization. Some quilters use narrow velvet ribbons or even leather scraps to add a 3D element to their Butterfly Quilt Block- Pattern. While this makes the quilt less “washable,” it adds an incredible textural dimension for a decorative wall piece. For a more traditional approach, simple satin stitching or a tight zigzag in a dark thread provides a classic, clean finish to the insect’s anatomy.
The journey of assembling a Butterfly Quilt Block- Pattern usually begins with the creation of the wing units. Most patterns will have you start with two contrasting squares of fabric to create your half-square triangles. By sewing a quarter-inch on both sides of a diagonal line and cutting them apart, you get two identical triangles that form the outer slope of the butterfly’s wings. This strip-piecing technique is the most efficient way to ensure all your butterflies have a uniform wingspan.
Once the wing units are ready, you will move on to the central “body” section of the Butterfly Quilt Block- Pattern. This is typically a long, thin rectangle flanked by two background strips. It is helpful to sew the body units together first to create a central column, then attach the wing units to either side. This “columnar” assembly method helps keep the block centered and prevents the butterfly from looking like it is leaning to one side or the other.
A common challenge when sewing the Butterfly Quilt Block- Pattern is keeping the “points” of the wings where they meet the body. To avoid losing these points, always sew with the wing unit on top so you can see exactly where the previous seams intersect. Aim your needle just a hair’s breadth outside the “V” where the seams meet; this will ensure that when you flip the fabric open, the point is perfectly preserved in the seam line.
After the main sections are joined, it is time to address the “corners” of the Butterfly Quilt Block- Pattern. Often, the butterfly doesn’t fill the entire square, so you will need to add background squares to the corners to “square up” the block. This is a critical step because it provides the “air” or “negative space” that allows the butterfly to look like it is floating on the fabric. Consistency in these corner sizes is what allows the blocks to be joined into a cohesive quilt top layout.
For those adding antennae to their Butterfly Quilt Block- Pattern, this is best done after the block is fully pieced but before it is quilted. You can use a fabric marker to trace a delicate curve and then follow it with a tight embroidery stitch like a stem stitch or a backstitch. Some quilters even use small beads for the ends of the antennae, though this should be avoided if the quilt is intended for a small child or a baby.
The final step in assembly is the “squaring up” of the entire Butterfly Quilt Block- Pattern. Use a large square ruler to trim any excess fabric from the edges, ensuring that the butterfly is perfectly centered. If one side is a fraction of an inch larger than the other, the quilt will begin to “wave” or “bow” as you add more rows. A perfectly square block is the foundation of a flat, professional-looking quilt project.
Once you have mastered the basic Butterfly Quilt Block- Pattern, the creative possibilities are endless. One popular variation is the “Wonky Butterfly,” where the wings are intentionally asymmetrical. This gives the quilt a modern, artistic feel and is very forgiving for those who struggle with perfect 45-degree angles. This “improv” style of quilting turns the butterfly motif into something unique and expressive, perfectly suited for contemporary art quilts.
Another sophisticated variation of the Butterfly Quilt Block- Pattern is the “Shadow Butterfly.” This involves using a slightly darker version of the background fabric to create a “shadow” effect behind one side of the wings. It creates a 3D illusion that makes the butterfly appear to be lifting off the surface of the quilt. Achieving this requires careful planning of your fabric values but results in a truly breathtaking visual impact.
When it comes time to quilt the layers together, the Butterfly Quilt Block- Pattern offers several beautiful options. “Stitch-in-the-ditch” is the most common method to emphasize the shape of the wings without adding distracting lines. However, if you want to add more movement, consider a “swirl” or “wind” pattern in the background area. This makes it look as though the butterflies are caught in a gentle breeze, enhancing the natural theme of the design.
For a more intricate look, you can quilt “veins” into the wings of the Butterfly Quilt Block- Pattern. Using a contrasting thread color, you can follow the organic lines found in real butterfly wings, such as those of a Monarch or a Swallowtail. This level of detail turns each block into an individual piece of art and is a great way to practice your free-motion quilting skills on a small, manageable scale.
If you are making a “scrap quilt” with the Butterfly Quilt Block- Pattern, consider using a consistent color for the bodies of all the butterflies, such as a deep black or a rich brown. This “common thread” helps to unify a wide variety of wing fabrics, preventing the quilt from looking too chaotic. It provides a visual anchor that allows the eye to travel across the different colors and patterns of the fabric wings comfortably.
Finally, think about the border of your quilt. A “flying geese” border or a simple solid “frame” can complement the Butterfly Quilt Block- Pattern beautifully. Some quilters even like to have a few butterflies “escape” into the border, breaking the grid and adding a playful, dynamic element to the overall design. This creative “rule-breaking” is what makes the quilting community so vibrant and ensures that your butterfly quilt will be a one-of-a-kind creation.
1. Is the Butterfly Quilt Block- Pattern suitable for beginners?
Yes, it is! While it looks intricate, the pieced version is essentially made of squares and triangles. If you can sew a straight line and match up corners, you can successfully create a butterfly block. Start with a larger block size (12 inches) to make the pieces easier to handle.
2. How much fabric do I need for a single butterfly block?
For a standard 12-inch block, you usually need about a fat eighth of wing fabric and a fat quarter of background fabric. It is a very “scrap-friendly” pattern, so you can often pull the pieces from your leftover fabric bin.
3. Can I make this pattern using a sewing machine, or does it have to be hand-sewn?
The Butterfly Quilt Block- Pattern is most commonly made using a sewing machine for speed and durability. However, the appliqué version is a wonderful choice for those who enjoy the slow, meditative process of hand-sewing.
4. What is the best way to handle the bulky seams where the wings meet?
To reduce bulk, you can “spin” your seams at the intersections or press them open rather than to one side. Using a heavy wooden tailor’s clapper after steaming will also help flatten those thick areas, making the quilting process much easier.
5. How do I choose colors that look like real butterflies?
Look at photos of real butterflies for inspiration! Monarchs use orange and black, Blue Morphos use brilliant shimmery blues, and Swallowtails often feature yellows and blacks. Nature is the best designer for your fabric palette.
6. Can I resize the Butterfly Quilt Block- Pattern?
Absolutely. Because it is based on a grid (often a 3×3 or 4×4 grid), you can scale the individual units up or down. Just remember to recalculate your seam allowances and cutting sizes accordingly to maintain the correct proportions.
The Butterfly Quilt Block- Pattern is a classic design that manages to be both traditional and endlessly adaptable. In this guide, we have explored the geometric foundations of the wings, the essential tools for accuracy, and the assembly techniques that ensure your butterflies look their best. Whether you choose the precision of traditional piecing or the creative freedom of appliqué, this pattern allows you to play with color, texture, and movement in a way few other blocks do.
By mastering the Butterfly Quilt Block- Pattern, you aren’t just making a blanket; you are capturing a sense of wonder and transformation in fabric. We hope these tips and insights have given you the “wings” to start your own project today. The beauty of quilting is that no two butterflies will ever be exactly alike, just like in nature.


