
American-style placemat with a fruit theme - Pattern

Creating a Butterfly Quilt – Pattern is one of the most enchanting projects a textile artist can undertake, offering a perfect blend of symbolic beauty and technical creativity. Butterflies have long been a favorite motif in the quilting world, symbolizing transformation, hope, and the vibrant colors of nature, which makes this specific design a popular choice for nursery decor, spring-themed throws, and personalized gifts. When you begin working on a Butterfly Quilt – Pattern, you aren’t just sewing fabric together; you are capturing the delicate essence of a garden in bloom through the structured art of patchwork and appliqué.
The versatility of the Butterfly Quilt – Pattern is truly remarkable, as it allows for a wide range of artistic interpretations ranging from hyper-realistic biological renderings to whimsical, modern abstractions. For beginners, the pattern provides an excellent opportunity to practice foundational skills like half-square triangles and precise seam alignment, while advanced quilters can use the butterfly’s wings as a canvas for intricate “fussy cutting” or elaborate embroidery. Because each butterfly can be made with different fabric scraps, a Butterfly Quilt – Pattern is also an ideal way to utilize your stash, creating a “scrappy” look that feels both cohesive and energetic.
In this comprehensive guide, we will explore the essential elements that make a Butterfly Quilt – Pattern successful, from choosing the right materials to mastering the assembly of complex wing shapes. We will dive into the technical nuances of various construction methods, such as traditional piecing versus raw-edge appliqué, and provide tips on how to choose a color palette that makes your butterflies appear to take flight. By following these structured steps, you will gain the confidence to create a stunning Butterfly Quilt – Pattern that will be cherished for its artistry and warmth for many years to come.
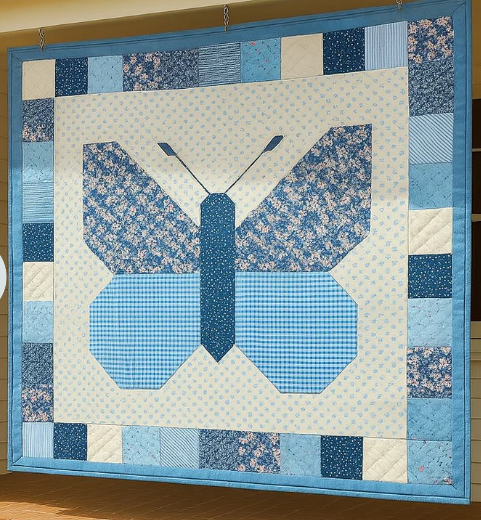
The soul of any Butterfly Quilt – Pattern lies in the fabric selection, as the wings offer a unique opportunity to play with color and “value.” Most experts recommend using high-quality 100% quilting cotton because it holds its shape during the intricate cutting required for the antennae and wing tips. When selecting your palette, consider using “batiks” or hand-dyed fabrics; their mottled textures mimic the natural, organic patterns found on real butterfly wings, adding a layer of realism to your Butterfly Quilt – Pattern that flat solids might lack.
Color “value”—the lightness or darkness of a fabric—is a critical component in making your Butterfly Quilt – Pattern visually striking. To make the butterfly shapes “pop” against the background, you should choose a neutral or contrasting background fabric, such as a crisp white, a soft grey, or even a deep navy blue for a “midnight garden” effect. If the background is too similar in value to the wing fabrics, the delicate silhouette of the butterfly will be lost, so always test your fabric combinations under bright, natural light before you begin cutting.
For the body and antennae of the butterfly in your Butterfly Quilt – Pattern, most quilters opt for solid black or dark charcoal fabrics. This creates a strong structural anchor for the vibrant wings and mimics the biological anatomy of the insect. However, if you are aiming for a more modern or whimsical Butterfly Quilt – Pattern, you can experiment with metallic threads or glitter-infused fabrics for the body. This small touch of sparkle can transform a simple patchwork project into a magical heirloom that catches the light beautifully.
Don’t be afraid to use “directional prints” within your Butterfly Quilt – Pattern, but be mindful of how you cut them. If you have a fabric with a floral or leaf motif, you can “fussy cut” specific elements so they sit symmetrically on both the left and right wings. This attention to detail is what elevates a standard Butterfly Quilt – Pattern into a professional-grade work of art. Using a clear acrylic ruler will help you see the fabric design through the tool, ensuring that your fussy-cut pieces are perfectly centered and aligned.
The scale of the prints is another important factor when following a Butterfly Quilt – Pattern. If your butterfly blocks are small (e.g., 6 inches), using large-scale floral prints might make the design look cluttered and unrecognizable. Instead, choose small-scale prints or “low-volume” fabrics that complement the size of the wing segments. For a larger Butterfly Quilt – Pattern with 12-inch blocks or bigger, you have more freedom to use bold, oversized patterns that showcase the beauty of contemporary textile designs.
Lastly, consider the “weight” of the fabrics if you are mixing different types like linen or silk with your cottons. While a Butterfly Quilt – Pattern can technically be made with mixed media, it is much easier to maintain consistent tension and flat seams if all your fabrics have a similar weight and weave. If you decide to use a thinner fabric for a “shimmer” effect, you may need to apply a light fusible interfacing to the back. This stabilizes the fabric, ensuring your butterfly wings don’t stretch or distort during the assembly of your Butterfly Quilt – Pattern.
When it comes to executing a Butterfly Quilt – Pattern, there are two primary methods: traditional piecing and appliqué. Traditional piecing involves sewing geometric shapes together to form the butterfly, which usually results in a more “pixelated” or modern geometric look. This method is fantastic for quilters who love the precision of Half-Square Triangles (HSTs) and want a pattern that comes together quickly using a sewing machine. It yields a sturdy, flat block that is easy to quilt and very durable for everyday use.
The second popular method for a Butterfly Quilt – Pattern is “Appliqué,” which allows for much more organic and curved wing shapes. In this method, you cut the butterfly wings out of fabric and sew them onto a background square using a blanket stitch, zig-zag stitch, or an invisible hem stitch. Appliqué is the best choice if you want your Butterfly Quilt – Pattern to look more like a painting or a biological illustration, as it removes the constraints of straight-line sewing and allows for intricate, layered wing designs.
For those who want the best of both worlds, a “Foundation Paper Piecing” (FPP) version of the Butterfly Quilt – Pattern is highly recommended. FPP allows for incredible precision with very sharp points and complex angles that would be nearly impossible with standard piecing. By sewing the fabric directly onto a paper guide, you can create a Butterfly Quilt – Pattern with realistic wing veins and slender bodies. This technique is a favorite among intermediate quilters who want to challenge themselves with a more technical and detailed project.
Maintaining a scant quarter-inch seam is vital regardless of which method you choose for your Butterfly Quilt – Pattern. In a design with so many meeting points—such as where the wings meet the body—even a tiny error in seam allowance can cause the block to become “wonky” or lose its symmetry. Using a specialized quilting foot on your sewing machine can help you maintain this consistency, ensuring that every butterfly in your quilt is uniform in size and looks professionally finished once the blocks are joined.
Pressing is the “secret ingredient” to a flawless Butterfly Quilt – Pattern. You should press your seams as you go, usually toward the darker fabric to prevent shadowing. In areas where many seams intersect, such as the center of the butterfly, you might find it helpful to press seams open to reduce the bulk. This makes it much easier to quilt over the blocks later, preventing your sewing machine needle from breaking or skipping stitches on thick “humps” of fabric within the Butterfly Quilt – Pattern assembly.
To add a truly unique touch to your Butterfly Quilt – Pattern, consider “English Paper Piecing” (EPP) for the wings. This hand-sewing technique involves wrapping fabric around paper hexagons or diamonds to create the butterfly shape. While it is the most time-consuming method, it is also the most portable and relaxing. EPP allows you to work on your Butterfly Quilt – Pattern while traveling or watching television, resulting in a quilt that feels incredibly personal and serves as a testament to your patience and craftsmanship.
The layout of your Butterfly Quilt – Pattern can completely change the “story” the quilt tells. A “Grid Layout,” where each butterfly sits inside its own square frame, offers a classic, organized look that is perfect for traditional homes. However, if you want to create a sense of movement, you can use a “Scattered Layout” where the butterflies are at different angles across the quilt top. This makes it look as though a flock of butterflies has just landed on your bed, giving the Butterfly Quilt – Pattern a lively and whimsical energy.
Using “Negative Space” effectively is a hallmark of modern Butterfly Quilt – Pattern design. Negative space refers to the large areas of solid background fabric around the butterflies. By leaving wide margins of background, you give the eye a place to rest and make the colorful butterflies the undisputed stars of the show. This approach also gives you a large canvas for decorative quilting, where you can stitch wind swirls, flower outlines, or geometric patterns that complement the butterfly theme without distracting from it.
Sashing and borders are the “frames” that contain the beauty of your Butterfly Quilt – Pattern. Sashing consists of strips of fabric between the blocks, which can help separate the butterflies and prevent the design from feeling too crowded. Choosing a contrasting sashing color can create a “window-pane” effect, while using the same fabric as the background makes the sashing disappear, allowing the butterflies to float. Your choice here depends on whether you want a structured or an airy feel for your Butterfly Quilt – Pattern.
Incorporating “focal points” into your Butterfly Quilt – Pattern layout can add a professional design touch. You might choose to make one large butterfly the centerpiece of the quilt, surrounded by several smaller ones. This creates a visual hierarchy that guides the viewer’s eye through the piece. This technique is particularly effective for wall hangings or baby quilts where you want to emphasize a specific area of the Butterfly Quilt – Pattern, making it more than just a repeating pattern but a composed artistic statement.
Color flow, or “Color Washing,” is another advanced layout technique for a Butterfly Quilt – Pattern. You can arrange your butterflies so that the colors transition from one side of the quilt to the other—starting with cool blues and greens and ending with warm oranges and reds. This “rainbow” effect is incredibly popular in modern quilting and works beautifully with the butterfly motif. It requires careful planning and a large design wall, but the result is a breathtaking Butterfly Quilt – Pattern that looks like a sunset.
Finally, don’t forget the binding of the quilt, which is the final fabric edge that keeps everything together. For a Butterfly Quilt – Pattern, a “bias binding” in a striped or polka-dot fabric can add a playful, finishing touch. Alternatively, using the same black fabric as the butterfly bodies for the binding can create a sophisticated “frame” that ties all the elements together. The binding is the last thing you see, so choosing a fabric that echoes the colors of your Butterfly Quilt – Pattern is essential for a cohesive finish.
One common challenge when working on a Butterfly Quilt – Pattern is “stretching” on the bias edges of the wings. Because butterfly wings often involve diagonal cuts, the fabric can become unstable and “grow” while you are sewing. To prevent this, try using a bit of fabric starch before cutting your pieces. Starch stiffens the fibers, allowing you to sew those angled seams in your Butterfly Quilt – Pattern with much more control and accuracy, ensuring your butterflies stay perfectly symmetrical.
Another issue many quilters face in a Butterfly Quilt – Pattern is “losing the points” of the wings when joining the blocks. This happens when the seam allowance cuts off the tip of the butterfly’s wing. To avoid this, always look for the “V” where your previous seams meet and sew exactly through the point of that “V.” This precision stitching ensures that your butterfly wings stay sharp and elegant, rather than looking “chopped off” or blunt in the final Butterfly Quilt – Pattern assembly.
Choosing the right quilting design to finish your top is crucial. If you are a beginner, “straight-line quilting” or “matchstick quilting” can look very modern and clean on a Butterfly Quilt – Pattern. However, if you are comfortable with free-motion quilting, you can sew “stipple” patterns that look like fur or “swirls” that mimic the movement of air. Quilting “around” the butterfly shapes (echo quilting) helps them stand out from the background, adding a 3D texture that makes the pattern look more sophisticated.
When it comes to the “quilt sandwich”—the top, the batting, and the backing—make sure you use a high-quality cotton or wool batting. Wool batting is particularly nice for a Butterfly Quilt – Pattern because it has more “loft” and “memory,” meaning the quilted butterflies will look puffier and more defined. The backing fabric should be wide enough to avoid too many seams, and choosing a cat-themed or floral print for the back can add a delightful “hidden” surprise to your finished project.
To ensure your Butterfly Quilt – Pattern lasts for generations, proper care is essential. Always wash your quilt on a gentle cycle with cold water and a mild detergent. Using “color catchers” in the wash is a smart move, especially if you have used bright reds or purples for the wings, as it prevents the dyes from bleeding into your white background. Air drying is the safest method, as it prevents the fibers from becoming brittle and keeps the Butterfly Quilt – Pattern soft and pliable.
Lastly, remember to label your quilt. A Butterfly Quilt – Pattern is a significant investment of time and love, and future owners will want to know who made it. Sew a small fabric label onto the back corner with your name, the date, and the city where it was made. You might even include a small message about why you chose the Butterfly Quilt – Pattern. This simple step transforms your project from a household item into a documented piece of family history that carries your legacy forward.
What is the best size for a Butterfly Quilt – Pattern block?
The most common and manageable size for a butterfly block is 10 inches or 12 inches square. This provides enough space for detail without making the pieces too small to handle. For a baby quilt, you might only need 9 to 12 of these blocks to create a beautiful finished piece.
Can I make a Butterfly Quilt – Pattern using only scraps?
Absolutely! In fact, butterflies are one of the best motifs for “scrappy” quilting. Since real butterflies are so diverse, you can use a different fabric for every single wing. This makes the Butterfly Quilt – Pattern a fantastic “stash-buster” project that looks intentional rather than messy.
What kind of thread should I use for the antennae?
For the antennae and small body details, a 40-weight or 28-weight thread is recommended if you are embroidering them. If you are using a sewing machine, a standard 50-weight cotton thread is fine, but you may want to go over the line twice (triple stitch) to make the antennae more visible.
Is this pattern suitable for someone who has never quilted before?
A simplified, “straight-line” version of a Butterfly Quilt – Pattern is achievable for a persistent beginner. However, if the pattern involves many curves or small paper-pieced segments, it is considered an intermediate project. We recommend starting with a “charm-square” version of the butterfly for your first attempt.
How do I stop the wings from fraying if I use raw-edge appliqué?
If you choose the raw-edge appliqué method for your Butterfly Quilt – Pattern, you must use a high-quality fusible web on the back of the wings before cutting. Once you iron the wings onto the background, use a tight zig-zag or “satin stitch” around the edges to seal the fibers and prevent fraying during washing.
How much fabric do I need for a twin-sized Butterfly Quilt – Pattern?
For a twin-sized quilt (approx. 63″ x 87″), you will typically need about 5 to 6 yards of background fabric and approximately 3 yards of various colored fabrics for the butterflies. Always buy an extra half-yard of background fabric to account for “squaring up” and potential cutting errors.
In this guide, we have explored the artistic and technical journey of creating a Butterfly Quilt – Pattern, from the initial selection of vibrant cotton fabrics to the final stitches of the binding. We have learned that whether you choose the precision of foundation paper piecing or the organic freedom of appliqué, the key to a beautiful quilt lies in the balance of color value and the accuracy of your seam allowances.
We also discussed how to use negative space to make your designs pop and how to properly care for your finished masterpiece so it remains a treasured heirloom. A Butterfly Quilt – Pattern is more than just a blanket; it is a celebration of nature’s beauty and the transformative power of your own creativity.


