
Horizontal Row Quilt - Pattern

If you’re looking for a charming and nostalgic quilt block, this Canning Jar Block Tutorial – Pattern is a delightful addition to your sewing journey. The canning jar motif is beloved by quilters for its homey feel and versatility, making it perfect for kitchen-themed quilts, gifts, or as a fun block in a sampler project.
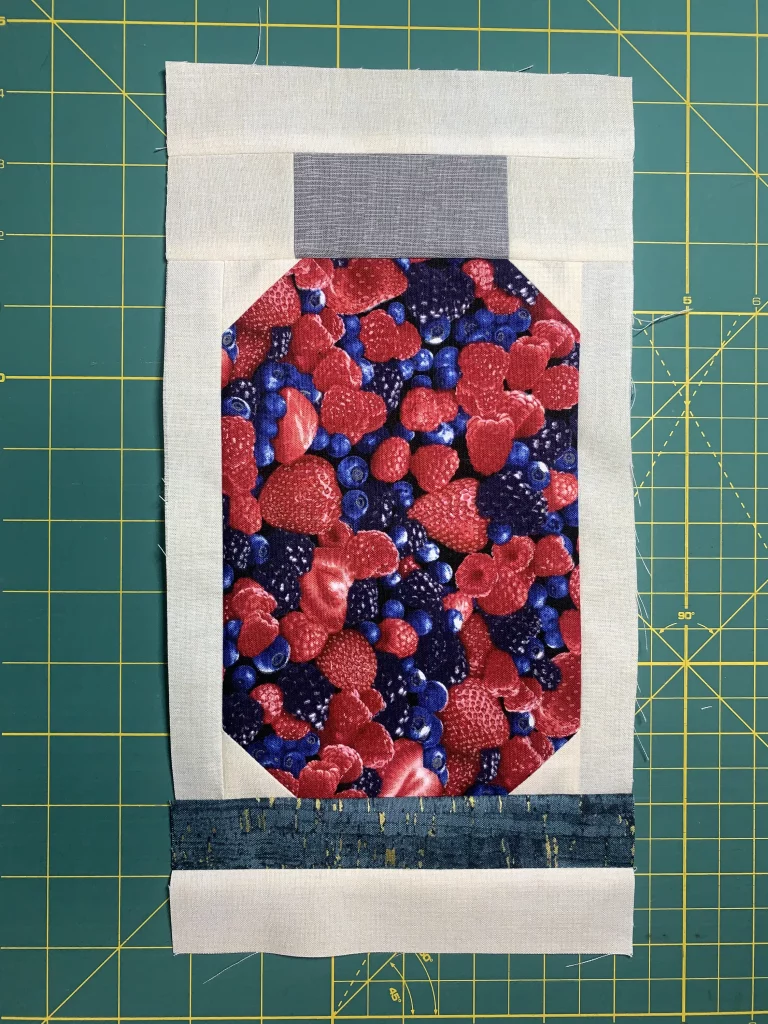
In this tutorial, you’ll learn how to sew a canning jar quilt block that looks just like a real glass jar, complete with a fabric “label” and “lid.” Whether you’re an experienced quilter or just getting started, this pattern is simple, beginner-friendly, and offers endless creative opportunities for fussy cutting, applique, and personalization.
The Canning Jar Block Tutorial – Pattern allows you to feature your favorite fabric prints as “contents” inside the jar — think strawberries, buttons, flowers, or even tiny animals. It’s a fun way to showcase fabric scraps and create a quilt that tells a story. Let’s dive into how to make this adorable block step-by-step.
To start your Canning Jar Block Tutorial – Pattern, you’ll need to choose your fabrics wisely. Because this block mimics the look of a real jar, fabric choice plays a key role in how realistic or whimsical your block will look.
Select a “jar content” fabric. This is the central piece inside the jar that will be the focus. It’s best to use prints with small motifs like fruits, florals, or novelty items. Fussy cutting these prints can help center the design within the block for visual impact.
Next, choose a fabric for the jar lid. Metallic-looking grays or silvers give a realistic lid appearance, while bright colors or gingham can add a fun twist. For the jar glass, a light gray or white solid fabric works well to simulate transparency.
You’ll also need background fabric for the quilt block, usually in a neutral tone such as white, cream, or light blue. This helps the jar design stand out and gives you flexibility when assembling multiple blocks together.
Gather your basic sewing supplies: rotary cutter, ruler, cutting mat, iron, sewing machine, and thread. If you plan to add embellishments, fabric glue, embroidery thread, or applique tools can enhance your finished block.
Prewashing and pressing your fabrics before cutting is recommended, especially if you’re mixing scraps from different fabric lines. This helps reduce shrinkage and makes piecing more accurate.
The Canning Jar Block Tutorial – Pattern can be adapted to different sizes, but a common version finishes at 6.5″ x 8.5″ before seam allowances. You can scale it up or down based on your project needs. Here’s how to piece it step-by-step.
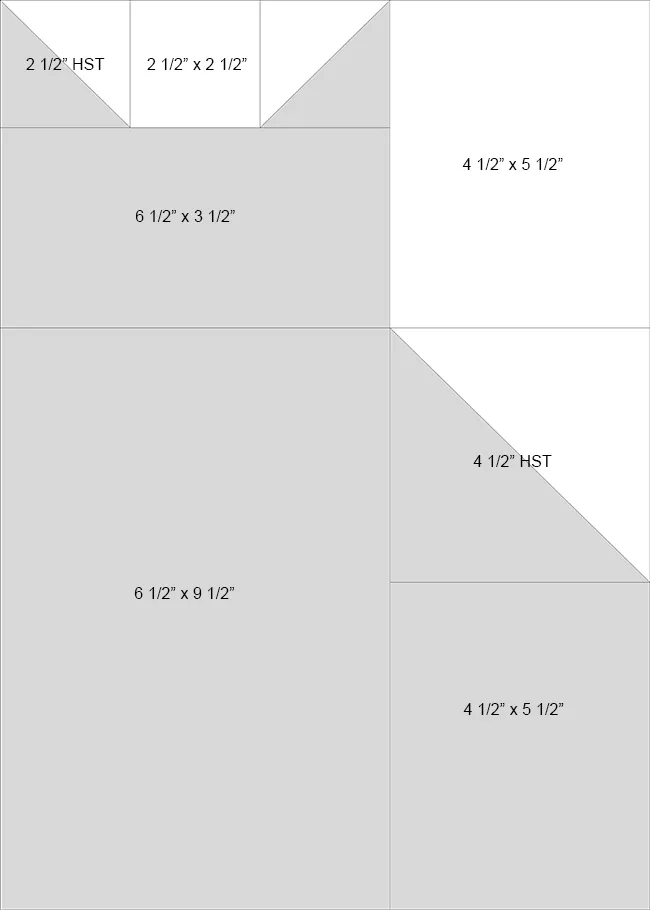
Start by cutting your pieces:
Sew the lid fabric between the two top background pieces. This forms the top strip of the jar block. Press seams open or to the sides, depending on your preference.
Now take the small background squares and place one on each upper corner of the jar content fabric. Using the snowball method, sew diagonally across each corner, trim the excess, and press the corners open to form angled edges.
Sew the lid/top background strip to the top of the jar contents piece. Then add side and bottom background strips to frame the jar. This helps your block blend into the rest of your quilt and gives it a clean, finished look.
Press all your seams well, trim the block if necessary, and square it up to the desired size. This is the foundation of your Canning Jar Block Tutorial – Pattern, ready for embellishment or quilt assembly.
Now that you have a basic Canning Jar Block Tutorial – Pattern, you can start having fun with creative details and personalization. This is where your personality and theme really shine.
Add a label to your jar using a small fabric scrap or hand embroidery. Stitch the word “Jam,” “Pickles,” or even someone’s name onto the jar to create a personalized touch. Labels can be fused with applique or hand sewn for a charming effect.
Use a clear or translucent fabric overlay (like organza) over the jar contents to simulate glass. This adds a clever, dimensional effect to the block and makes it look more realistic.
For added dimension, quilt around the edges of the jar or lid when assembling the final quilt. Stitch-in-the-ditch or echo quilting can help define the jar shape and make it pop on the quilt surface.
You could also turn your canning jar block into a stand-alone project. Make one into a hot pad, potholder, or placemat for a farmhouse-style kitchen accessory. It also works great on tote bags or as a decorative pillow front.
Another fun idea is creating a row of jar blocks with different fabrics in each one to mimic a pantry shelf or fabric stash. Use novelty prints to make the jars look like they’re filled with craft supplies, candy, or nature items.
Because of the block’s simple shapes, kids and beginner sewists can join in too. Try using this Canning Jar Block Tutorial – Pattern as a quilting class project or weekend sewing activity.
With your Canning Jar Block Tutorial – Pattern completed, it’s time to consider how you’ll incorporate it into a finished project. The possibilities are endless!
Sew multiple canning jar blocks together to create a quilt top. Arrange them in rows like a shelf, alternating lid colors or “jar contents” for visual interest. You can add sashing between rows or keep it simple with a modern edge-to-edge layout.
Use your jar blocks to create a table runner or wall hanging. A line of three or five blocks makes a perfect kitchen-themed decoration for your dining space or entryway.
You can alternate jar blocks with plain blocks or coordinating patchwork squares to make a larger quilt. This is a great way to use up scrap fabric and reduce waste while still highlighting your feature blocks.
When finishing the quilt, choose backing and binding fabrics that complement the tone of the jars. A gingham binding adds a country vibe, while bold solids create a modern contrast.
Layer your quilt with batting and backing, then quilt as desired. Quilting around each jar gives dimension, or you can opt for an all-over pattern like swirls, straight lines, or crosshatch.
Finish the quilt with a hand or machine-stitched binding, and don’t forget to label it with your name and the date. Your Canning Jar Block Tutorial – Pattern masterpiece is now complete and ready to enjoy.
Q: What size is the finished canning jar quilt block?
A standard block is 6.5″ x 8.5″ before sewing into a quilt, but you can easily resize it to fit your project.
Q: Can I use fussy cut fabric in the jar section?
Absolutely! Fussy cutting is highly encouraged to showcase cute or themed prints inside the jar.
Q: What’s the easiest way to add a label to the jar?
You can applique a small fabric square or use embroidery to stitch a word or name onto the jar area.
Q: Is this project suitable for beginners?
Yes, it’s very beginner-friendly. The straight seams and small size make it manageable for new quilters.
Q: How do I make the jar lid look metallic?
Use gray or silver-tone fabric, or even metallic fabric if you want a shiny effect.
Q: Can I use this block in a kitchen-themed quilt?
Definitely! This block is perfect for kitchen decor, wall hangings, or gift items like placemats and aprons.
The Canning Jar Block Tutorial – Pattern is a delightful project that blends charm, creativity, and practicality. Whether you’re sewing a few blocks for a quilt or crafting a personalized kitchen decoration, this pattern offers endless room for customization and storytelling.
We’ve covered fabric selection, piecing instructions, embellishment ideas, and creative uses for your finished block. With its nostalgic appeal and versatile design, this block is a great addition to any quilter’s toolbox.
Have you tried making a canning jar quilt block? We’d love to hear how it went! Leave a comment below with your feedback, photos, or suggestions. Your experience might inspire someone else to give it a try. Happy quilting!


