
Bird-shaped Pincushion - Pattern

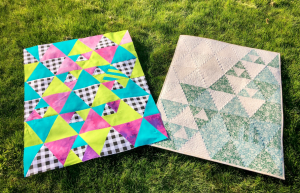
The Catavento Patchwork Block – Pattern is a vibrant and dynamic design that brings a sense of constant motion to any quilting project it graces. Often referred to by its Portuguese name “Catavento,” which translates to “pinwheel” in English, this specific block is a cornerstone of traditional quilting that has found a second life in modern, minimalist designs. The visual appeal of this pattern lies in its sharp angles and the way colors seem to chase one another around a central axis, creating a playful energy that is perfect for nursery quilts, summer throws, or bold wall hangings.
Mastering the Catavento Patchwork Block – Pattern is an essential milestone for any quilter because it teaches the fundamental mechanics of half-square triangles (HSTs) and precise seam alignment. While the finished result looks like it might require complex curved piecing, the “magic” of the Catavento is that it is entirely constructed from straight lines and squares. This makes it an accessible yet deeply satisfying project for makers of all skill levels, providing a canvas to experiment with high-contrast fabrics and secondary patterns that emerge when multiple blocks are joined together.
In this comprehensive guide, we will explore the nuances of the Catavento Patchwork Block – Pattern, diving into everything from fabric selection to the final pressing techniques that ensure your pinwheels spin perfectly. We will break down the mathematical logic behind the blocks and provide troubleshooting tips for those tricky “spinning” centers. By the end of this article, you will have a thorough understanding of how to execute this quilt design with professional precision, allowing you to incorporate this timeless motif into your own unique textile art pieces.
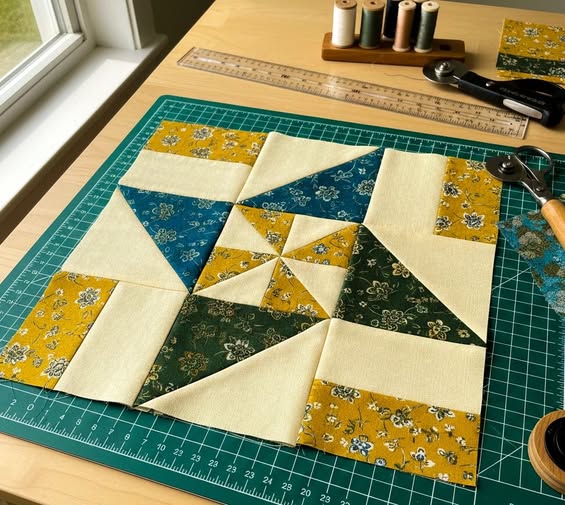
At its most basic level, the Catavento Patchwork Block – Pattern is composed of four half-square triangles arranged in a specific rotation. The geometry relies on the relationship between the hypotenuse of the triangles and the square grid of the quilt top. To achieve that iconic “spinning” look, each triangle must be oriented so that the same color or value always points toward the center in a clockwise or counter-clockwise fashion. This simple rotation is what transforms static shapes into a design that feels alive and moving.
One of the most critical aspects of the Catavento Patchwork Block – Pattern is the “scant” quarter-inch seam. Because you are dealing with diagonal seams, the fabric has a tendency to stretch along the bias. If your seams are even a fraction of a millimeter off, the block will not square up correctly, and the “wings” of your pinwheel will look blunted. Using a specialized quilting foot or a magnetic seam guide can help maintain the exact measurements required to keep the geometry of the block intact and visually sharp.
The visual impact of the Catavento Patchwork Block – Pattern is heavily dependent on “value contrast.” Value refers to how light or dark a fabric is, regardless of its actual color. To make the pinwheel stand out, you typically pair a very light fabric (often called the background) with a medium or dark fabric (the pinwheel itself). If the two fabrics are too similar in value, the “blades” of the catavento will blend into the background, and the illusion of movement will be lost to the viewer’s eye.
Precision cutting is the foundation upon which the Catavento Patchwork Block – Pattern is built. Using a high-quality rotary cutter and an acrylic ruler is essential for ensuring that your initial squares are perfectly sized. Many quilters prefer the “two-at-a-time” method for making the half-square triangles, where you sew two squares together and cut them diagonally. This method minimizes fabric handling and helps prevent the bias edges from stretching, which is the number one cause of wonky pinwheels.
Another geometric secret of the Catavento Patchwork Block – Pattern is the intersection of the points at the very center. For the block to look professional, all four points of the pinwheel blades should meet at a single, crisp point. This requires “nesting” your seams, a technique where you press the seam allowances of adjacent units in opposite directions so they lock together like a puzzle. This mechanical alignment ensures that the center of your patchwork block remains flat and perfectly centered.
Finally, the scale of the Catavento Patchwork Block – Pattern can drastically change the mood of the quilt. Large 12-inch blocks create a bold, graphic statement that works well for modern decor, while tiny 3-inch blocks can create an intricate, mosaic-like effect. Regardless of the size you choose, the mathematical ratio remains constant. Understanding these geometric principles allows you to resize the pattern to fit any project, from a small decorative pillow to a king-sized bedspread.
When choosing materials for your Catavento Patchwork Block – Pattern, the texture and weight of the fabric are just as important as the color. Most experts recommend using 100% quilting cotton because it has a stable weave that doesn’t slip during the sewing process. Cotton also takes a crisp press, which is vital for the sharp angles of a pinwheel. Avoid using stretchy fabrics or heavy upholstery weights, as these will make it nearly impossible to get the points of the catavento to line up.
Color theory plays a massive role in how the Catavento Patchwork Block – Pattern is perceived. If you use a “warm” color like red or orange for the blades and a “cool” color like blue for the background, the pinwheel will appear to “pop” forward toward the viewer. Conversely, using monochromatic shades—such as different tones of gray—can create a sophisticated, architectural look that is perfect for modern interior design. Always consider where the quilt will be used before finalizing your palette.
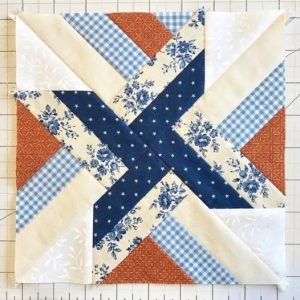
Prints can add another layer of complexity to the Catavento Patchwork Block – Pattern. Small, non-directional prints work best because they don’t distract from the overall shape of the pinwheel. However, if you use a large directional print (like stripes or birds), you must be very careful with how you cut the fabric. If the stripes are going in different directions on each “blade,” it can create a chaotic look that detracts from the clean lines of the catavento design.
Many quilters enjoy using “fat quarters” or “charm packs” to create a scrappy version of the Catavento Patchwork Block – Pattern. A scrappy pinwheel quilt uses a different fabric for every single block, but usually maintains a consistent background color to tie the whole design together. This “organized chaos” is a wonderful way to use up your fabric stash while still producing a quilt that looks intentional and well-balanced. It’s a celebration of color and variety.
Don’t overlook the importance of the “background” fabric in your Catavento Patchwork Block – Pattern. While white or cream is the traditional choice, using a dark background like charcoal or navy can make a bright pinwheel look like it’s glowing. This is often called a “night-sky” effect. Experimenting with textured neutrals, like linen blends or “low-volume” prints (fabrics that look solid from a distance but have subtle patterns), can add a touch of luxury to the finished piece.
Pre-treating your fabrics with fabric starch can be a game-changer when working on the Catavento Patchwork Block – Pattern. Starching the fabric before you cut it makes the cotton stiff and paper-like. This significantly reduces the chance of the fabric stretching on the bias, which is the diagonal grain of the fabric. Since the catavento is made entirely of diagonal seams, keeping the fabric stable is the best way to ensure that your finished blocks are square and your points are sharp.
The actual assembly of the Catavento Patchwork Block – Pattern starts with creating your half-square triangles (HSTs). Once you have sewn your squares and cut them to create triangles, you must press them open. It is generally recommended to press the seam toward the darker fabric. However, for a pinwheel, some quilters prefer to press the seams open to reduce the bulk at the center point where eight layers of fabric will eventually meet.
Once your four HSTs are ready, lay them out on a flat surface in the Catavento Patchwork Block – Pattern formation. It is very easy to accidentally flip one of the triangles, which results in a broken pinwheel rather than a spinning one. Take a moment to verify that the “blades” are all chasing each other. Sewing the block together is typically done in two rows: sew the top two triangles together, then the bottom two, and finally join the two halves.
The “secret sauce” of a perfect Catavento Patchwork Block – Pattern is how you handle the center intersection. To avoid a big, hard lump in the middle of your quilt, you can “spin” the center seams. This involves gently clipping a few stitches in the seam allowance at the very center (within the allowance, not the block itself) so that the seams can be pressed in a circular motion. This creates a tiny “mini-pinwheel” on the back of the block, allowing it to lay perfectly flat.
If your points aren’t meeting exactly, don’t panic. In the Catavento Patchwork Block – Pattern, a common trick is to use “pin-matching.” Insert a fine glass-head pin exactly through the point where the seams should meet on the top piece, and then through the corresponding point on the bottom piece. Keep the pin perfectly vertical as you sew up to it. This mechanical alignment prevents the fabric from shifting under the pressure of the sewing machine’s presser foot.
After the block is fully assembled, “squaring up” is the final quality-control step. Even with perfect sewing, the Catavento Patchwork Block – Pattern can sometimes become slightly distorted. Use a square ruler to trim away any excess fabric, ensuring that the center of the pinwheel is exactly in the center of the square. Be careful not to trim too much; you must leave a quarter-inch of fabric beyond the points so they aren’t “chopped off” when you sew the blocks together.
Consistency is key when making multiple blocks for a larger quilt. If you are creating a “secondary pattern”—where the spaces between the pinwheels create a new shape—every Catavento Patchwork Block – Pattern must be identical in size. Using a “strip-piecing” method where possible, or simply being meticulous with your cutting and seam allowances, will ensure that the final quilt top is flat, square, and ready for the quilting process.
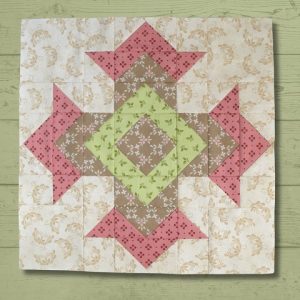
Once you have mastered the basic Catavento Patchwork Block – Pattern, you can begin to play with different layouts to create complex visual effects. One popular variation is the “Double Pinwheel,” where a smaller pinwheel is nested inside a larger one. This requires more intricate piecing but results in a stunning, kaleidoscope-like design that is sure to be a conversation starter. It pushes the boundaries of traditional patchwork into the realm of fine art.
Another way to elevate the Catavento Patchwork Block – Pattern is through the use of “sashing” and “cornerstones.” Sashing is the strips of fabric that act as borders between the blocks. By adding sashing, you isolate each pinwheel, making them stand out like individual portraits. If you use a contrasting color for the cornerstones (the small squares where the sashing intersects), you can create a secondary grid that adds even more movement to the quilt.
The “Off-Center Catavento” is a modern twist on the Catavento Patchwork Block – Pattern. By varying the lengths of the “blades” or placing the center of the pinwheel away from the center of the block, you create a sense of wonky, whimsical motion. This style is very popular in the “Modern Quilt” movement, where traditional rules are intentionally broken to create fresh, unexpected aesthetic results. It’s a great way to show off your personality.
For those who love a challenge, the “Curved Pinwheel” or “Whisper Pinwheel” uses slightly curved seams to give the blades a more organic, petal-like appearance. While this is significantly harder to sew than the standard Catavento Patchwork Block – Pattern, it creates a soft, feminine look that is beautiful for floral-themed quilts. It requires a deep understanding of fabric bias and “ease,” making it a great “graduate-level” project for experienced sewists.
Border treatments can also transform your Catavento Patchwork Block – Pattern. A “pieced border” that uses smaller versions of the pinwheel can create a sense of continuity. Alternatively, a “sawtooth border” echoes the sharp angles of the catavento blades, framing the quilt in a way that reinforces the theme of sharp, geometric precision. The border is the “frame” for your fabric art, so choose it with care to complement the central design.
Finally, consider the role of machine quilting in your design. You can use the quilting stitches to emphasize the motion of the Catavento Patchwork Block – Pattern. Swirling, circular motifs in the background can make the pinwheels look like they are actually spinning in the wind. Or, you can use straight-line “matchstick” quilting to emphasize the sharp, modern lines of the blades. The quilting is the final layer of storytelling in your handmade creation.
1. Is the Catavento Patchwork Block – Pattern suitable for a beginner?
Yes, it is considered a “confident beginner” project. If you have made a basic square quilt before, this is the perfect next step. It introduces half-square triangles and seam nesting, which are essential skills for any quilter to learn.
2. How do I stop my points from getting “cut off” when I join blocks?
The secret is to ensure you have a full quarter-inch of “seam allowance” fabric beyond the point of the triangle. If your point is right at the edge of the fabric before you sew the blocks together, it will disappear into the seam. Always leave that “breathing room” when trimming.
3. Can I make a Catavento Patchwork Block – Pattern without a rotary cutter?
While you can use fabric scissors and a template, a rotary cutter and ruler are highly recommended. The precision required for the triangles to fit together perfectly is much easier to achieve with a blade and a straight-edge guide.
4. Why is my block “puckering” at the center?
Puckering is usually caused by too many seams meeting in one spot. To fix this, try “spinning” your seams as described in the assembly section of this article. This distributes the bulk of the fabric in a circle rather than stacking it all in one thick pile.
5. What is the “best” size for a Catavento block?
The 12-inch block is the industry standard because the math is easy and it covers a lot of area quickly. However, 6-inch blocks are very popular for “baby quilts” as they make the design look more delicate and detailed.
6. How do I choose the right needle for this project?
A “Universal” or “Sharps” needle in size 80/12 is usually perfect for quilting cotton. If you are using very fine cotton, you might drop down to a 70/10 to avoid making large holes in the fabric.
The Catavento Patchwork Block – Pattern is a timeless masterpiece of design that offers infinite possibilities for creativity and skill-building. In this guide, we have explored the geometric foundations of the block, the importance of value contrast in fabric selection, and the technical “pro-tips” like spinning seams and nesting to achieve a flat, professional finish.
Whether you choose a traditional high-contrast palette or a modern, scrappy look, the Catavento remains one of the most rewarding patterns in the quilting world.


