
Bird-shaped Pincushion - Pattern

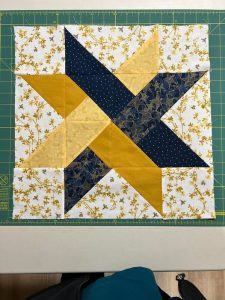
The Chicago Geese Quilt Block- Pattern is a sophisticated and visually arresting design that captures the spirit of traditional American quilting while offering a modern, architectural appeal. This specific block is a captivating variation of the classic Flying Geese motif, rearranged in a way that creates a sense of movement and structured elegance across the fabric. For many quilters, the allure of this pattern lies in its ability to look incredibly complex once assembled into a full quilt top, despite being built from fundamental geometric shapes that even an intermediate enthusiast can master with patience.
Working with the Chicago Geese Quilt Block- Pattern allows you to explore the intersection of precision piecing and creative color play. The “geese” in the design—triangular units that appear to soar in a specific direction—are grouped in a way that mimics the organized yet fluid motion of a flock. Whether you are aiming to create a heritage-style heirloom or a contemporary wall hanging, this pattern serves as a versatile foundation. It challenges the maker to focus on sharp points and consistent seams, which are the hallmarks of high-quality textile craftsmanship.
In this comprehensive exploration of the Chicago Geese Quilt Block- Pattern, we will dissect the technical requirements, the historical charm, and the practical steps needed to bring this design to life. We will look at how color value impacts the final look, the tools that make the process smoother, and the common pitfalls to avoid during the assembly phase. By understanding the underlying logic of this block, you will gain the confidence to manipulate the design to suit your specific aesthetic needs, turning simple yards of cotton into a stunning display of quilt artistry.
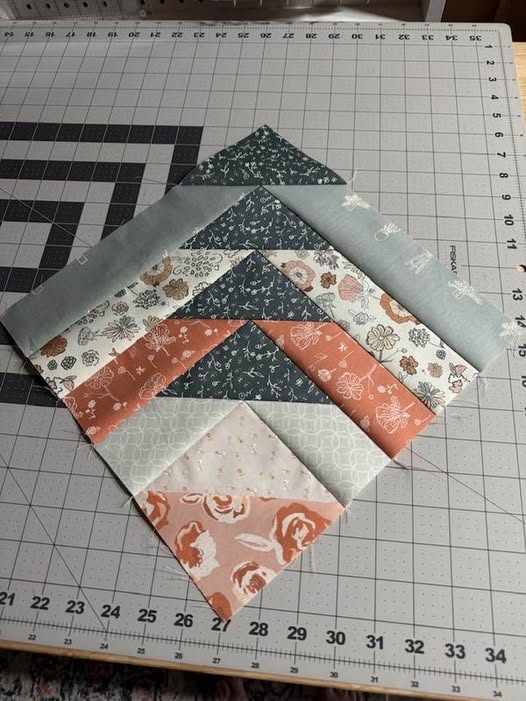
The structural integrity of the Chicago Geese Quilt Block- Pattern begins with the accurate construction of individual “geese” units. Typically, these are made using a large rectangle and two smaller squares, utilizing the “stitch and flip” method to create the triangular appearance. Unlike a standard row of geese, the Chicago variation often incorporates these units into a larger grid, sometimes rotating them to create a diamond or star-like secondary pattern. This requires a keen eye for spatial orientation to ensure every “goose” is flying in the correct direction.
Precision cutting is the most critical factor when preparing for a Chicago Geese Quilt Block- Pattern. Because the block relies on many intersecting diagonal lines, even a 1/16th of an inch error in cutting can multiply across the block, leading to “wonky” edges or blunt points. Using a high-quality rotary cutter and a specialized quilting ruler is essential. Many modern quilters prefer to cut their initial pieces slightly oversized and trim them down to the perfect “unfinished” size to ensure every unit is identical before the final assembly.
The math behind the Chicago Geese Quilt Block- Pattern is based on a specific ratio, usually where the rectangle is twice as long as it is wide. Mastering this ratio allows you to scale the block up for a quick-finish bed quilt or scale it down for a delicate, intricate pillow cover. Understanding the relationship between the “finished” size and the “unfinished” size—which includes the seam allowance—is vital for ensuring that your blocks fit together perfectly without losing the tips of your triangles.
Choosing the right needle and thread can make a subtle but significant difference in your Chicago Geese Quilt Block- Pattern. A fine, 50-weight cotton thread is often recommended because it occupies very little space within the seam. This helps the fabric lay flatter when pressed, which is crucial when you have multiple layers of fabric meeting at a single point. A fresh microtex needle is also a great choice, as its sharp point can pierce through multiple layers of quilting cotton without causing the fabric to pucker or shift.
The “scant quarter-inch seam” is a technique that every fan of the Chicago Geese Quilt Block- Pattern should practice. This involves sewing a seam that is just a hair narrower than a full quarter-inch. This tiny bit of extra room accounts for the space the fabric takes up when it is folded over the seam. Without this adjustment, you might find that your units end up slightly too small, which can cause the points of your “geese” to get cut off when you join the blocks together.
Finally, the Chicago Geese Quilt Block- Pattern thrives on high-contrast fabric choices. To make the “geese” truly stand out, you need a clear distinction between the “sky” (the background fabric) and the “goose” (the triangular fabric). Many quilters use a solid or a very subtle print for the background to let the main colors of the pattern shine. Using a color value scale can help you determine if your chosen fabrics have enough contrast to maintain the visual impact of the design once it is seen from a distance.
When selecting fabrics for your Chicago Geese Quilt Block- Pattern, think about the “temperature” of your colors. Warm colors like reds, oranges, and yellows tend to “advance” or pop forward, while cool colors like blues and greens tend to “recede.” By placing warm-colored geese against a cool-colored background, you create a sense of three-dimensional depth. This color theory application is what transforms a flat piece of fabric into a dynamic work of art that captures the eye’s attention.
The use of “low-volume” prints for the background of a Chicago Geese Quilt Block- Pattern is a popular modern trend. Low-volume fabrics are those that have very subtle, light-colored patterns on a white or cream base. This adds texture and interest to the “negative space” of the quilt without distracting from the geometric precision of the geese. It’s a great way to add a “shabby chic” or contemporary feel to a very traditional geometric quilt block design.
If you are going for a more traditional look with the Chicago Geese Quilt Block- Pattern, consider using Civil War reproduction fabrics or 1930s “feedsack” prints. These fabrics often feature small-scale florals and geometric motifs that lend a sense of history to the project. When using these busy prints, it is even more important to ensure your value contrast is high, so the intricate shapes of the Chicago Geese don’t get lost in a sea of competing patterns.
The Chicago Geese Quilt Block- Pattern is also an excellent candidate for a “scrappy” approach. By using a different fabric for every single goose, you create a vibrant, eclectic quilt that tells a story of your fabric collection. To keep a scrappy quilt from looking chaotic, many designers recommend using a consistent, solid color for all the background pieces. This “unifying background” provides a place for the eye to rest and helps the diverse scrappy units feel like they belong together.
Don’t overlook the importance of fabric grain when working on the Chicago Geese Quilt Block- Pattern. Because the “geese” units involve diagonal seams, you will be dealing with “bias” edges. Bias edges are stretchy and can easily become distorted if handled roughly. Using fabric starch or a stabilizer before cutting can make the fabric more rigid, acting like paper and preventing the triangles from stretching out of shape during the sewing process.
Finally, consider the scale of the prints you choose for your Chicago Geese Quilt Block- Pattern. If your blocks are small (e.g., 6 inches), a large-scale floral print might look unrecognizable once it’s cut into tiny triangles. Smaller, “non-directional” prints or solids are generally easier to work with because you don’t have to worry about the orientation of the pattern. This ensures that the focus remains on the soaring geese rather than on the specific motifs within the fabric itself.
Proper pressing is half the battle when it comes to the Chicago Geese Quilt Block- Pattern. You should never “iron” your blocks—which involves sliding the iron back and forth—as this will almost certainly stretch the bias edges. Instead, you should “press” by lifting the iron and placing it down firmly. Setting your seams with a hot, dry iron before pressing them open or to the side helps to embed the thread into the fabric for a flatter, more professional quilt finish.
In the Chicago Geese Quilt Block- Pattern, deciding which way to press your seams can be a strategic choice. Pressing seams to the side is traditional and makes the seams stronger, while also allowing you to “nest” your seams when joining units together. Nesting seams means having the seam allowances of two joining pieces point in opposite directions, which locks them together and results in perfectly matched corners. This is a vital skill for any patchwork enthusiast.
However, because the Chicago Geese Quilt Block- Pattern often involves many layers of fabric meeting at the points of the geese, some quilters prefer to press their seams open. Pressing open reduces the bulk at the intersections, making it much easier to quilt over later. If you choose to press open, you may want to use a slightly shorter stitch length to ensure the seams remain secure, as they won’t have the extra support of the folded fabric on one side.
Organization is key when assembling a large number of units for a Chicago Geese Quilt Block- Pattern. Many makers use “chain piecing” to speed up the process. This involves sewing one pair of fabrics after another without cutting the thread in between. It creates a long “chain” of units that can then be clipped apart. This method not only saves thread and time but also helps maintain a consistent sewing rhythm, which leads to more uniform blocks.
As you move from individual geese to the full Chicago Geese Quilt Block- Pattern, use plenty of fine pins. Pinning at the “critical intersections”—the spots where the points of the triangles meet—is non-negotiable. You want your needle to pass exactly through the “V” of the previously sewn unit. If you are off by even a few threads, you will “cut off” the point of your goose, which is one of the most common frustrations in precision quilting.
Once your block is fully assembled, it is time for the final “squaring up.” Use a square ruler that is at least as large as your unfinished Chicago Geese Quilt Block- Pattern. Center the ruler on the block, ensuring that the diagonal lines on the ruler align with the seams of your geese. Trim away any excess fabric to ensure the block is perfectly square. This step is the “secret sauce” that ensures your entire quilt top will lay flat and hang straight once it is finished.
The beauty of the Chicago Geese Quilt Block- Pattern is that the block itself is just the beginning; the way you arrange those blocks can create entirely different visual effects. By rotating every other block by 90 degrees, you can create a “weaving” effect that looks like a complicated lattice. This flexibility makes the Chicago variation a favorite for those who enjoy experimental quilt layouts and want to move beyond simple rows and columns.
Adding sashing between your Chicago Geese Quilt Block- Pattern units can also dramatically change the look. Sashing is the strips of fabric that act as a frame for each block. Using a dark, solid sashing can make the blocks look like windows, while no sashing at all allows the “geese” from neighboring blocks to interact, often creating secondary shapes like stars or larger triangles. This interlocking design is one of the most rewarding aspects of the pattern.
Consider the borders when finishing a quilt made from the Chicago Geese Quilt Block- Pattern. A “pieced border” that uses leftover geese units can tie the whole design together and give the quilt a very sophisticated, custom look. Alternatively, a wide, plain border in a contrasting color can provide a calm frame for the “busy” activity happening in the center of the quilt. The border is your chance to balance the visual weight of the project.
The quilting process—the actual stitching that holds the three layers together—should complement the lines of the Chicago Geese Quilt Block- Pattern. “Stitch-in-the-ditch” is a classic choice that emphasizes the geometric shapes, but “echo quilting” (stitching a set distance away from the seams) can add a sense of ripple and movement that mimics the wind under the geese’s wings. This adds a beautiful textural layer to your work.
If you are feeling adventurous, you can use “free-motion quilting” to add organic shapes like swirls or feathers into the background areas of the Chicago Geese Quilt Block- Pattern. This contrast between the rigid, straight lines of the pieced block and the soft, flowing lines of the quilting creates a stunning professional result. Many award-winning quilts use this exact combination of linear piecing and curvilinear quilting.
Finally, the binding is the “frame” of your masterpiece. For a Chicago Geese Quilt Block- Pattern, a striped binding cut on the bias can add a playful, “barber pole” effect to the edge of the quilt. Or, you can use the same fabric as the background for a “limitless” look where the design seems to float. Regardless of your choice, finishing the edges with care ensures that your handcrafted quilt will be durable enough to be used and loved for generations.
1. Is the Chicago Geese Quilt Block- Pattern difficult for beginners?
It is considered an “intermediate” block because of the precision required for the points. However, a beginner who is comfortable with the “stitch and flip” method and is willing to use pins and a rotary cutter can certainly succeed with this pattern.
2. How do I prevent my “geese” points from getting cut off?
The secret is the “scant” quarter-inch seam and checking your intersections. When sewing units together, look for the “X” where your previous seams cross. Your new seam should go exactly through the center of that “X” to keep the point perfectly sharp.
3. What is the best size for a Chicago Geese Quilt Block?
A common size is a 12-inch finished block, as it is large enough to show off the pattern but small enough to be manageable. However, the Chicago Geese Quilt Block- Pattern is mathematically scalable to almost any size.
4. Can I use a charm pack or jelly roll for this pattern?
Yes! Since the block is made of rectangles and squares, pre-cut fabrics like 5-inch charm squares or 2.5-inch jelly roll strips can save you a lot of initial cutting time. Just check the dimensions required by your specific quilt template.
5. Why is my block not perfectly square?
This usually happens due to inaccurate seams or stretching the fabric during pressing. Always use a “pressing” motion (up and down) rather than an “ironing” motion (side to side) to keep the fabric stable.
6. How many colors should I use for a Chicago Geese quilt?
To keep the “geese” effect clear, it’s best to use at least two contrasting colors (one for the geese and one for the background). However, using three or four colors can add more complexity and “rhythm” to the overall design.
In this guide, we have explored the intricate details and creative possibilities of the Chicago Geese Quilt Block- Pattern. We’ve learned that the success of this design relies on the harmony between precision cutting, the “scant” quarter-inch seam, and the strategic use of color value to create depth and movement.
Whether you are following the traditional path or experimenting with scrappy, modern aesthetics, the Chicago Geese offers a rewarding challenge for any quilter looking to sharpen their skills and create a truly dynamic piece of textile art.


