
Horizontal Row Quilt - Pattern

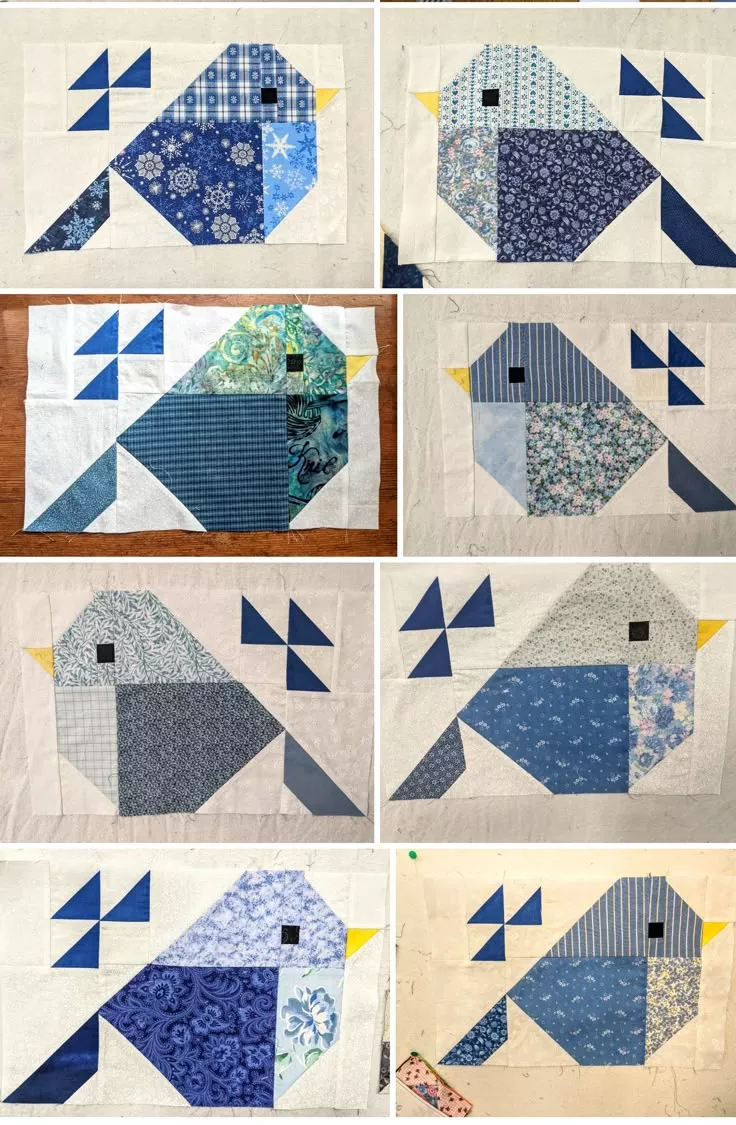
The Chicken Block – Pattern is a delightful and whimsical quilt block design that has captured the hearts of modern and traditional quilters alike. This fun pattern is perfect for farmhouse-style décor, country-themed quilts, or simply for adding a bit of charm and personality to your patchwork projects. Whether you are making a wall hanging, table runner, or a full quilt, the chicken block brings a sense of rustic joy and handmade warmth.
What makes the Chicken Block – Pattern so appealing is its versatility. You can use solids or printed fabrics, incorporate scraps, or make an entire flock of different chickens—each with its own unique flair. This pattern invites creativity while still being accessible to beginners. With simple geometric shapes and easy construction methods, it’s a great way to explore quilting techniques without feeling overwhelmed.
In this article, you’ll find everything you need to know about the Chicken Block – Pattern: design inspiration, fabric choices, step-by-step construction, and customization ideas. Whether you’re new to quilting or a seasoned stitcher, this guide will help you create something both fun and functional.
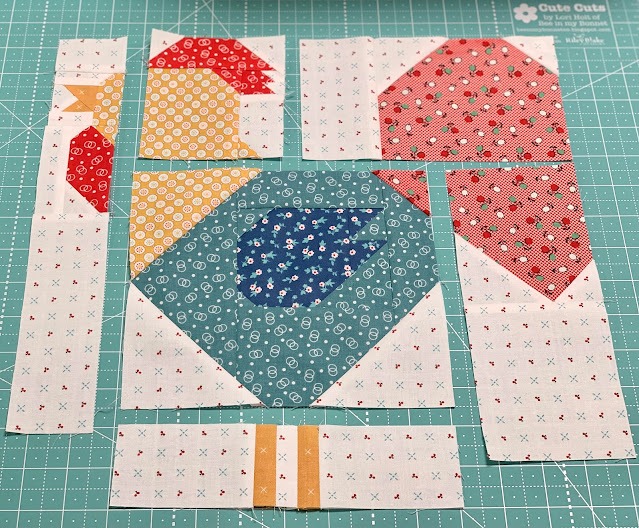
The Chicken Block – Pattern is a quilt block design featuring the playful image of a chicken or hen, often constructed with basic shapes such as rectangles, squares, and half-square triangles. These elements come together to form the outline and features of a chicken, including its body, beak, comb, and sometimes legs or wings.
One of the charming aspects of the chicken block is its blend of whimsy and simplicity. It doesn’t aim for a photorealistic chicken—rather, it captures the essence of the animal in a stylized and cozy way. This is what makes it so endearing for quilters of all levels.
These blocks are typically made using a traditional piecing technique, although some quilters opt for appliqué or even paper piecing for added detail. Regardless of the method, the focus is on using contrast and color placement to define the chicken’s shape.
Size can vary, but most chicken blocks measure between 8” and 12” square, making them ideal for inclusion in larger quilts or as stand-alone features in smaller projects. Their straightforward structure also makes them easy to resize as needed.
While the design is simple, it allows for endless personalization. You can use a red print for the comb, a speckled fabric for feathers, or even novelty prints for a fun twist. Each chicken can look different, adding to the charm of the finished piece.
Quilters often create a series of chicken blocks with varied fabrics to form a themed quilt—sometimes called a “chicken coop quilt.” These fun projects work great for kitchens, gift-giving, or seasonal farmhouse displays.
Choosing the right materials for your Chicken Block – Pattern project is a key part of the fun. Because this block lends itself well to personalization, you can get creative with textures, colors, and prints.
To start, you’ll want a mix of fabrics in contrasting tones to help each part of the chicken stand out. Common choices include neutral backgrounds (like cream, white, or beige) and bold or patterned fabrics for the chicken’s body. You’ll also need smaller scraps in red, orange, or yellow for the comb and beak.
Consider using fat quarters or fabric scraps, as the pieces for each block are usually small. This makes the pattern ideal for using up leftovers from other quilting projects, reducing fabric waste while still producing a vibrant quilt.
Cotton fabrics are most common due to their ease of use, durability, and ability to hold a crease. They press well, sew easily, and are widely available. If you’re looking for a softer, more textured look, you might also experiment with linen or flannel, but be aware of potential shrinkage.
Alongside fabric, ensure you have the basic quilting tools: rotary cutter, quilting ruler, cutting mat, sewing machine, iron, thread, pins or clips, and a seam ripper (just in case!). Accuracy is key when working with small pieces, so a quarter-inch presser foot is especially helpful.
If you’re planning to turn your chicken blocks into a full quilt, be sure to pick a cohesive background fabric for all blocks to unify the design. Otherwise, for a more scrappy and playful look, you can mix and match backgrounds too.
Don’t forget the batting and backing fabric if you’re creating a quilt. For small projects like pillows or wall hangings, lightweight batting or fusible fleece is often enough.
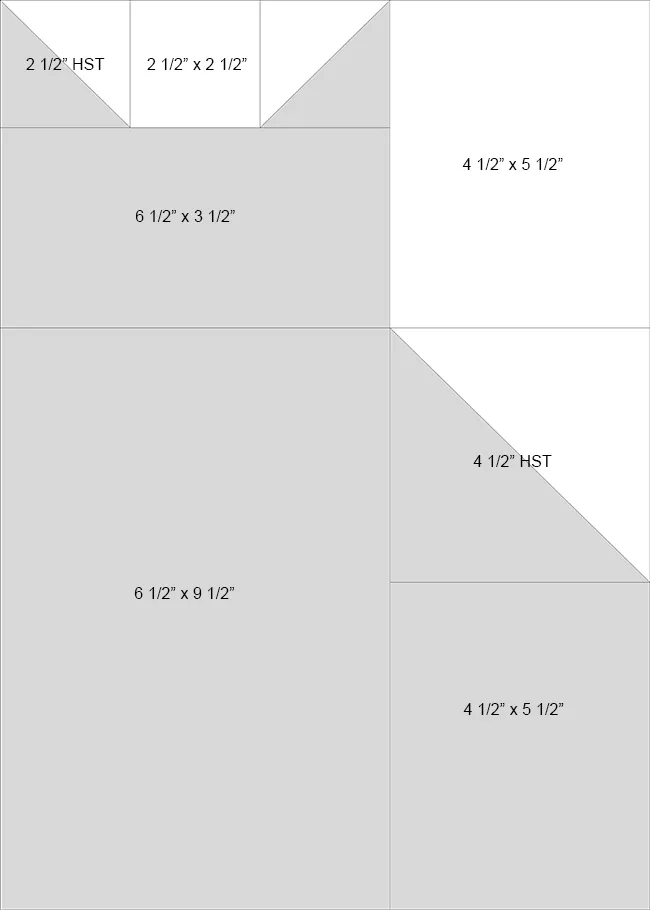
Now it’s time to build your Chicken Block – Pattern piece by piece. This block typically starts with a combination of square and rectangular fabric cuts arranged to form the chicken’s body and details.
Start by cutting all the required fabric pieces. You’ll typically need several small rectangles and squares for the body, head, beak, and tail. Refer to a cutting chart based on your chosen block size—standard 12” block instructions are widely available online or in pattern books.
Begin sewing the background and chicken body pieces together, row by row. Use a consistent ¼” seam allowance to maintain proper sizing. Press each seam as you go, either open or to one side, depending on your preference.
Create the chicken’s comb and beak using small triangles or appliqué, attaching them to the top and front sections of the block. These pieces help bring character and personality to your chicken, even though they’re small.
Once all rows are complete, sew them together to form the full block. Give the block a final press and square it up if necessary, trimming any excess fabric to ensure straight, clean edges.
At this stage, you can repeat the block to create multiple chickens or move on to assembling your final project—a quilt, pillow cover, wall hanging, or table runner.
Quilters often add sashing or cornerstones between blocks to help separate each chicken visually. Borders, embroidery, or quilting designs can also enhance the final piece.
The Chicken Block – Pattern is endlessly versatile, and you can use it in a variety of creative projects beyond just quilts. These blocks work beautifully as decorative accents or gifts for loved ones.
One of the most popular uses is in making a farm-themed quilt. By stitching together several chicken blocks—each with different fabrics—you can create a fun and colorful quilt that showcases your personal style and fabric stash.
Chicken blocks also make great kitchen décor. Add a border and turn one into a potholder, hot pad, or tea towel appliqué. You can also make a matching set of placemats or napkin rings with mini versions of the block.
For holidays or seasonal projects, use festive fabrics like red-and-green prints for a holiday chicken or pastels for spring-themed designs. These variations can turn your quilt into a year-round display.
If you’re a beginner, try making a small pillow cover using a single chicken block. It’s a quick and satisfying project that helps build skills without the commitment of a full quilt.
Want to go big? Combine the chicken block with other farm-themed patterns like barns, cows, or corn blocks to create a large sampler quilt that celebrates country life.
Don’t forget to add personal details—buttons for eyes, hand-stitched outlines, or embroidery for feathers. These little touches make your quilt block extra special and unique.
Q: What size is the standard Chicken Block?
A: Most chicken blocks measure between 8” and 12” square, though you can resize them easily depending on your project needs.
Q: Is this pattern good for beginners?
A: Yes! The Chicken Block is very beginner-friendly, involving simple shapes like squares and triangles. It’s a great way to practice basic piecing skills.
Q: Can I use fabric scraps for this pattern?
A: Absolutely. The pattern is perfect for using up small scraps and fat quarters. It’s a great stash-buster project.
Q: Should I use appliqué or piecing for the comb and beak?
A: Either works well! Many patterns include both options. Piecing gives a clean finish, while appliqué allows for more flexibility in shape and positioning.
Q: Can I add embellishments like buttons or stitching?
A: Yes, adding embellishments like embroidered eyes or buttons can add personality to your chicken. Just be cautious if the quilt is for a child.
Q: What are some project ideas using chicken blocks?
A: Full quilts, pillows, table runners, wall hangings, potholders, and placemats are all excellent options. You can also mix chicken blocks with other farm-themed blocks for a fun sampler.
The Chicken Block – Pattern offers a perfect mix of charm, simplicity, and creative potential. Whether you’re making one chicken or a whole flock, this block gives you the chance to experiment with color, texture, and layout while still sticking to an approachable design.
From rustic farmhouse quilts to playful kitchen accessories, this block brings a smile to everyone who sees it. Plus, with endless customization options, it’s a design you can revisit time and time again.
Now it’s your turn to give the Chicken Block – Pattern a try. We’d love to hear your thoughts—leave a comment with your honest opinion, share photos of your finished project, or suggest other fun animal block patterns you’d like to see featured!
Happy quilting!


