
American-style placemat with a fruit theme - Pattern

The Colorburst quilt block – Pattern is a spectacular explosion of geometric art that brings a sense of energy and movement to any sewing project, making it a favorite for those who love high-contrast designs. This specific pattern is celebrated for its ability to mimic the radiance of a sunburst or the complexity of a kaleidoscope, utilizing sharp angles and radiating lines to draw the viewer’s eye toward a central focal point. Whether you are aiming to create a bold single-block wall hanging or a large-scale bedding masterpiece, this design provides the perfect structural framework to experiment with the interaction of light and saturated color.
Working on a Colorburst quilt block – Pattern allows quilters to explore the boundaries of traditional piecing while embracing a modern, “color-forward” aesthetic that feels both fresh and timeless. The design relies heavily on the repetition of triangular units and precise intersections, which, when organized correctly, create a “burst” effect that seems to pulsate outward from the center of the fabric. By choosing a diverse palette ranging from deep jewel tones to soft pastels, you can customize the mood of the quilt to fit any interior design style, from eclectic bohemian to sleek contemporary minimalism.
In this comprehensive guide, we will delve into the technical nuances of the Colorburst quilt block – Pattern, providing you with professional strategies for fabric selection, cutting accuracy, and seamless assembly. We will explore how to manage complex seams without losing your points and how to use “value” to enhance the 3-dimensional illusion of the burst. This project is more than just a sewing exercise; it is an invitation to play with the physics of color and light, ensuring that your finished handcrafted quilt stands out as a radiant centerpiece in your creative portfolio.
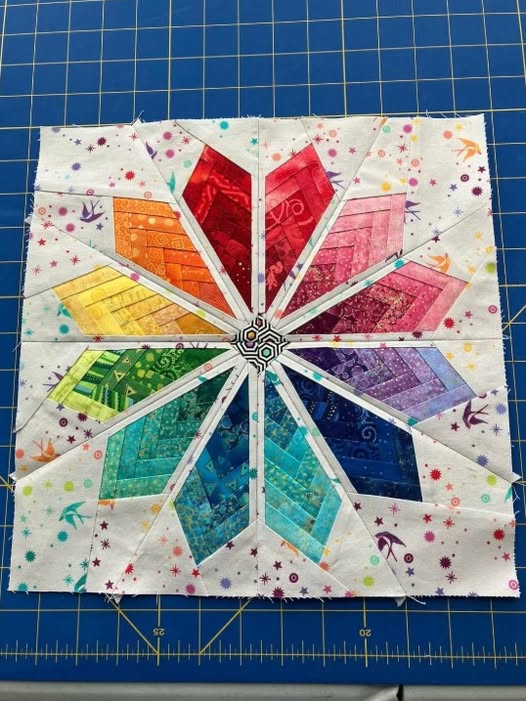
The core structure of the Colorburst quilt block – Pattern is fundamentally rooted in the concept of “radial symmetry,” where every element is balanced around a single central axis. Unlike traditional grid-based blocks, the Colorburst utilizes “wedge” shapes or elongated triangles that converge at a middle point, creating a sense of infinite expansion. To master this anatomy, you must first visualize the block as a circle inscribed within a square, where the “rays” of color are the primary actors in the visual narrative, giving the quilt motif its characteristic energy.
Value contrast is the most critical element in the Colorburst quilt block – Pattern design theory. To make the “burst” truly pop, you need a clear distinction between the “foreground” rays and the “background” setting triangles. If the colors are too similar in value (the lightness or darkness of a hue), the radiating lines will blend together, and the block will lose its explosive impact. Using a very dark navy or charcoal background can make neon-colored rays appear to glow, while a crisp white background lends the finished block a clean, summery, and airy vibration.
Precision cutting is non-negotiable when preparing pieces for a Colorburst quilt block – Pattern. Because many of the triangles are cut on the “bias” (the diagonal grain of the fabric), they are prone to stretching and warping during handling. It is highly recommended to use a sharp rotary cutter and a specialized “ruler grip” to ensure that every wedge is identical. Even a fraction of an inch of deviation at the wide end of a triangle can lead to a significant “bulge” in the center of the block, making it difficult to get the patchwork to lie perfectly flat.
The central intersection of the Colorburst quilt block – Pattern is often called the “bulk zone” because so many seams meet in one tiny area. To manage this, many quilters choose to use a “center circle” applique to hide the intersection, or they “fan” the seams during the pressing process. Fanning the seams involves clipping a few stitches at the very center so the fabric can rotate in a spiral, significantly reducing the thickness. This technical adjustment is essential for anyone who plans to perform machine quilting over the finished top without breaking a needle.
Fabric choice for this dynamic quilt pattern should lean toward “solids” or “read-as-solids” like batiks and small-scale tonal prints. Large, busy floral prints can distract from the sharp geometric lines of the Colorburst, breaking the illusion of the radiating rays. If you do want to use prints, try “fussy cutting” specific motifs to place them at the tips of the rays, which adds an extra layer of hidden detail for the viewer to discover upon closer inspection of your textile art.
Finally, the scale of the Colorburst quilt block – Pattern can be adjusted to suit your needs. A 12-inch block is standard and provides a great balance of detail and ease of handling. However, creating a “Mega Colorburst” that takes up an entire 60-inch quilt top is a growing trend in modern quilting circles. This large-scale approach allows for incredible “ombre” transitions, where colors gradually shift from one hue to another across the entire surface of the quilt, creating a stunning visual gradient that mimics a natural sunrise.
For many artisans, the most effective way to tackle the Colorburst quilt block – Pattern is through “Foundation Paper Piecing” (FPP). This method involves sewing your fabric directly onto a paper template, which ensures that every angle is mathematically perfect. FPP is particularly useful for the Colorburst because it prevents the bias edges of the triangles from stretching. It allows even a beginner to achieve those “razor-sharp” points that define a high-quality quilt block, making the complex geometry much more approachable and less stressful.
If you prefer traditional piecing for your Colorburst quilt block – Pattern, the “scant 1/4-inch seam” is your best friend. This is a seam that is just a hair narrower than a true quarter-inch, which accounts for the space the fabric takes up when it is folded over the seam. Without this adjustment, your block will slowly “shrink” as you add more rays, and the final square will be smaller than intended. Using a dedicated quilting foot on your sewing machine can help you maintain this consistency throughout the entire assembly process.
Pinning is a “must-do” step when joining the radiating wedges of the Colorburst quilt block – Pattern. Because you are often sewing a long, narrow point to a wider base, the fabrics can shift easily under the presser foot. Using “fork pins” or “flat-head pins” can help hold the intersections in place without creating extra bulk. This step ensures that the lines of the rays continue seamlessly from one segment to the next, maintaining the visual integrity of the burst and preventing the “zig-zag” look that occurs when seams don’t align.
Pressing technique is another technical secret to a successful Colorburst quilt block – Pattern. You should always “press” (lift and lower the iron) rather than “iron” (slide the iron back and forth). Sliding the iron can pull the bias edges out of shape, leading to a wavy quilt top. Using a tailor’s clapper—a wooden tool that holds heat and steam in the fabric—can help you get the seams of your Colorburst extremely flat, which is critical for a block with so many intersecting layers of fabric.
Thread choice can also impact the flatness of your Colorburst quilt block – Pattern. A heavy 40wt thread might add too much bulk to the seams, especially in the center where the rays meet. Using a fine, high-quality 50wt or 60wt cotton thread is much better, as it provides a strong bond while remaining nearly invisible within the seam. This choice of premium sewing supplies is a hallmark of professional quilters who prioritize a smooth, “bumpy-free” surface for their finished masterpieces.
Lastly, “squaring up” your block is the final technical hurdle of the Colorburst quilt block – Pattern. Once all the rays are joined and pressed, use a large square ruler to trim the block to its final dimensions. Always measure from the center outward to ensure the “burst” remains perfectly centered. This discipline in the final stage of block construction ensures that when you join multiple blocks together, the rays will meet at the edges in a harmonious, rhythmic pattern that spans the entire quilt.
The magic of the Colorburst quilt block – Pattern is that it doesn’t have to exist in isolation; the way you arrange multiple blocks can create entirely new “secondary patterns.” For example, if you place four blocks so that their most vibrant rays meet in the center, you create a “Supernova” effect that is larger and more complex than the individual blocks themselves. This “modular design” approach allows you to create intricate quilt tops that look like they required much more math than they actually did.
“Sashing” is another layout strategy that can transform the Colorburst quilt block – Pattern. By placing strips of a neutral solid fabric between the blocks, you give each “burst” its own dedicated space to shine. This is an excellent choice if each block uses a different color palette, as the sashing acts as a “frame” that prevents the colors from clashing. Using a dark sashing with a “cornerstone” (a small square at the intersections) can add a sophisticated, architectural look to your finished quilt.
For a modern, “minimalist” take on the Colorburst quilt block – Pattern, consider an asymmetrical layout. You could place three or four blocks in one corner of the quilt and leave the rest of the space as “negative space” (uninterrupted background fabric). This allows you to focus your quilting stitches on the empty areas, creating “ghost bursts” or swirling wind patterns that complement the energy of the pieced blocks, resulting in a gallery-worthy piece of textile art.
Color “weighting” is a technique where you arrange your Colorburst quilt block – Pattern units based on their intensity. You could have the darkest, most saturated blocks at the bottom of the quilt and the lighter, “sun-bleached” versions at the top. This creates a “vertical ombre” or “color-wash” effect that feels very organic and atmospheric. It turns the quilt top into a study of light, mimicking the way the sun filters through the atmosphere at different times of the day.
Don’t be afraid to experiment with the “rotation” of the Colorburst quilt block – Pattern. By turning every other block by 90 degrees, you can create a “weaving” effect where the rays seem to overlap and go under one another. This creates a fascinating optical illusion that adds a layer of depth and complexity to the work. It’s a simple trick that completely changes the visual vibration of the pattern without requiring any extra sewing or cutting.
Finally, think about the border of your Colorburst quilt block – Pattern project. A “piano key” border—made of thin vertical strips in the same colors as your rays—can extend the burst effect all the way to the edge of the quilt. Alternatively, a simple wide border in the background fabric can act as a “quiet” frame that keeps all the attention on the explosive center. Whichever you choose, the goal is to complement the geometric energy of the blocks and provide a professional, finished appearance.
Once the assembly of your Colorburst quilt block – Pattern top is complete, the “quilting” phase begins, which is where you can truly enhance the theme of movement. “Echo quilting” is a spectacular choice for this pattern. By stitching lines that are parallel to the rays at 1/4-inch intervals, you reinforce the “bursting” effect, making it look as if the energy is vibrating outward from the center. This adds incredible textural depth and a rhythmic quality to the finished piece.
If you prefer a more organic contrast to the sharp lines of the Colorburst quilt block – Pattern, consider “swirl quilting” or “pebble quilting” in the background areas. The soft, rounded shapes of the stitches provide a beautiful counterpoint to the rigid geometric triangles of the piecing. This “hard and soft” juxtaposition is a classic technique in art quilting, as it creates a balanced visual interest that keeps the viewer’s eye moving across the surface of the textile.
“Stitch-in-the-ditch” is the best approach if you want the Colorburst quilt block – Pattern itself to be the sole focus. By sewing exactly along the seams where the fabrics meet, you stabilize the quilt while making the stitches nearly invisible. This creates a “puffy” effect, where the rays of the burst are raised slightly above the background, giving the quilt a tactile, 3-dimensional quality that is both subtle and sophisticated, perfect for a high-end home aesthetic.
Choosing the right “batting” (the middle layer) is crucial for the Colorburst quilt block – Pattern. If you want a very crisp, flat look that highlights the geometry, a thin “cotton or bamboo” batting is ideal. If you want more “loft” and texture, a “wool or polyester” blend will make your quilting stitches pop more prominently. The choice of batting affects how the quilt “drapes” and how much the colorburst motifs stand out, so consider the final use of the quilt before making your selection.
Binding your Colorburst quilt block – Pattern is the final “frame.” A “bias binding” in a bold, contrasting color can add a final spark of energy to the perimeter. For a more “infinite” look, use the same fabric as the background for the binding, which makes the edge of the quilt disappear and keeps the focus entirely on the central burst. A well-applied binding ensures that your handmade masterpiece is durable enough to be loved and washed for generations to come.
In conclusion, the Colorburst quilt block – Pattern is a celebration of the joy of color and the precision of geometry. It is a project that rewards patience and rewards the bold use of color. From the first wedge you cut to the final quilting stitch, every step is an opportunity to express your unique creative voice. We hope this guide inspires you to create a radiant quilt that brings light and energy into your home, acting as a testament to your skill and your passion for the art of quilting.
1. Is the Colorburst quilt block – Pattern suitable for beginners?
It is considered an “intermediate” block if pieced traditionally because of the bias edges. However, if you use the Foundation Paper Piecing (FPP) method, a beginner can achieve excellent results with just a little practice on the basics of paper piecing.
2. How do I stop the center of the block from becoming too “bulky”?
The best way is to “fan” or “spiral” your seams at the center. By clipping a tiny bit of the seam allowance at the very middle, you can press the seams in a circular direction, which flattens the intersection and makes it easier for your quilting needle to pass through.
3. What are the best colors to use for a “Colorburst” effect?
To get a true “burst,” use a “gradient” or “rainbow” of colors for the rays and a high-contrast neutral (like black, white, or navy) for the background. The more different the fabric values are, the more explosive the pattern will look.
4. Can I make this block without a special ruler?
Yes, while specialized “wedge” rulers make it easier, you can easily create your own templates from cardboard or use FPP patterns which don’t require any special rulers at all—just a standard straight-edge and a rotary cutter.
5. How do I prevent my triangles from stretching while I sew?
Using a light spray of fabric starch before you cut your pieces is the best defense. Starch makes the fabric fibers more rigid and less prone to shifting on the bias, ensuring your Colorburst pattern remains square and flat.
This article has provided a deep dive into the energetic world of the Colorburst quilt block – Pattern, exploring its geometric foundations and the technical precision required to create a stunning “radiating” effect.
We discussed the importance of value contrast, the benefits of Foundation Paper Piecing for sharp points, and various layout strategies that can transform individual blocks into complex secondary masterpieces. From the intricacies of managing seam bulk in the center to choosing the right echo-quilting lines, every detail contributes to a handcrafted textile that celebrates movement and light.


