
American-style placemat with a fruit theme - Pattern

The Cord Keeper Fabric Tutorial – Pattern is one of the most practical small-scale sewing projects you can undertake , offering a simple yet elegant solution to the perennial problem of tangled electronic cables. In our increasingly digital world, the average person carries multiple charging cables, headphones, and data leads, which often end up in a frustrating knot at the bottom of a bag or desk drawer. By following a Cord Keeper Fabric Tutorial – Pattern, you can transform scrap pieces of fabric into functional organizers that not only protect your electronics but also add a touch of personality to your tech accessories.
When you start looking for a Cord Keeper Fabric Tutorial – Pattern, you will find that it is a project designed for efficiency and ease, making it perfect for beginners who want to practice their sewing skills or for experienced crafters looking for a quick “scrap-buster” project. The beauty of the Cord Keeper Fabric Tutorial – Pattern lies in its versatility; you can adapt the dimensions to fit everything from a tiny earbud cord to a thick laptop power brick cable. Using high-quality quilting cotton or durable canvas fabric, these little keepers serve as a sustainable alternative to plastic zip ties or disposable rubber bands, reflecting a modern commitment to eco-friendly living.
Beyond just organization, a Cord Keeper Fabric Tutorial – Pattern provides a great opportunity to experiment with different closures, such as metal snaps, hook-and-loop tape, or even vintage buttons. As you progress through this Cord Keeper Fabric Tutorial – Pattern, you will learn how to handle small fabric pieces, apply interfacing for stability, and achieve professional-looking topstitching. This article is designed to be your comprehensive guide, covering everything from material selection to creative variations, ensuring that your finished cord keepers are as sturdy as they are stylish.
The modern workspace is often a battlefield of wires, and the Cord Keeper Fabric Tutorial – Pattern is your first line of defense against the chaos. Most people don’t realize how much time they waste untangling cords until they start using a dedicated cord organizer. By committing to a Cord Keeper Fabric Tutorial – Pattern, you are investing in a system that brings order to your backpack, nightstand, and office desk, making your daily routine significantly smoother.
Furthermore, following a Cord Keeper Fabric Tutorial – Pattern is an excellent way to use up those beautiful fabric scraps that are too small for a quilt but too precious to throw away. These small items require very little yardage, meaning you can create a whole set of matching organizers from a single fat quarter. The Cord Keeper Fabric Tutorial – Pattern is essentially a “zero-waste” sewing project that helps you declutter your home while simultaneously cleaning out your fabric bin.
The durability of a handmade item is another reason why a Cord Keeper Fabric Tutorial – Pattern is superior to store-bought plastic versions. Plastic clips can snap, and rubber bands eventually perish and become sticky, potentially damaging your expensive cables. A fabric keeper made from this Cord Keeper Fabric Tutorial – Pattern is soft, flexible, and washable, ensuring that your organization’s tools last as long as the devices they support.
If you enjoy making handmade gifts, the Cord Keeper Fabric Tutorial – Pattern is a goldmine for thoughtful, practical presents. Everyone has cords, so everyone can benefit from a well-made fabric cord keeper. You can customize the Cord Keeper Fabric Tutorial – Pattern with fabrics that match the recipient’s interests—perhaps a space-themed print for a tech-loving friend or a floral pattern for someone who loves gardening and needs to organize their headphones.
For those just starting their sewing journey, a Cord Keeper Fabric Tutorial – Pattern acts as a low-stakes training ground for essential techniques. You will practice cutting straight lines, sewing consistent seam allowances, and turning small tubes of fabric right-side out. Because the Cord Keeper Fabric Tutorial – Pattern is so small, if you make a mistake, it is easy to start over without wasting significant time or expensive materials.
Finally, the aesthetic appeal of a coordinated set of cables cannot be overstated. When you follow a Cord Keeper Fabric Tutorial – Pattern, you can choose colors and patterns that complement your laptop bag or your home decor. No longer will your desk be an eyesore of black and white plastic wires; instead, it will feature the charming textures and colors of your favorite textile designs, all thanks to the Cord Keeper Fabric Tutorial – Pattern.
To get the best results from your Cord Keeper Fabric Tutorial – Pattern, selecting the right fabric is the first step. Medium-weight cotton is the most popular choice because it is easy to sew and comes in an endless array of prints. However, for a more rugged Cord Keeper Fabric Tutorial – Pattern, you might consider using denim, linen, or even synthetic upholstery fabric that can withstand being tossed around in a heavy tool bag or suitcase.
Interfacing is the “secret ingredient” that gives your Cord Keeper Fabric Tutorial – Pattern a professional feel. Without a layer of fusible interfacing, the fabric can feel too flimsy to support the tension of a tightly wrapped cord. A lightweight or medium-weight iron-on interfacing ensures that the Cord Keeper Fabric Tutorial – Pattern remains crisp and maintains its shape over hundreds of uses, preventing the fabric from bunching up around the closure.
The choice of closure is a pivotal part of the Cord Keeper Fabric Tutorial – Pattern. Plastic or metal snaps (often called “KAM snaps”) are a favorite because they are quick to install and provide a satisfying “click” when closed. If you don’t have a snap press, you can use hook-and-loop tape (Velcro) for your Cord Keeper Fabric Tutorial – Pattern, which allows for a bit more adjustability in how tight the keeper wraps around the bundle of wires.
Precision cutting tools are vital when working on a small project like the Cord Keeper Fabric Tutorial – Pattern. A rotary cutter and a small acrylic quilting ruler will allow you to cut the perfect rectangles or circles required by the pattern. Since the pieces are small, even a slight inaccuracy in cutting can make the Cord Keeper Fabric Tutorial – Pattern look lopsided, so taking the time to measure twice and cut once is highly recommended.
A standard sewing machine with a universal needle (size 80/12 or 90/14) is all you need for the construction of the Cord Keeper Fabric Tutorial – Pattern. You will also need high-quality all-purpose polyester thread in a color that either matches your fabric or provides a nice contrast for decorative topstitching. Many quilters prefer using a walking foot when sewing through multiple layers of fabric and interfacing in the Cord Keeper Fabric Tutorial – Pattern to prevent the layers from shifting.
Lastly, you will need basic sewing notions like fabric scissors, a pinking shears (optional but helpful for curves), and an iron with a steam setting. The iron is particularly important for the Cord Keeper Fabric Tutorial – Pattern, as crisp seams are what give these small items their structure. A turning tool or a simple chopstick can also be helpful for pushing out the corners of your fabric cord keeper once you’ve sewn the main body.
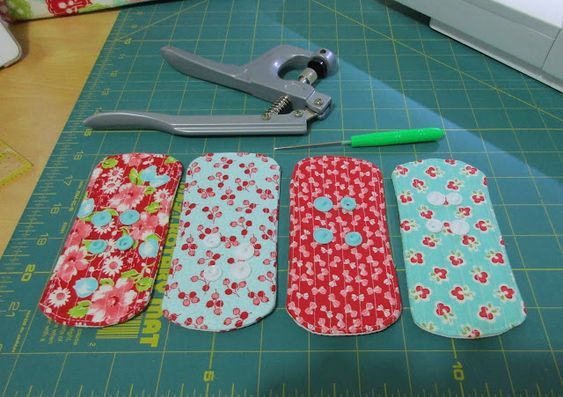
The first phase of the Cord Keeper Fabric Tutorial – Pattern involves preparing your fabric pieces. For a standard keeper, you will typically cut two rectangles of fabric and one of interfacing, usually around 5 inches by 1.5 inches. Once cut, you will iron the fusible interfacing onto the wrong side of one of the fabric pieces, providing the necessary body for the Cord Keeper Fabric Tutorial – Pattern to function correctly as a wrap.
Next, you will place the two fabric pieces “right sides together” (the pretty sides facing each other). According to the Cord Keeper Fabric Tutorial – Pattern, you will sew around the perimeter with a small seam allowance, usually 1/4 inch. It is crucial to leave a small opening of about 1 inch on one of the long sides, which will allow you to turn the Cord Keeper Fabric Tutorial – Pattern right-side out after the initial stitching is complete.
Before turning the piece, the Cord Keeper Fabric Tutorial – Pattern suggests clipping the corners. By cutting a small diagonal line across each corner (being careful not to cut the stitches), you remove excess bulk, allowing for sharp, crisp corners. If your Cord Keeper Fabric Tutorial – Pattern has rounded ends, you would use pinking shears or small “V” notches to help the fabric curve smoothly without bunching up inside.
Turning the fabric through the small opening is the most delicate part of the Cord Keeper Fabric Tutorial – Pattern. Use your turning tool or a dull pencil to gently push the corners out until they are square. Once turned, you must use your iron to press the Cord Keeper Fabric Tutorial – Pattern flat, ensuring that the raw edges of the opening are tucked neatly inside and aligned with the rest of the seam.
Topstitching is the final sewing step in the Cord Keeper Fabric Tutorial – Pattern, and it serves two purposes: it closes the opening you used for turning and provides a decorative border. Sew a slow, steady line of stitching about 1/8 inch from the edge all the way around the Cord Keeper Fabric Tutorial – Pattern. This not only strengthens the edges but also keeps the interfacing from shifting over time, ensuring the cord organizer remains functional for years.
The final step in the Cord Keeper Fabric Tutorial – Pattern is attaching the closure. If using snaps, follow the manufacturer’s instructions to punch a small hole and press the cap and socket into place on opposite ends. If using Velcro, you will sew a small square or circle of the hook side on one end and the loop side on the other. Once the closure is secure, your project from the Cord Keeper Fabric Tutorial – Pattern is ready to be put to work in your bag!
Once you have mastered the basic Cord Keeper Fabric Tutorial – Pattern, you can start exploring creative variations to suit different needs. For example, you can scale up the Cord Keeper Fabric Tutorial – Pattern to create “Mega Keepers” for thick extension cords or garden hoses. These larger versions often benefit from using heavy-duty webbing or multiple snaps to ensure they can handle the weight and tension of a heavy-duty cable bundle.
Another popular variation of the Cord Keeper Fabric Tutorial – Pattern is the “tab” style, which features a small loop that stays attached to the cord even when it’s unwrapped. This is achieved by adding a small extra piece of fabric or a ribbon to the Cord Keeper Fabric Tutorial – Pattern that loops around the cable itself. This ensures that you never lose your fabric cord keeper while you are using your charger, a common problem with traditional loose clips.
If you are an embroidery enthusiast, the Cord Keeper Fabric Tutorial – Pattern is a perfect canvas for small designs. You can embroider icons representing the type of cord—like a tiny lightning bolt for a phone charger or a musical note for headphones—onto the fabric before assembly. This adds a layer of high-end customization to your Cord Keeper Fabric Tutorial – Pattern and makes it even easier to identify the right cord at a glance in a dark bag.
For a more “luxe” version of the Cord Keeper Fabric Tutorial – Pattern, try using vegan leather or cork fabric. These materials don’t fray, which means you can simplify the Cord Keeper Fabric Tutorial – Pattern by skipping the turning and topstitching steps and simply cutting a single layer of material with a decorative edge. Cork is particularly trendy in 2026 as a sustainable, water-resistant material that feels great in the hand and looks sophisticated on an office desk.
You can also adapt the Cord Keeper Fabric Tutorial – Pattern to be a “multi-cord” organizer by making a longer strip of fabric with multiple snap points. This allows you to secure several cables side-by-side in a single wrap, which is excellent for the back of a TV stand or a computer desk where several wires run in the same direction. The versatility of the Cord Keeper Fabric Tutorial – Pattern is limited only by your imagination and your specific organizational needs.
Finally, consider using the Cord Keeper Fabric Tutorial – Pattern as a learning project for children or teens. Because it is fast and results in a highly useful item they can actually use for their own devices, it is a great “first project” for young sewists. Teaching them how to follow a Cord Keeper Fabric Tutorial – Pattern not only gives them a sense of accomplishment but also encourages them to take better care of their electronics and keep their own spaces organized.
1. Can I wash my cord keepers after I make them?
Yes! One of the biggest advantages of the Cord Keeper Fabric Tutorial – Pattern is that the finished product is washable. If you used cotton fabric and plastic snaps, you can simply toss them in a small mesh laundry bag and wash them with your regular clothes. If you used metal snaps, make sure to dry them thoroughly to prevent any potential rusting over time.
2. What is the best size for a standard phone charger?
For most standard USB cables, a finished size of approximately 4 inches long by 1 inch wide is ideal. When following the Cord Keeper Fabric Tutorial – Pattern, remember to add your seam allowances to these measurements. A 5×1.5 inch starting rectangle usually results in the perfect “standard” size for modern smartphone leads.
3. Do I really need interfacing for such a small project?
While you can sew it without it, we highly recommend using interfacing in your Cord Keeper Fabric Tutorial – Pattern. The repetitive action of opening and closing snaps or Velcro puts stress on the fabric. Interfacing prevents the fabric from tearing or stretching out of shape, making your cord keeper much more durable and professional-looking.
4. How can I make my cord keepers without a snap press?
If you don’t have a snap press, the Cord Keeper Fabric Tutorial – Pattern works perfectly with sew-on snaps or Velcro. You could even use a small button and a hair elastic loop if you want a more “shabby chic” look. The closure is purely functional, so use whatever tools you have available in your sewing kit.
5. Can I use this pattern for business purposes?
Generally, most free patterns are for personal use, but if you create your own version based on this Cord Keeper Fabric Tutorial – Pattern, these items are fantastic for selling at craft fairs or in Etsy shops. They are low-cost to produce and highly “giftable,” making them excellent “impulse buy” items for your customers.
The Cord Keeper Fabric Tutorial – Pattern is a small project that makes a massive difference in the quality of your organized life. Throughout this guide, we have explored why this pattern is an essential “scrap-buster,” the specific materials like cotton and interfacing that ensure success, and the step-by-step process of sewing, turning, and snapping your way to a tidy desk. We’ve also seen how the Cord Keeper Fabric Tutorial – Pattern can be customized with different materials and embroidery to create unique, personalized gifts. By spending just thirty minutes with your sewing machine and this tutorial, you can eliminate “cable spaghetti” forever and add a touch of handmade charm to your daily technology use.
We hope you found this Cord Keeper Fabric Tutorial – Pattern helpful and inspiring! There is something so satisfying about finishing a project that you can put to use immediately. We would love to hear your thoughts—did you choose snaps or Velcro for your keepers? Do you have any tips for sewing small fabric items? Please leave your sincere opinion and suggestions in the comments below, as we love hearing from our fellow crafters and improving our tutorials based on your experiences. Happy sewing!


