
American-style placemat with a fruit theme - Pattern

Crumb Quilt – Pattern techniques are taking the sewing world by storm because they turn what most people consider trash into beautiful, functional art. If you have ever looked at a pile of tiny fabric scraps—those bits too small for a standard block—and felt a pang of guilt about throwing them away, then a Crumb Quilt – Pattern is exactly what you need to reclaim your workspace. This style of quilting is the ultimate expression of “waste not, want not,” allowing for complete creative freedom without the rigid constraints of traditional geometric measurements.
Starting your first Crumb Quilt – Pattern journey is an incredibly liberating experience for any quilter, regardless of their skill level. Unlike intricate paper piecing or demanding star patterns, this method relies on a process known as “improv piecing,” where you stitch fragments together based on how they fit rather than following a strict template. The result is a vibrant, textured fabric that tells a story of all your past projects, blending colors and prints in a way that feels organic and deeply personal.
In this comprehensive guide, we are going to explore how to master the Crumb Quilt – Pattern from the ground up, ensuring your finished piece is as durable as it is beautiful. We will cover the essential tools, the step-by-step assembly process, and how to optimize your scrappy quilting workflow for the best results. By the end of this article, you will see your scrap bin not as a mess to be managed, but as a treasure chest of possibilities waiting to be transformed into a stunning handmade quilt.
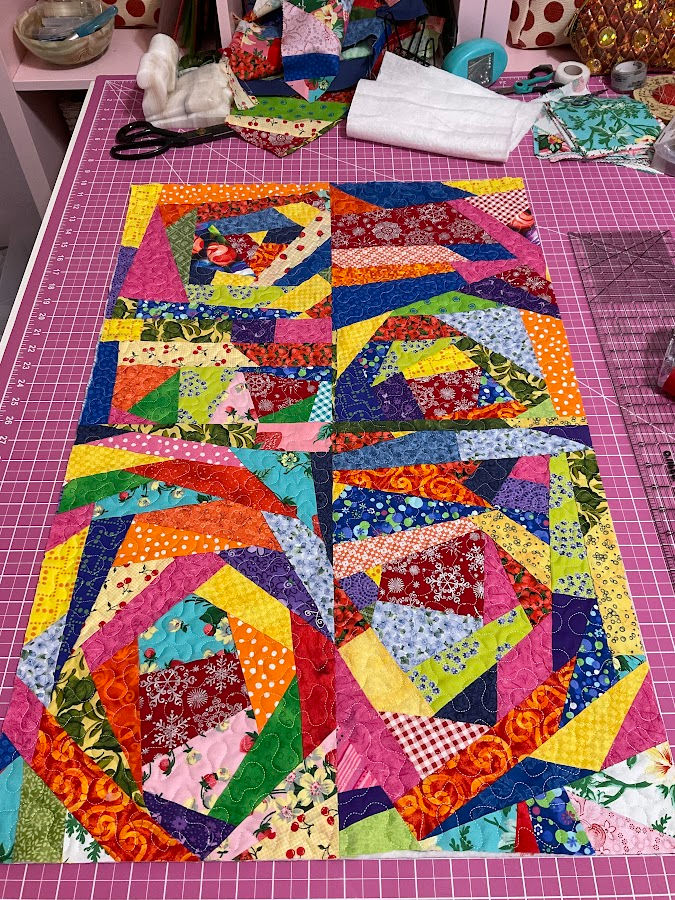
The core concept of a Crumb Quilt – Pattern is the assembly of “crumbs,” which are scraps of fabric smaller than two inches. In traditional quilting, these bits are usually discarded, but here, they are the stars of the show. To begin, you don’t need a formal paper guide; the pattern emerges naturally as you sew two pieces together, trim the edge, and add a third.
When working with a Crumb Quilt – Pattern, the “pattern” isn’t a set of shapes you cut out beforehand; rather, it refers to the improvisational piecing technique used to create a “made-fabric.” This made-fabric can then be treated like a standard bolt of cloth, cut into specific shapes, or used as large, chaotic blocks. It is a brilliant way to practice sustainable sewing while clearing out your stash.
To keep your Crumb Quilt – Pattern looking intentional rather than messy, many quilters choose a unifying element. This could be a specific color palette, like “cool blues and greens,” or a consistent background fabric that acts as a frame for the colorful crumbs. Even though it is random, having a loose “visual logic” helps the final quilt top look cohesive and professional.
One of the most important parts of the Crumb Quilt – Pattern terminology is the “anchor piece.” This is usually a slightly larger scrap that you sew smaller crumbs onto. As you rotate the anchor and add more bits to each side, the block grows outward in a spiral piecing fashion. This method ensures that your seams stay relatively flat and manageable.
Because these pieces are so small, you will find that the seam allowance becomes a significant factor in your project. While the standard 1/4 inch is still the gold standard, in a Crumb Quilt – Pattern, being consistent is more important than the exact width. Using a pressing tool or a hot iron after every few seams is vital to prevent the fabric from bunching or becoming too bulky.
Ultimately, a Crumb Quilt – Pattern is about the joy of discovery. It is an eco-friendly quilting method that challenges you to look at color and value rather than shapes and lines. You are essentially weaving a tapestry of memories, using leftovers from baby quilts, holiday projects, and apparel sewing to create something entirely new and unique.
Before diving into your Crumb Quilt – Pattern, you need to organize your materials to avoid feeling overwhelmed. Sorting your scraps by size or color can make the process much faster. Many experts suggest keeping a small basket next to your sewing machine specifically for “crumbs,” making it easy to grab and sew during “leader and ender” sessions.
A high-quality rotary cutter and a self-healing mat are indispensable when working on a Crumb Quilt – Pattern. Even though the piecing is random, you will need to “straighten the edge” of your growing block frequently. Trimming away excess fabric and keeping your edges straight allows the next crumb to be attached securely without creating ripples in the quilt sandwich.
Thread choice is another critical component of a successful Crumb Quilt – Pattern. Since you will be sewing through many different colors, a neutral grey or tan thread is usually the best option. These colors tend to blend into the seams of both light and dark fabrics, ensuring that the stitching remains invisible and the focus stays on your beautiful fabric scraps.
Don’t forget the importance of a sharp denim or microtex needle. Because a Crumb Quilt – Pattern involves sewing over many intersecting seams, your machine will be working through several layers of fabric at once. A fresh, strong needle will prevent skipped stitches and ensure that your improv blocks are sturdy enough to withstand years of use and washing.
Using interfacing or a foundation fabric is a popular variation for beginners. If you find the “free-form” style too difficult, you can sew your crumbs directly onto a thin piece of muslin or a paper foundation. This keeps the Crumb Quilt – Pattern stable and prevents the small bits from shifting or stretching during the construction phase.
Lastly, prepare a dedicated space for pressing. Since a Crumb Quilt – Pattern requires constant ironing to keep the blocks flat, having your iron within arm’s reach will save you a lot of time. Many quilters use a wool pressing mat which reflects heat back into the fabric, making those tiny seams lay perfectly flat with minimal effort.
The first step in creating your Crumb Quilt – Pattern is to pick two tiny scraps that have at least one straight side of a similar length. Place them right sides together and sew a seam. It doesn’t matter if the shapes are irregular; as long as the edges you are sewing are aligned, you are successfully building your quilt block.
Once you have your first pair, open them up and press the seam to one side. Now, look for a third scrap that can fit along one of the newly created edges. This is the heart of the Crumb Quilt – Pattern workflow: sew, press, trim, and repeat. You are essentially building a fabric mosaic one tiny piece at a time.
As your block grows, you will eventually reach a point where it looks like a “wonky” polygon. This is the perfect time to use your acrylic ruler to trim the block into a square or rectangle. Trimming helps maintain the structural integrity of the Crumb Quilt – Pattern and makes it much easier to join multiple blocks together later in the process.
If you have scraps that are too long and thin, don’t worry. These can be used as “string” borders within your Crumb Quilt – Pattern. Sewing a long strip to the side of a cluster of smaller crumbs can help you quickly expand the size of your block while adding a different visual texture to the overall design of the quilt.
Don’t be afraid to incorporate “fussy cut” elements into your Crumb Quilt – Pattern. If you have a tiny scrap with a cute animal or a flower, make it the center of a block. This adds a “hidden treasure” effect to your scrap quilt, encouraging viewers to look closer and find the small details hidden within the chaotic beauty.
When you have created several blocks of the same size, it is time to assemble the quilt top. You can sew the crumb blocks directly to each other for a “full-on” scrap look, or you can add sashing between them. Sashing provides a place for the eye to rest and can make a Crumb Quilt – Pattern look much more organized and sophisticated.
Once your Crumb Quilt – Pattern top is complete, you need to decide on a quilting design. Because the top is already very busy, simple straight-line quilting or “stitch in the ditch” often works best. However, if you want to lean into the whimsical nature of the project, free-motion quilting with loops or swirls can look fantastic.
Choosing the right batting is important for a quilt with so many seams. A low-loft cotton or bamboo batting is often preferred for a Crumb Quilt – Pattern because it doesn’t add too much extra bulk. This makes the finished quilt soft and drapeable, rather than stiff, which can happen if you use a very thick polyester batting with heavy thread density.
The backing fabric is your chance to contrast the complexity of the front. A wide-back solid color or a subtle print will complement the vibrant energy of the Crumb Quilt – Pattern. Some quilters even use a soft flannel or minky fabric on the back to make the quilt extra cozy, perfect for a lap quilt or a baby gift.
When it comes to binding, a solid color that matches one of the prominent colors in your scraps will frame the piece beautifully. Alternatively, you can make a “scrappy binding” by sewing leftover strips together, carrying the Crumb Quilt – Pattern theme all the way to the very edge of the project.
Before you call it finished, give your Crumb Quilt – Pattern a final inspection. Check for any loose threads or seams that might have opened up during the quilting process. Because there are so many tiny pieces, it’s easy to miss a small gap. Reinforcing these areas now will ensure your heirloom quilt lasts for generations.
Finally, wash your quilt. Washing a Crumb Quilt – Pattern for the first time creates that classic “crinkly” look that quilters love. It also helps the fibers settle and the seams to nestle into the batting. There is nothing quite like the feeling of a finished, washed handmade project that turned a pile of “rubbish” into a work of art.
What is the difference between a Crumb Quilt and a String Quilt?
While both use scraps, a Crumb Quilt – Pattern uses tiny, irregularly shaped bits (crumbs), whereas a string quilt specifically uses long, narrow strips of fabric. Crumb quilting is generally more “random” and less structured than string quilting.
Do I need to use a foundation for a Crumb Quilt – Pattern?
No, it is not mandatory. Many people sew crumbs together “free-form.” However, using a muslin foundation can make it easier for beginners to keep the blocks square and prevent the fabric from stretching out of shape.
How small can a “crumb” be?
In a Crumb Quilt – Pattern, you can use pieces as small as 1 inch by 1 inch! However, keep in mind that after the 1/4 inch seam allowance on all sides, you will only see a tiny speck of fabric. Most quilters find that pieces around 1.5 to 2 inches are the easiest to handle.
How do I handle all the thick seams?
Pressing is your best friend. Always press your seams to one side (the darker side if possible) or press them open to reduce bulk. Using a tailor’s clapper after ironing can also help flatten those stubborn intersections in your Crumb Quilt – Pattern.
Can I mix different fabric types?
For the best results in a Crumb Quilt – Pattern, it is recommended to stick to 100% quilting cotton. Mixing cotton with stretchy fabrics or heavy upholstery fabrics can cause the quilt to pucker or wear unevenly over time.
Is this a good project for beginners?
Absolutely! The Crumb Quilt – Pattern is very forgiving. There are no points to match and no “perfect” measurements. It is a fantastic way for new sewists to get comfortable with their machine and learn about fabric placement.
Creating a Crumb Quilt – Pattern is one of the most rewarding journeys a sewist can take. We have explored how to turn the smallest bits of fabric into a cohesive quilt block, the essential tools needed to keep your work precise, and the step-by-step techniques for building a “made-fabric” masterpiece.
This process is not just about cleaning your sewing room; it’s about the artistic freedom of improvisational quilting and the satisfaction of creating something out of nothing. Remember that every “mistake” in this style of quilting just adds to its unique character.


