
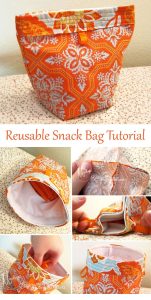
American-style placemat with a fruit theme - Pattern

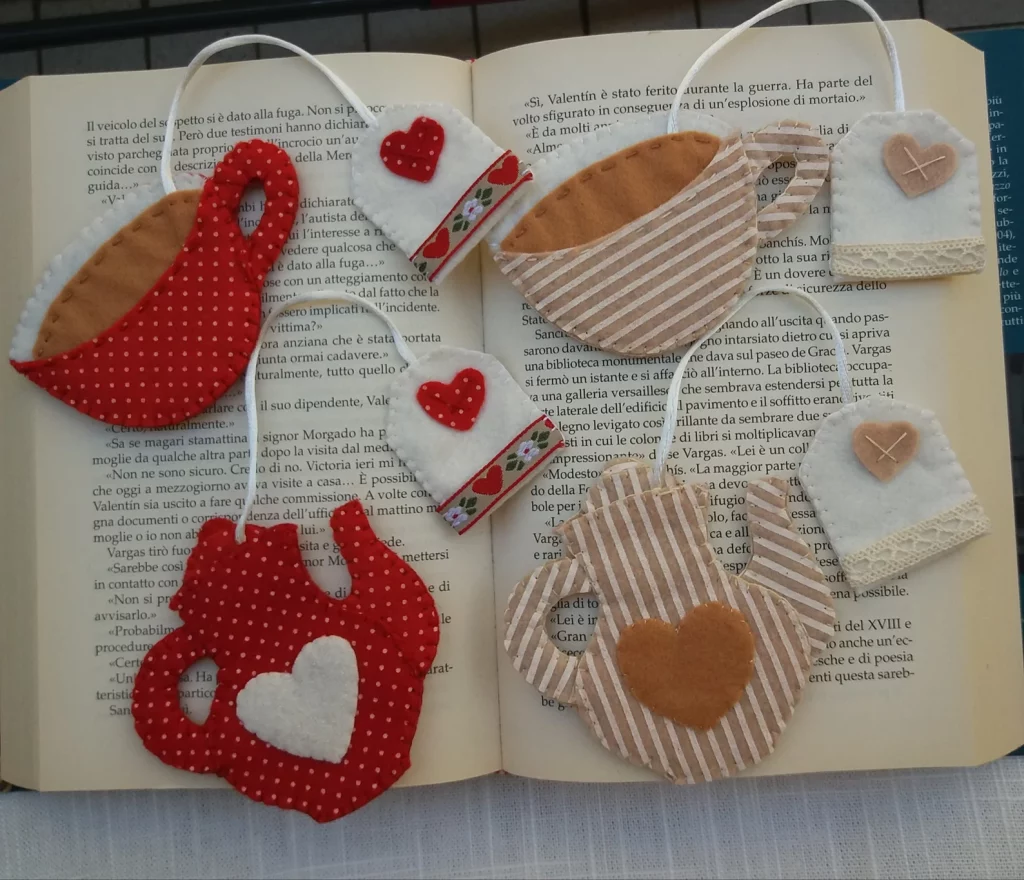
The Cup-shaped felt bookmark – Pattern is a delightful and practical project that brings a touch of cozy charm to any reading experience. If you are someone who loves the smell of old books and the warmth of a fresh cup of tea or coffee, this handcrafted stationery item is the perfect marriage of your two favorite hobbies. Using simple materials like felt and embroidery thread, this DIY felt project allows you to create a functional piece of art that protects your pages while adding a splash of personality to your bookshelf.
Creating a Cup-shaped felt bookmark – Pattern is an ideal way to spend a quiet afternoon, whether you are an experienced sewist or a complete beginner looking for a low-stress entry point into the world of textile crafts. The beauty of working with felt is its forgiving nature; it doesn’t fray, it’s easy to cut, and it comes in an endless array of vibrant colors that can match any aesthetic. By following a few simple steps, you can transform small scraps of fabric into a miniature “mug” or “cup” that slides onto the corner of your page, ensuring you never lose your place again.
In this guide, we will explore the nuances of the Cup-shaped felt bookmark – Pattern, covering everything from material selection to advanced decorative stitching. We will discuss why wool blend felt is the superior choice for longevity and how to customize your design to reflect different types of beverages, from foamy lattes to herbal teas. This project is not only a treat for yourself but also makes a thoughtful, handmade gift for the bibliophiles in your life, proving that the best things often come in small, felt-shaped packages.
The first step in bringing your Cup-shaped felt bookmark – Pattern to life is selecting the right type of felt. For a professional finish, I highly recommend using a wool-rayon blend felt rather than the cheaper acrylic “craft felt” found in many big-box stores. Wool blends have a much softer hand-feel, are less likely to pill over time, and hold embroidery stitches much better, which is essential for the decorative elements of your felt bookmark.
Once you have your fabric, you will need a sharp pair of fabric shears or a dedicated set of embroidery scissors. Precision is key when cutting out the small curves of the cup and the delicate handle. If your scissors are dull, you may end up with jagged edges that detract from the “clean” look of the Cup-shaped felt bookmark – Pattern. Always keep a separate pair of scissors for paper and fabric to maintain the sharpness of your blades.
To create the shape, you can draw a simple “U” or trapezoid shape on a piece of cardstock to act as your sewing template. The classic cup design usually consists of two identical pieces for the body and a small, separate strip for the handle. If you want to get creative with your Cup-shaped felt bookmark – Pattern, you can even cut out a tiny “steam” cloud or a “tea bag” tag to hang from the side, adding a layer of 3D realism to the piece.
Adhering the template to the felt can be done with pins, but many crafters prefer using a disappearing ink fabric marker. This allows you to trace the Cup-shaped felt bookmark – Pattern directly onto the felt and cut accurately without the distortion that pins can sometimes cause. Since the bookmark is small, even a few millimeters of deviation can change the way it fits onto the corner of a book page.
Don’t forget to select your embroidery floss. For a traditional look, a 6-strand cotton floss is perfect. You can use a contrasting color to make your stitches stand out or a matching color for a subtle, sophisticated finish. The thread is what will hold your Cup-shaped felt bookmark – Pattern together, so choosing a high-quality brand ensures that your bookmark won’t fall apart after repeated use in heavy novels.
Finally, consider using a bit of wonder tape or a tiny dab of fabric glue to hold the pieces in place before you start sewing. This is especially helpful for the handle of the cup, which can be slippery and difficult to keep aligned. Preparation is 90% of the work in any DIY craft, and taking the time to set up your materials properly will make the sewing process of your Cup-shaped felt bookmark – Pattern much more enjoyable.
Assembly of the Cup-shaped felt bookmark – Pattern usually begins with the front panel decorations. Before sewing the two main pieces together, you have a blank canvas to express your style. You might choose to embroider a tiny heart, a coffee bean, or even the initials of the person you are gifting it to. Using a satin stitch for solid shapes or a backstitch for outlines adds a beautiful, tactile texture to the felt surface.
The most popular stitch for joining the edges of a Cup-shaped felt bookmark – Pattern is the blanket stitch. This stitch not only secures the two layers of felt but also creates a decorative border that frames the cup beautifully. It provides a sturdy edge that can withstand being slid on and off paper hundreds of times. If you prefer a more minimalist look, a simple running stitch or a “whip stitch” can also get the job done effectively.
When you begin sewing the two halves of your Cup-shaped felt bookmark – Pattern together, remember the “corner pocket” rule. You only want to sew around the bottom and the sides, leaving the top open. This creates the pocket that allows the bookmark to sit snugly over the corner of a page. If you accidentally sew the top shut, your cup will just be a flat ornament rather than a functional corner bookmark.
The handle of the cup requires a bit of extra attention. I recommend tucking the ends of the handle between the two layers of the body before you start your blanket stitch. By sewing through all three layers (front, handle, and back), you ensure the handle is structurally sound. A flimsy handle is the first part to fail on a Cup-shaped felt bookmark – Pattern, so reinforcing this area with a few extra stitches is a wise move for any maker.
If you want to simulate a beverage inside your cup, you can add a third, smaller piece of felt in a “latte brown” or “matcha green” color to the top edge. This “liquid” layer should be sewn to the back piece only or sandwiched slightly between the two. This adds a wonderful pop of color to the Cup-shaped felt bookmark – Pattern and makes the design feel more complete and thoughtfully executed.
Finally, once you have finished the perimeter of the cup, tie off your thread with a hidden knot. You can do this by passing the needle between the two layers of felt and cutting the tail close to the fabric so it “pops” inside and disappears. This small detail is what separates a homemade-looking project from a professional-grade Cup-shaped felt bookmark – Pattern that you could proudly sell or display.
One of the greatest joys of the Cup-shaped felt bookmark – Pattern is its versatility. You can easily adapt the design to represent different types of vessels. For example, a tall, slim shape can become a “to-go” coffee cup, complete with a white felt “lid” and a brown “cardboard sleeve” wrap. This modern twist on the pattern is perfect for students or busy professionals who are always reading on the move.
If you prefer a vintage aesthetic, you can turn your Cup-shaped felt bookmark – Pattern into an elegant teacup. Use pastel colors like mint, lavender, or soft pink, and add “gold” embroidery thread to the rim and handle to mimic fine china. You can even use a small french knot to represent a tiny flower on the side of the cup, giving it a classic “cottagecore” feel that pairs perfectly with Victorian literature.
For fans of hot cocoa, adding “marshmallows” is a must. You can do this by sewing tiny white felt circles or even small white beads onto the “liquid” part of your Cup-shaped felt bookmark – Pattern. This adds a fun, whimsical 3D element that makes the bookmark look almost good enough to eat. It’s a favorite design for children’s books and holiday-themed gifts during the winter months.
Seasonal customization is another way to keep the Cup-shaped felt bookmark – Pattern fresh and exciting. In the fall, you might use orange and cream felt to create a “Pumpkin Spice Latte” bookmark. In the summer, you could switch the cup for a “mason jar” shape with a felt lemon slice and a straw, proving that the basic logic of the corner bookmark pattern can be adapted for any time of year.
Texture can also play a role in your customization. Instead of just using flat felt, you can use embossed felt or even a small piece of lace to create a “doily” effect on the saucer or the cup itself. Mixing different types of textile materials adds visual interest and makes your Cup-shaped felt bookmark – Pattern a more sensory experience for the reader who will be touching it frequently.
Don’t forget the power of “scrappy” designs. If you have a bin of leftover felt from other projects, the Cup-shaped felt bookmark – Pattern is the ultimate “scrap buster.” You can make a multi-colored, “patchwork” cup that is vibrant and unique. This eco-friendly approach to crafting ensures that no bit of high-quality wool felt goes to waste, making your handcrafted bookmark as sustainable as it is cute.
While the primary use for a Cup-shaped felt bookmark – Pattern is keeping your place in a novel, these little items have many other applications. They are excellent for organizing cookbooks, marking your favorite recipes so you can find them quickly in a busy kitchen. Because they are soft, they won’t damage the delicate pages of an antique book or leave “indentations” like metal or plastic bookmarks often do.
In an educational setting, a Cup-shaped felt bookmark – Pattern can be a great reward for students. Teachers can create “reading cups” in different colors to help kids track their progress or celebrate finishing a difficult chapter. The tactile nature of the felt makes it a great “fidget” for young readers, helping them stay engaged with the physical book in an increasingly digital world.
When it comes to gift-giving, the Cup-shaped felt bookmark – Pattern is a superstar. You can pair it with a bag of gourmet coffee beans, a box of luxury tea, or—best of all—a brand-new book. It shows the recipient that you didn’t just buy a gift; you spent time crafting something that aligns with their interests. It’s a small gesture that carries a lot of emotional weight and crafting sincerity.
For those who sell their work at craft fairs, the Cup-shaped felt bookmark – Pattern is a high-profit, low-cost item. They are quick to make, easy to transport, and always draw a crowd because of their “cute” factor. You can package them in small cellophane bags with a bit of decorative cardstock to create a professional retail presentation that highlights the handmade nature of the product.
You can also use these bookmarks as unique wedding or party favors. Imagine a “Tea for Two” themed bridal shower where every guest receives a personalized Cup-shaped felt bookmark – Pattern in the wedding colors. It’s a functional memento that guests will actually use long after the party is over, serving as a sweet reminder of a special day every time they open a book.
Lastly, consider the “companion” potential. You could make a set of four Cup-shaped felt bookmark – Patterns—one for each season—and gift them as a “Year of Reading” bundle. This encourages a consistent reading habit and gives the user something to look forward to as the months change. No matter how you choose to use or give them, these bookmarks are a testament to the enduring appeal of simple, thoughtful design.
1. Does the bookmark fall off easily?
Not if it is constructed correctly! The key to a secure Cup-shaped felt bookmark – Pattern is making sure the “pocket” is deep enough. By sliding the corner of about 10–15 pages into the cup, the friction of the felt against the paper keeps it snugly in place even if the book is tossed into a backpack or purse.
2. Can I wash my felt bookmark?
If you used wool blend felt, you should be very careful. Hand-washing in cool water with a tiny bit of wool-safe detergent is best. Never put your Cup-shaped felt bookmark – Pattern in the dryer, as the heat will cause the wool to shrink and “felt” further, which will distort the shape and make the bookmark too small for the page corner.
3. What is the best size for this bookmark?
Most people find that a size of approximately 2.5 inches wide by 2.5 inches tall is perfect. This is large enough to be seen and handled easily, but small enough that it doesn’t obscure too much of the text on the page. When designing your Cup-shaped felt bookmark – Pattern, try to keep the “opening” at least 2 inches wide.
4. Do I need a sewing machine?
Absolutely not! In fact, the Cup-shaped felt bookmark – Pattern is much easier to make by hand. Because the pieces are so small, a sewing machine can be difficult to maneuver around the tight curves of the cup and handle. Hand-sewing with a blanket stitch gives you much more control and adds to the “artisanal” charm of the finished piece.
5. My felt is very thin; how can I make the bookmark sturdier?
If you are using thin craft felt, you can simply cut a third layer of felt (or a piece of thin iron-on interfacing) to sandwich in the middle. This adds “body” to the Cup-shaped felt bookmark – Pattern and makes it feel more substantial. However, switching to a thicker 2mm wool felt usually solves this problem instantly.
6. Can I make this pattern without any sewing?
Yes, you can use high-quality fabric glue to assemble a “no-sew” version. Simply apply a thin line of glue along the sides and bottom of the cup pieces. However, keep in mind that a glued Cup-shaped felt bookmark – Pattern may not be as durable as a sewn one, and you won’t get the beautiful aesthetic of the embroidery stitches.
Throughout this article, we have explored the wonderful world of the Cup-shaped felt bookmark – Pattern, a project that perfectly blends utility with creativity. We’ve learned about the importance of choosing quality felt and sharp tools, the techniques of the blanket stitch for assembly, and the endless ways you can customize your cup to be a latte, a teacup, or a cozy cocoa mug.
Whether you are crafting for yourself, a friend, or a craft fair, this DIY bookmark is a small project that makes a big impact on your reading life. It reminds us that taking the time to make something by hand adds a layer of joy to our daily routines that mass-produced items simply cannot match.


