
Bird-shaped Pincushion - Pattern

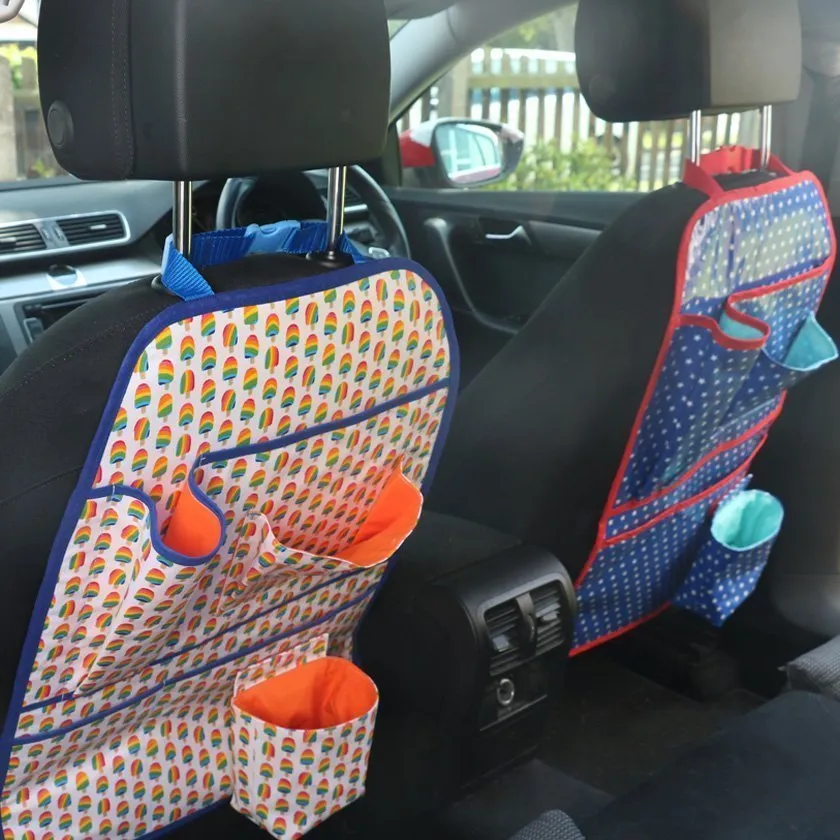
A Custom car seat organizer – Pattern is the ultimate solution for anyone looking to declutter their vehicle while adding a touch of personal style to their interior. Many drivers struggle with loose items sliding around the seats or floorboards, but by using a Custom car seat organizer – Pattern, you can create a tailored storage system that fits your specific needs. This DIY project is not only practical for keeping essentials like water bottles, tablets, and snacks within reach, but it also allows you to choose durable fabrics that match your car’s aesthetic perfectly.
When you decide to embark on the journey of creating a Custom car seat organizer – Pattern, you are choosing functionality over mass-produced, one-size-fits-all products. These handmade organizers are particularly popular among parents and frequent travelers who need reliable vehicle storage solutions that don’t wear out after a few months of use. By selecting your own materials, you ensure that the stitching and durability meet your high standards, providing a long-term organization fix that looks professional and feels unique.
The beauty of working with a Custom car seat organizer – Pattern lies in its versatility and the ability to optimize every inch of your car’s cabin space. Whether you are a beginner at sewing or an experienced crafter, following a well-structured DIY car accessory guide ensures that your finished product is both secure and ergonomic. Throughout this article, we will explore the essential steps to mastering this pattern, selecting the right materials, and implementing SEO-friendly organization tips to make your driving experience more enjoyable and stress-free.
The foundation of any successful sewing project starts with a high-quality Custom car seat organizer – Pattern. This blueprint acts as your roadmap, indicating where to cut the fabric, where to place the pockets, and how to reinforce the straps. Without a clear pattern, you risk creating an organizer that sags or fails to hold the weight of your items.
Choosing a Custom car seat organizer – Pattern allows you to customize the dimensions to fit your specific car seat model. Most patterns are designed for standard bucket seats, but having the ability to adjust the width and height ensures a snug, “factory-installed” look. This precision is what separates a DIY project from a professional-grade automotive interior accessory.
In terms of sewing patterns for beginners, the organizer is a fantastic entry-level project because it primarily uses straight lines and simple hems. The complexity arises only when you decide to add specialized compartments, such as insulated pockets for drinks or clear PVC windows for tablet screens. A good pattern will guide you through these advanced sewing techniques step-by-step.
One of the main benefits of using a Custom car seat organizer – Pattern is the cost-effectiveness compared to high-end retail options. While premium leather organizers can cost a fortune, a DIY version using heavy-duty canvas or upholstery fabric provides the same utility at a fraction of the price. You can even repurpose old materials for an eco-friendly approach.
The ergonomics of car storage are also addressed within a well-made pattern. By positioning pockets at the right height, you ensure that drivers can reach for their sunglasses or charging cables without taking their eyes off the road. Safety should always be a priority, and a structured pattern ensures the organizer remains securely fastened to the headrest and seat base.
Finally, the Custom car seat organizer – Pattern serves as a creative outlet. You aren’t limited to the boring black or grey polyester found in stores; you can use vibrant prints, quilted textures, or even waterproof linings. This customization makes the interior of your car feel more like home, reflecting your personality through creative fabric selection.
When executing a Custom car seat organizer – Pattern, the choice of fabric is the most critical decision you will make. For the main body, you should prioritize abrasion-resistant fabrics like Cordura, heavy denim, or duck canvas. These materials can withstand the constant friction and weight of heavy items like books or tools without tearing.
The backing of your Custom car seat organizer – Pattern should ideally feature a non-slip material or a soft felt. This prevents the organizer from sliding against the leather or cloth of your car seats, which could cause unwanted wear or noise during transit. Using high-friction fabrics on the rear adds an extra layer of stability to your installation.
Don’t forget the importance of heavy-duty thread and needles. Since a car organizer is subject to temperature fluctuations and physical stress, using a standard all-purpose thread might lead to seam failure. Instead, opt for bonded nylon or polyester thread, which offers superior UV resistance and tensile strength for long-lasting DIY automotive projects.
For the pockets, incorporating mesh fabric or elastic webbing is a smart move. Mesh allows you to see the contents of a pocket immediately, while elastic keeps items tightly in place even during sharp turns or sudden stops. Integrating these smart storage materials into your pattern design enhances the overall functionality of the piece.
Fasteners are the final piece of the puzzle. You will need adjustable nylon webbing straps and heavy-duty plastic or metal side-release buckles. These components ensure that your Custom car seat organizer – Pattern stays attached to the seatback. Using high-quality hardware prevents the straps from loosening over time due to the weight of the stored items.
Lastly, consider adding a waterproof lining to at least one pocket. This is especially useful for families with young children, as it provides a safe place for leaky sippy cups or damp umbrellas. Incorporating laminated cotton or PUL fabric into your pattern design adds a layer of protection for your car’s carpet and upholstery.
To begin working with your Custom car seat organizer – Pattern, you must first prepare your workspace and cut your fabric according to the specified measurements. Precision is key during the cutting phase; using a rotary cutter and a self-healing mat will provide much cleaner edges than standard scissors. Ensure you leave a consistent seam allowance as directed by the pattern.
Once the pieces are cut, start by sewing the smaller pockets onto the front panel. This “layering” technique is common in organizational sewing projects. It is much easier to attach zippers, velcro, or decorative trim to individual pockets before they are joined to the main body of the Custom car seat organizer – Pattern.
Reinforcement is the next vital step. Every point where a pocket or strap meets the main panel should be reinforced with cross-stitch or bar tacking. Since these areas bear the most weight, extra stitching prevents the fabric from ripping. This is a hallmark of high-quality handmade car accessories and ensures your project lasts for years.
After the pockets are secured, it is time to attach the mounting straps. These should be positioned at the top to wrap around the headrest poles and at the bottom to tuck into the seat crease or wrap around the base. Following the Custom car seat organizer – Pattern instructions for strap placement ensures the organizer hangs flat against the seat.
As you near completion, you will join the front panel to the back panel. If you are using a padded interlayer like foam or batting, sandwich it between the layers now. This padding gives the organizer structure and protects the items inside from bumping against the hard seatback, enhancing the premium feel of your DIY project.
The final touch is the binding. Applying bias tape or webbing around the outer edges of your Custom car seat organizer – Pattern hides raw edges and provides a professional, polished finish. Once the binding is sewn, do a final “stress test” by pulling on the straps and pockets to ensure everything is locked in place and ready for the road.
Once your Custom car seat organizer – Pattern is fully realized and installed, maintenance becomes the priority. Because cars are high-traffic areas, your organizer will inevitably collect dust or spills. If you chose machine-washable fabrics, you can simply unbuckle the unit and toss it in the wash on a gentle cycle to keep it looking new.
Optimization is about how you use the space you’ve created. Categorize your items by frequency of use; keep your most-used items in the top pockets for easy access. By applying organizational psychology to your car, you reduce the mental clutter and stress that often comes with a messy vehicle interior, making every commute more peaceful.
Over time, you might find that your needs change. The beauty of a DIY Custom car seat organizer – Pattern is that you can easily modify it. If you get a new phone that doesn’t fit the old pocket, or if you need a dedicated spot for a first-aid kit, you can simply sew on an addition or create a “version 2.0” using your original pattern as a base.
To keep the fabric from fading, consider the impact of UV exposure on car interiors. If your car is frequently parked in the sun, applying a fabric protectant spray can help prevent the colors of your Custom car seat organizer – Pattern from bleaching. This simple step preserves the aesthetic appeal of your hard work.
For those looking to sell their creations, focus on niche marketing for car enthusiasts. Many people are looking for high-quality, handmade alternatives to plastic organizers. Highlighting the custom craftsmanship and durable materials used in your pattern-based design can turn a hobby into a profitable small business on platforms like Etsy.
In conclusion, mastering the Custom car seat organizer – Pattern is a rewarding experience that combines utility with creativity. It transforms your vehicle into a more functional space and gives you the satisfaction of building something with your own hands. Whether for personal use or as a gift, a well-made organizer is a must-have car upgrade for the modern driver.
What is the best fabric for a car seat organizer?
The best fabrics are heavy-duty materials like canvas, 600D polyester, or Cordura. These are durable, easy to clean, and hold their shape well over time.
Can I make a car seat organizer without a sewing machine?
While a sewing machine is recommended for structural integrity, you can use heavy-duty fabric glue or hand-sewing with a saddle stitch. However, for a Custom car seat organizer – Pattern, a machine provides the most professional and durable result.
How do I make sure the organizer doesn’t sag?
To prevent sagging, use internal stiffeners like plastic canvas, thick interfacing, or thin plywood inserts within the layers of your Custom car seat organizer – Pattern.
Is it safe to have an organizer on the back of the driver’s seat?
Yes, as long as it is securely fastened and does not interfere with the seat’s mechanical parts or the driver’s ability to move comfortably. Always ensure it doesn’t block side-impact airbags if your seat is equipped with them.
How many pockets should a standard organizer have?
Most Custom car seat organizer – Patterns suggest between 5 to 8 pockets of varying sizes to accommodate everything from tablets to small charging cables.
Creating your own Custom car seat organizer – Pattern is a fantastic way to bring order to your vehicle while showcasing your sewing skills. Throughout this article, we have covered the importance of selecting high-quality industrial-strength fabrics, the precision required in the cutting and assembly phases, and how to maintain your organizer for the long haul.
By following these DIY car organization steps, you ensure a cleaner, safer, and more stylish environment for yourself and your passengers.


