
American-style placemat with a fruit theme - Pattern

Finding the best DIY Fabric Easter Eggs – Pattern is a fantastic way to welcome the spring season into your home while utilizing your favorite fabric scraps. Many crafters look for sustainable alternatives to plastic decorations, and creating your own ornaments allows for a level of personalization that store-bought items simply cannot match. This DIY Fabric Easter Eggs – Pattern is designed to be accessible for beginners while offering enough creative room for experienced sewists to experiment with embroidery, beadwork, and intricate textile layering.
The versatility of a DIY Fabric Easter Eggs – Pattern means you can create a diverse “basket” of eggs that coordinates perfectly with your existing home decor. Whether you prefer a rustic farmhouse look using burlap and linen or a bright, modern aesthetic with bold geometric prints, the core pattern remains a reliable foundation for your artistic expression. These soft, fabric-based decorations are not only beautiful but also child-friendly and pet-safe, making them an ideal choice for busy households that want to celebrate the holiday without worrying about fragile ceramic or glass ornaments.
Working through a DIY Fabric Easter Eggs – Pattern also provides a therapeutic sewing experience that can be completed in just a few sittings. Because these eggs are small, they offer instant gratification and a sense of accomplishment, which is perfect for a quick weekend project. By following a structured DIY Fabric Easter Eggs – Pattern, you ensure that each egg has a consistent shape and size, allowing them to look professional and intentional when displayed together in a decorative bowl or hanging from a seasonal “Easter tree” branch.
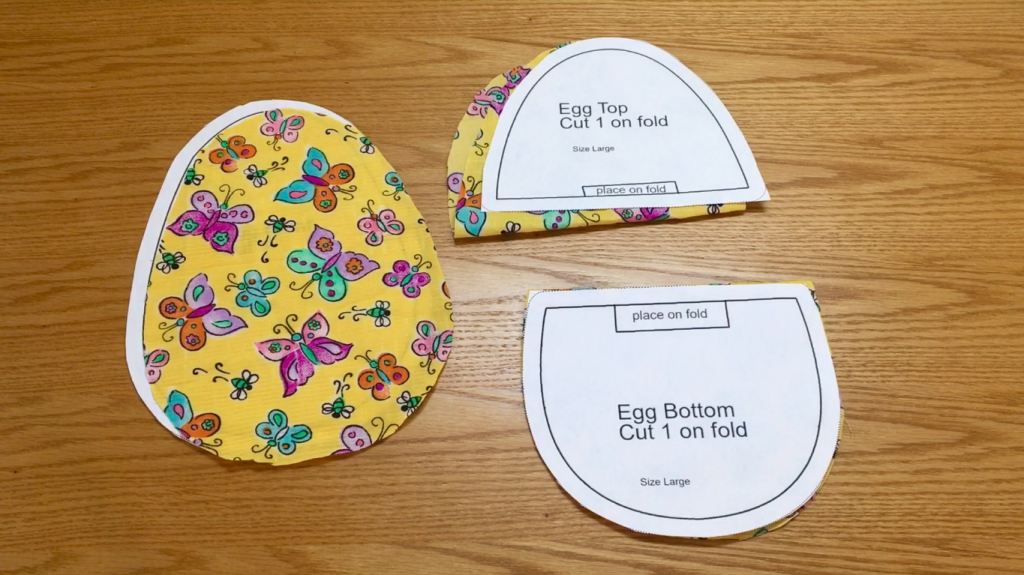
The first step in achieving a successful result with your DIY Fabric Easter Eggs – Pattern is choosing the right material. While almost any fabric can work, 100% quilting cotton is often the top choice because it is easy to handle, holds its shape well, and comes in an endless variety of festive prints. If you want a more textured look, you can incorporate felt, velvet, or even repurposed vintage garments into your DIY Fabric Easter Eggs – Pattern workflow.
To get started, you will need basic sewing supplies including sharp fabric scissors, a marking pen, and a reliable DIY Fabric Easter Eggs – Pattern template. Precision is key when cutting out your fabric wedges; if the pieces are uneven, the egg will look lopsided once stuffed. Using a cardboard or plastic template helps maintain consistency across multiple eggs, ensuring your “batch” looks cohesive and well-crafted.
Thread selection is another detail that can elevate your DIY Fabric Easter Eggs – Pattern project. You can choose a thread that matches your fabric perfectly for a seamless look, or use a contrasting color to add a decorative “topstitch” effect. For those who enjoy hand-sewing, a slightly thicker embroidery floss can be used to join the panels, adding a charming, handmade primitive feel to the finished fabric ornament.
Stuffing is what brings your DIY Fabric Easter Eggs – Pattern to life, and the type of fill you choose matters. High-quality polyester fiberfill is the most common option as it provides a smooth, lump-free finish. However, for a more eco-friendly approach, you can use shredded fabric scraps or even dried lavender to turn your eggs into fragrant sachets that double as beautiful spring decorations.
A good DIY Fabric Easter Eggs – Pattern often involves sewing curved lines, which can be tricky for some. Using a shorter stitch length on your sewing machine will help create a smoother curve and prevent the stuffing from poking through the seams. If you are sewing by hand, a tight backstitch is recommended to ensure the structural integrity of the egg when it is firmly stuffed.
Finally, consider the tools for the “turning” process. Since the pieces in a DIY Fabric Easter Eggs – Pattern are relatively small, using a chopstick or a specialized turning tool will help you push out the curves and points from the inside. This ensures that the final shape is crisp and mimics the natural oval of a real egg, which is the ultimate goal of any floral or festive Easter sewing pattern.
Once your fabric pieces are cut according to the DIY Fabric Easter Eggs – Pattern, it is time to begin the assembly. Most patterns consist of three or four identical wedges that are sewn together. Begin by pinning two wedges with their right sides facing each other and sew along one curved edge. Repeat this process until all panels are joined, leaving a small opening on one side for turning and stuffing.
The “turning” phase of the DIY Fabric Easter Eggs – Pattern is where the magic happens. After sewing, it is helpful to “clip” the curves—making small snips into the seam allowance—without cutting through the stitches. This allows the fabric to stretch and lay flat when you turn it right side out, preventing the unsightly puckering that can sometimes ruin the look of a handmade fabric egg.
Now it is time to stuff your creation based on the DIY Fabric Easter Eggs – Pattern dimensions. Start by pushing small amounts of fiberfill into the top and bottom “points” of the egg first. Gradually fill the center until the egg is firm but still soft to the touch. Over-stuffing can put too much stress on the seams, while under-stuffing will result in a wrinkled and sad-looking decoration.
Closing the opening is a critical finishing touch in any DIY Fabric Easter Eggs – Pattern. The “ladder stitch” or “hidden stitch” is the best technique for this task, as it allows you to close the gap from the outside without any visible thread. This creates a clean, professional finish that makes the egg look like it was manufactured rather than hand-stitched in a home workshop.
If your DIY Fabric Easter Eggs – Pattern includes a hanging loop, now is the time to attach it. You can sew a small ribbon or a piece of baker’s twine into the top of the egg before you finish the final closure. This transforms your egg from a bowl filler into a versatile ornament that can be hung from windows, cabinets, or even used as a unique “gift tag” for an Easter basket.
To add a bit of weight to the bottom of your eggs, some variations of the DIY Fabric Easter Eggs – Pattern suggest adding a small amount of plastic pellets or clean sand before the final stuffing. This allows the eggs to stand upright on a flat surface, which is perfect for creating a festive table centerpiece or a mantel display that stays in place throughout the holiday season.
After mastering the basic DIY Fabric Easter Eggs – Pattern, you might want to add some personal flair. Embroidery is a fantastic way to enhance the fabric. You can sew small flowers, the recipient’s initials, or even a simple “Happy Easter” message onto the fabric panels before you sew them together. This turns a simple decoration into a cherished personalized keepsake.
Another popular way to customize the DIY Fabric Easter Eggs – Pattern is by adding lace or ric-rac trim. By sewing a strip of vintage lace along the seams where the fabric panels meet, you can create a “Victorian” style egg that looks incredibly sophisticated. This technique is excellent for using up those tiny bits of leftover trim that are too small for larger sewing projects.
Beads and sequins can also be incorporated into your DIY Fabric Easter Eggs – Pattern design for a bit of holiday sparkle. Sewing tiny pearls or iridescent sequins onto the surface of the egg mimics the look of a fancy “Fabergé” egg. This is a wonderful activity for those who enjoy the slow, meditative process of hand-embellishment and want to create something truly spectacular.
For a more modern and playful version of the DIY Fabric Easter Eggs – Pattern, you can use “fabric markers” or paint. This is a great way to involve children in the crafting process. You sew the eggs using a plain white or cream fabric, and then let the kids decorate them with patterns, doodles, or colorful stripes, making the Easter project a fun family activity.
Button accents are another charming addition to the DIY Fabric Easter Eggs – Pattern. A small, colorful button sewn at the top or bottom point of the egg can cover up any minor sewing imperfections and add a pop of contrasting color. You can even create a “patchwork” look by using different but coordinating buttons on each side of the egg for a whimsical, crafty vibe.
Don’t forget the power of scent when working with your DIY Fabric Easter Eggs – Pattern. By mixing a few drops of essential oils into your stuffing or adding a small sachet of dried flowers, your eggs will not only look beautiful but also make your home smell like a fresh spring garden. This sensory addition makes the DIY project even more memorable and enjoyable for everyone in the house.
Once you have a collection of eggs from your DIY Fabric Easter Eggs – Pattern, the display possibilities are endless. One of the most classic ways to show them off is in a wooden dough bowl or a vintage wire basket filled with faux grass. This creates a stunning focal point for a dining table or an entryway console that instantly signals the arrival of spring.
You can also use the DIY Fabric Easter Eggs – Pattern to create an “Easter Wreath.” By hot-gluing several fabric eggs onto a grapevine or foam wreath base and adding a few faux greenery stems, you create a unique piece of door decor. This is a great way to reuse eggs from previous years or to show off a large variety of different fabric patterns in one place.
If you enjoy hosting, these eggs made from the DIY Fabric Easter Eggs – Pattern make excellent “place cards” for an Easter brunch. Simply tie a small paper tag with the guest’s name around the center of the egg with a piece of twine. Guests will love having a handmade gift to take home at the end of the meal, making the celebration feel extra special and thought-out.
The DIY Fabric Easter Eggs – Pattern is also perfect for creating “advent-style” countdowns. You can make twelve eggs and hide a small treat or a note inside the stuffing of each one (using a small velcro closure instead of a permanent stitch). This turns the lead-up to Easter into a fun daily activity for children, building excitement for the big day.
Gifting these eggs is a wonderful way to spread joy to neighbors and friends. You can package a set of three eggs from your DIY Fabric Easter Eggs – Pattern in a small egg carton or a clear cellophane bag tied with a pretty bow. Because they are lightweight, they are also very easy and affordable to mail to loved ones who live far away, serving as a “hug in an envelope.”
Finally, remember that the DIY Fabric Easter Eggs – Pattern is a project that can grow with you. Every year, you can add a few more eggs to your collection, perhaps choosing a “color of the year” or trying a new fabric medium like silk or wool. Over time, your collection of handmade eggs will become a beautiful timeline of your crafting journey, filled with memories of past spring seasons.
1. Is the DIY Fabric Easter Eggs – Pattern suitable for someone who has never sewn before?
Yes! This is an excellent beginner project. It teaches you how to sew curves, how to turn fabric, and how to use a basic ladder stitch. If you find the sewing machine intimidating, you can easily sew the entire pattern by hand while watching your favorite show.
2. How long does it take to make one egg?
Once you have your fabric cut, sewing and stuffing a single egg usually takes about 15 to 20 minutes. If you are making a large batch, it is much faster to do it “assembly line” style—doing all the cutting first, then all the sewing, and finally all the stuffing.
3. What is the best size for the DIY Fabric Easter Eggs – Pattern?
Most people prefer their fabric eggs to be roughly the size of a large chicken egg (about 2.5 to 3 inches tall). However, you can easily scale the pattern up to make “giant” eggs for floor displays or down to make tiny “quail” eggs for a miniature display.
4. Can I wash these fabric eggs?
If you used 100% cotton and a standard polyester fill, you can gently hand wash them and let them air dry. However, if you added embellishments like glue-on sequins, beads, or used “dry-clean only” fabrics like silk, it is best to only spot clean them with a damp cloth.
5. How much fabric do I need for a DIY Fabric Easter Eggs – Pattern?
This is the ultimate scrap-buster! A single fat quarter of fabric can yield several eggs. You only need small pieces (wedges usually about 4 inches long), so it is a great way to use up those leftovers from larger quilting or garment projects.
6. Can I make these eggs without a sewing machine?
Absolutely. Many crafters prefer hand-sewing the DIY Fabric Easter Eggs – Pattern because it allows for more control on the tight curves. A simple running stitch or backstitch works perfectly and gives the egg a lovely “handmade” character.
In this article, we have explored the creative and rewarding process of using a DIY Fabric Easter Eggs – Pattern to decorate your home for spring. We covered everything from choosing the best cotton fabrics and essential sewing tools to the step-by-step assembly and the beautiful embellishments that make each egg unique.
We also discussed how to display and gift these handmade treasures, ensuring they bring joy to your family and friends. This pattern is more than just a craft; it is a way to celebrate tradition and sustainability through the art of sewing.


