
American-style placemat with a fruit theme - Pattern

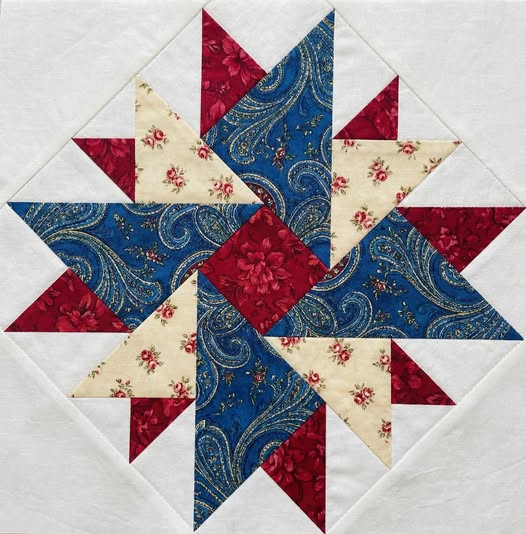
The Double Aster Quilt Block Tutorial is your gateway to creating a stunning, vintage-inspired masterpiece that brings a touch of celestial elegance to your home. If you have been searching for a high-quality Pattern that balances complexity with manageable steps, this Double Aster Quilt Block guide is specifically designed for you. Quilting is more than just sewing fabric together; it is an art form that tells a story through geometric precision and color theory, and this specific block is a shining example of how traditional designs remain timeless in the modern era.
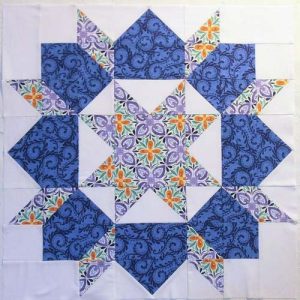
By following this comprehensive Tutorial, you will learn how to navigate the intricate points and layers that make the Double Aster Quilt Block so visually striking. This design is often characterized by its “star-within-a-star” appearance, requiring a careful eye for detail and a steady hand at the sewing machine. Whether you are planning to make a full-sized bedspread or a decorative wall hanging, mastering this Pattern will significantly elevate your quilting repertoire and provide you with a versatile skill set for future projects.
In the world of quilting, the Double Aster Quilt Block stands out because of its unique symmetry and the way it utilizes negative space to make the primary colors “pop.” This Tutorial aims to demystify the construction process, breaking down the cutting, piecing, and pressing phases into digestible parts. Our goal is to ensure that your finished Pattern looks professional, with crisp corners and perfectly aligned seams that reflect the hard work and passion you put into every stitch.
To begin your journey with the Double Aster Quilt Block, you first need to gather high-quality cotton fabrics that provide high contrast. Selecting the right colors is the most critical part of this Pattern, as the “double” effect of the aster flower depends on how the light and dark shades interact. Most quilters prefer using a solid neutral background to let the vibrant “petals” of the star take center stage in the finished project.
Precision is key in any Tutorial, so ensure you have a rotary cutter with a fresh blade and a non-slip acrylic ruler. Because the Double Aster Quilt Block involves several small triangles and squares, even a slight measurement error can lead to a misaligned block. Investing time in accurate cutting will save you hours of frustration later when you are trying to match the delicate points of your Pattern.
Thread choice also matters when working on a Double Aster Quilt Block. A high-quality 50wt cotton thread in a neutral color like dove gray or tan is ideal because it blends well with most fabrics and doesn’t add bulk to your seams. Since this Tutorial involves many intersecting seams, keeping the thread thin but strong is essential for achieving a flat, professional-looking finish on your quilt top.
Don’t forget the importance of a reliable iron and ironing board. In this Pattern, pressing is just as important as sewing; every time you join two pieces of the Double Aster Quilt Block, you must press the seams to one side or open them to maintain the structural integrity of the design. This habit ensures that the block remains square and doesn’t warp as you add more layers of fabric.
A specialized marking tool, such as a water-soluble pen or a tailor’s chalk, is highly recommended for this Tutorial. Since the Double Aster Quilt Block requires sewing several diagonal lines for half-square triangles, having clear, visible guides will improve your accuracy significantly. This attention to detail is what separates a beginner project from a masterpiece created from a professional Pattern.
Lastly, make sure your sewing machine is cleaned and oiled before you start. The Double Aster Quilt Block involves sewing through multiple layers of fabric at the points where the stars meet, so a smooth-running machine and a sharp 80/12 needle are necessary. Having all your tools organized before you begin this Tutorial creates a relaxing environment where you can focus entirely on the creative process of your Pattern.
The first step in our Double Aster Quilt Block construction is the cutting process, which serves as the foundation for the entire project. For a standard 12-inch block, you will need to cut several squares of your primary “star” fabric and your secondary “accent” fabric. This Tutorial emphasizes that “measure twice, cut once” is the golden rule to follow when working with an intricate Pattern like this one.
You will need to cut four 3.5-inch squares of background fabric for the corners of your Double Aster Quilt Block. Additionally, the center of the Pattern usually requires a 4.5-inch square of your most prominent fabric to act as the “heart” of the aster flower. Precision at this stage ensures that the “double” layers of the star will radiate outward symmetrically as described in this Tutorial.
Next, focus on the “petals” or the points of the Double Aster Quilt Block. You will need to cut eight 3-inch squares of your main color and eight 3-inch squares of your accent color to create the half-square triangles (HSTs). These HSTs are the building blocks of the Pattern, providing the geometric movement that makes the Double Aster Quilt Block look so complex and beautiful.
Using your rotary cutter, divide some of these squares diagonally to create the necessary triangles for the inner star of the Double Aster Quilt Block. This Tutorial suggests keeping your cut pieces organized in small piles or labeled containers. When working with a detailed Pattern, it is very easy to mix up similar-sized pieces, so staying organized is a top priority for success.
The background fabric also requires several 4-inch squares that will be used to frame the outer points of the Double Aster Quilt Block. By cutting these slightly larger, you allow yourself a bit of “wiggle room” to trim the blocks down to the perfect size later. This is a common trick used in a professional Pattern to ensure that the final quilt top is perfectly square and easy to quilt.
Once all your pieces are cut, lay them out on a design board or a flat table to visualize the Double Aster Quilt Block before you start sewing. This allows you to check your color placement and ensure the Pattern flows the way you intended. Taking this extra moment in our Tutorial prevents the “seaming and ripping” cycle that can happen if a piece is accidentally rotated the wrong way.
Now that your pieces are ready, it is time to start the actual assembly of the Double Aster Quilt Block. We begin by creating the Half-Square Triangles (HSTs) that form the inner core of the Pattern. Place a colored square and a background square right sides together, draw a diagonal line, and sew a quarter-inch seam on both sides of that line as instructed in this Tutorial.
Once you have sewn the HSTs, cut them along the drawn line and press them open. It is vital to trim these units to the exact size specified in your Pattern instructions. For a 12-inch Double Aster Quilt Block, your HSTs should be trimmed to exactly 3 inches square. Consistent sizing at this stage is the secret to making sure all the points of your star meet perfectly in the middle.
Next, we assemble the “Flying Geese” units that often surround the center of a Double Aster Quilt Block. These units create the illusion of the aster petals reaching outward. This Tutorial recommends using the “stitch and flip” method for these units, as it tends to be more accurate for many quilters when following a complex Pattern. Always check that your points are not being “chopped off” by your seam allowance.
The assembly of the Double Aster Quilt Block usually happens in three rows. The top row, the middle row (containing the center square), and the bottom row. This horizontal approach to the Pattern makes it much easier to manage the many small pieces involved. Follow the layout you created on your design board to ensure every triangle is pointing in the correct direction as shown in our Tutorial.
When joining the rows of your Double Aster Quilt Block, use plenty of pins to keep the fabric from shifting. The “nesting seams” technique—where you press one row’s seams to the left and the next row’s seams to the right—is highly effective for this Pattern. This technique allows the seams to lock together, providing a flat surface and perfect intersections for your Double Aster Quilt Block.
The final step of the assembly in this Tutorial is to join the three rows together. Slow down your sewing speed as you cross over the bulky intersections of the Double Aster Quilt Block. Once the rows are joined, give the entire block a final press with a hot iron. You have now completed the main structure of the Pattern, resulting in a beautiful, symmetrical star that is ready to be incorporated into your quilt.
Finishing a Double Aster Quilt Block is a rewarding experience, but there are a few professional tips that can make your work stand out. One of the best ways to enhance this Pattern is to use “fussy cutting” for the center square. This means choosing a specific motif from your fabric—like a small bird or a single flower—to be perfectly centered in the Double Aster Quilt Block, adding a custom touch to your Tutorial results.
If you find that your Double Aster Quilt Block is coming out slightly smaller or larger than expected, don’t panic. Many quilters add a thin “stay-stitch” around the edge of the block, about 1/8 inch from the edge. This prevents the bias edges of the Pattern from stretching out of shape while you are handling it or sewing it to other blocks, a tip often overlooked in a basic Tutorial.
Borders can also transform a single Double Aster Quilt Block into a complete project like a pillow cover or a table runner. Choosing a fabric for the border that complements the “outer” star of your Pattern will create a cohesive look. In this Tutorial, we recommend using a simple 2-inch border to frame the intricate geometry of the block without distracting from the main design.
When it comes to quilting the Double Aster Quilt Block, “stitch-in-the-ditch” is a classic choice that emphasizes the geometric lines of the Pattern. Alternatively, you could try free-motion quilting a circular “swirl” pattern over the star to mimic the organic feel of a real aster flower. Whatever method you choose, remember that the goal of this Tutorial is to highlight the beauty of your handiwork.
Consistency across multiple blocks is vital if you are making a full quilt. Use the same seam allowance (preferably a scant 1/4 inch) for every Double Aster Quilt Block you create. This ensures that every Pattern unit you produce will fit together seamlessly, making the final assembly of your quilt top a breeze rather than a struggle, as emphasized throughout this Tutorial.
Finally, take pride in your completed Double Aster Quilt Block. This specific Pattern is known for being a bit of a challenge, so finishing one successfully is a testament to your growth as a quilter. Share your progress with the quilting community, and don’t be afraid to experiment with bold color palettes in your next Tutorial attempt. Your journey with this classic design is just the beginning of many beautiful creations.
1. Is the Double Aster Quilt Block suitable for absolute beginners?
While a beginner can certainly attempt it, the Double Aster Quilt Block is generally considered an intermediate-level Pattern. It requires precise cutting and accurate quarter-inch seam allowances to ensure all the points line up. If you are a beginner, we recommend following this Tutorial slowly and practicing on scrap fabric first.
2. What is the best fabric for this Double Aster Quilt Block Tutorial?
High-quality 100% cotton “quilter’s weight” fabric is the best choice. It has a stable weave that doesn’t fray easily, which is important for the many small pieces in this Pattern. Using contrasting colors—like a dark navy and a bright yellow—will make the Double Aster Quilt Block design much more visible.
3. How do I prevent my points from getting cut off?
This is a common challenge with the Double Aster Quilt Block. The key is to sew exactly a quarter-inch away from the point where the seams intersect. In our Tutorial, we suggest using a “scant” quarter-inch seam, which is just a hair narrower than a standard quarter inch, to account for the fold of the fabric in the Pattern.
4. Can I resize the Double Aster Quilt Block Pattern?
Yes, you can scale the Pattern up or down. However, the math can be tricky because of the many components. It is usually easier to find a Tutorial specifically written for the size you want (e.g., 6-inch, 9-inch, or 12-inch) rather than trying to calculate the measurements for a Double Aster Quilt Block manually.
5. How long does it take to finish one block?
For an intermediate quilter, one Double Aster Quilt Block usually takes about 1 to 2 hours from cutting to the final press. If you are using this Tutorial for the first time, it might take a bit longer as you familiarize yourself with the Pattern layout and the assembly steps.
In this article, we have explored the intricate and beautiful world of the Double Aster Quilt Block, providing you with a detailed Tutorial to help you master this classic Pattern.
From selecting the right high-contrast fabrics to the precise cutting of squares and triangles, we have covered the essential steps needed to create a stunning “star-within-a-star” effect. We also discussed the importance of pressing seams, nesting intersections, and using professional tips like fussy cutting to make your work truly unique.


