
Horizontal Row Quilt - Pattern

The Double Four Patch Quilt Block – Pattern is a timeless and versatile quilt block design that adds a charming, intricate touch to any quilt.
Whether you’re a seasoned quilter or just starting out, this block offers a wonderful way to practice piecing while creating a beautiful, symmetrical layout.
The Double Four Patch pattern is known for its interwoven blocks and its ability to create a visually striking design without requiring advanced skills.
In this article, we will guide you through the process of creating this quilt block and provide useful tips to help you personalize your design.
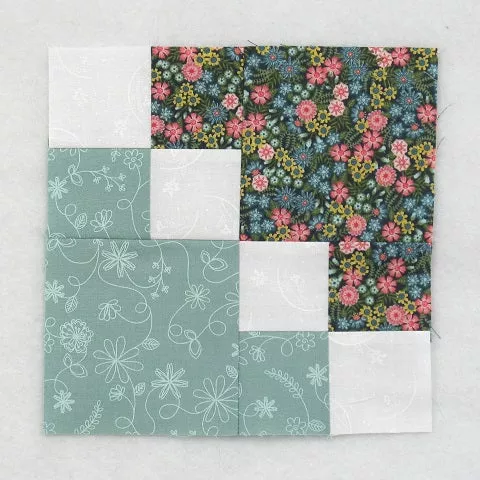
Image From Pinterest
The Double Four Patch Quilt Block is made up of four smaller four-patch blocks, which are combined to form a larger block. This pattern offers endless possibilities for color combinations, giving you the chance to get creative with your fabric choices. From simple two-tone designs to multicolored patterns, the Double Four Patch block can fit a variety of styles and themes. It’s perfect for those looking to make a quilt that is both traditional and modern at the same time.
As we delve into the process of making the Double Four Patch Quilt Block, you’ll learn how to cut the fabric, sew the patches together, and assemble the block to create the perfect piece for your quilt. We’ll also discuss some creative ideas for customizing the design and tips on how to make your quilt blocks even more unique.
Before beginning the Double Four Patch Quilt Block, it’s essential to gather all the necessary materials to ensure the process goes smoothly. Here are the key supplies you will need:
Fabric: Choose fabrics that complement each other. You’ll need four different fabrics to create a single Double Four Patch Block. Typically, two fabrics are used for the small four-patch blocks, and the other two fabrics are used for the larger four-patch sections. You can choose solid fabrics, prints, or a mix of both, depending on your desired aesthetic. For a more traditional look, use fabrics from the same color family; for a modern vibe, consider using contrasting colors or patterns.
Rotary Cutter and Cutting Mat: A rotary cutter and cutting mat are essential for making accurate cuts. The cutting mat protects your work surface, and the rotary cutter ensures you can cut clean, straight lines.
Quilting Ruler: A quilt ruler will help you measure and cut fabric pieces precisely. It’s especially helpful for cutting your fabric into squares and strips of the correct size.
Sewing Machine: A sewing machine is the most efficient way to stitch the pieces together. Be sure to adjust your machine’s settings for quilting, such as the stitch length and tension.
Thread: Use a good-quality quilting thread in a color that complements your fabric choices. A neutral color works well, but you can also match the thread to the fabric for a more polished look.
Pins or Fabric Clips: Pins or fabric clips will help you keep the fabric pieces in place while you sew. They ensure that the pieces align properly as you stitch.
Having all of these materials at hand will help ensure you can focus on the fun part of creating your Double Four Patch Quilt Block.
The first step in creating the Double Four Patch Quilt Block is cutting your fabric into the appropriate pieces. Precise cutting is key to ensuring the block fits together perfectly. Here’s how to cut the fabric:
Step 1: Cutting the Small Four-Patch Squares
Start by cutting the first two fabrics into small squares. You will need to cut each fabric into strips, typically 2.5 inches wide. Then, cut the strips into 2.5-inch squares. These squares will be used to create the smaller four-patch blocks. Aim for a total of 8 squares for each fabric (16 squares in total).
Step 2: Cutting the Larger Four-Patch Squares
Next, cut the other two fabrics into strips that are also 2.5 inches wide. Afterward, cut the strips into 5-inch squares. These squares will be used for the larger four-patch sections. Again, aim for a total of 8 squares for each fabric (16 squares in total).
Step 3: Creating the Border Strips
If you plan on adding a border around your Double Four Patch Quilt Block, now is the time to cut the border strips. For a standard-sized block, you can cut strips of fabric that are 2.5 inches wide to frame the block. Make sure the strips are long enough to fit around the block.
Step 4: Sorting and Organizing
Once all the pieces are cut, sort them by fabric and size. Keeping your fabric pieces organized will help ensure a smooth assembly process. Arrange the smaller squares and larger squares separately so they’re easy to access when you begin piecing them together.
Cutting your fabric carefully will set the foundation for a well-constructed Double Four Patch Quilt Block. Now you’re ready to start piecing the smaller four-patch blocks together.
Once your fabric is cut, the next step is to begin sewing the pieces together. This is where the Double Four Patch Quilt Block starts to take shape. Here’s how to piece everything together:
Step 1: Piecing the Smaller Four-Patch Blocks
Take four of the 2.5-inch squares from the first fabric and arrange them in a 2×2 grid. Sew them together by stitching along the edges with a quarter-inch seam allowance. Press the seams open to ensure the blocks lie flat. Repeat this process for the second fabric, creating another smaller four-patch block.
Step 2: Piecing the Larger Four-Patch Blocks
Take four of the 5-inch squares from the third fabric and arrange them in a 2×2 grid, similar to the smaller blocks. Sew them together in the same way, using a quarter-inch seam allowance, and press the seams open. Repeat the process with the fourth fabric, creating a second larger four-patch block.
Step 3: Assembling the Blocks
Now that you have the smaller and larger four-patch blocks, it’s time to combine them. Lay the two smaller four-patch blocks in the top and bottom positions, and place the two larger four-patch blocks in the left and right positions. This will form the Double Four Patch Quilt Block.
Step 4: Attaching the Blocks
Sew the smaller blocks to the larger blocks, making sure the seams align properly. Use a quarter-inch seam allowance as you sew. After attaching the blocks, press the seams open to flatten them and ensure a neat finish.
Step 5: Adding the Border
If you’re adding a border to your quilt block, now is the time to sew the 2.5-inch strips around the edges of the assembled block. This will give your block a finished, cohesive look.
Step 6: Final Pressing
After the entire block is assembled, give it a final press with your iron. This will set the seams and ensure your block lies flat and smooth. Now your Double Four Patch Quilt Block is ready to be added to your quilt project!
The Double Four Patch Quilt Block can be customized in many ways to suit your personal style. Here are some tips for adding your unique touch to the block:
Use Different Color Schemes
While the traditional design uses two contrasting fabrics for the smaller four-patch blocks and two contrasting fabrics for the larger four-patch blocks, you can experiment with different color combinations. Consider using a variety of tones and shades to create a more dynamic, eye-catching block.
Play with Print Fabrics
Don’t be afraid to use printed fabrics for the smaller and larger blocks. Floral, geometric, or even scrappy fabrics can add a fun, modern twist to your Double Four Patch Quilt Block.
Vary the Block Sizes
Although the traditional Double Four Patch block uses equal-sized pieces, you can experiment with different-sized patches to create a more complex design. Try larger or smaller blocks to add visual interest and variety to your quilt.
Add Embellishments
Consider adding appliqué, embroidery, or even beads to your Double Four Patch Quilt Block to give it a unique flair. These embellishments can create texture and depth within the block, making it stand out.
Create a Scrap Quilt
If you have fabric scraps lying around, use them to make a scrap quilt. A scrappy Double Four Patch Quilt Block can be a great way to use up leftover fabric and create a quilt with a fun, eclectic feel.
Experiment with Quilting Techniques
Once the block is assembled, try different quilting patterns to enhance the design. Free-motion quilting, straight-line quilting, or even hand-quilting can add texture and visual interest to your finished quilt.
1. What is a Double Four Patch Quilt Block?
A Double Four Patch Quilt Block is a block pattern made up of two smaller four-patch blocks and two larger four-patch blocks. The blocks are sewn together to create a symmetrical and balanced design.
2. Can I use different fabric types for the Double Four Patch?
Yes! You can use various fabric types, such as cotton, flannel, or even linen, depending on the look you want to achieve. Make sure the fabric is easy to work with and appropriate for quilting.
3. How do I ensure the blocks are the right size?
To ensure your blocks are the correct size, use a quilt ruler for precise cutting and a quarter-inch seam allowance for accurate stitching. Press the seams open to avoid bulk.
4. Can I use a machine to sew the blocks together?
Yes, using a sewing machine is the best way to piece together your Double Four Patch Quilt Block quickly and efficiently.
5. How can I customize my Double Four Patch Quilt Block?
You can customize your block by playing with fabric colors, using print fabrics, varying the block sizes, or adding embellishments like appliqué or embroidery.
The Double Four Patch Quilt Block – Pattern is a timeless, beautiful design that is perfect for quilters of all skill levels. In this article, we have explored the materials you need, the steps for cutting and piecing the fabric, and ideas for customizing your block. Whether you stick to the traditional design or get creative with color combinations and embellishments, the Double Four Patch block is sure to add charm and personality to any quilt. We’d love to hear your thoughts and suggestions, so feel free to share your experiences in the comments below!


