Carolina Lily Tabletop Quilt - Pattern

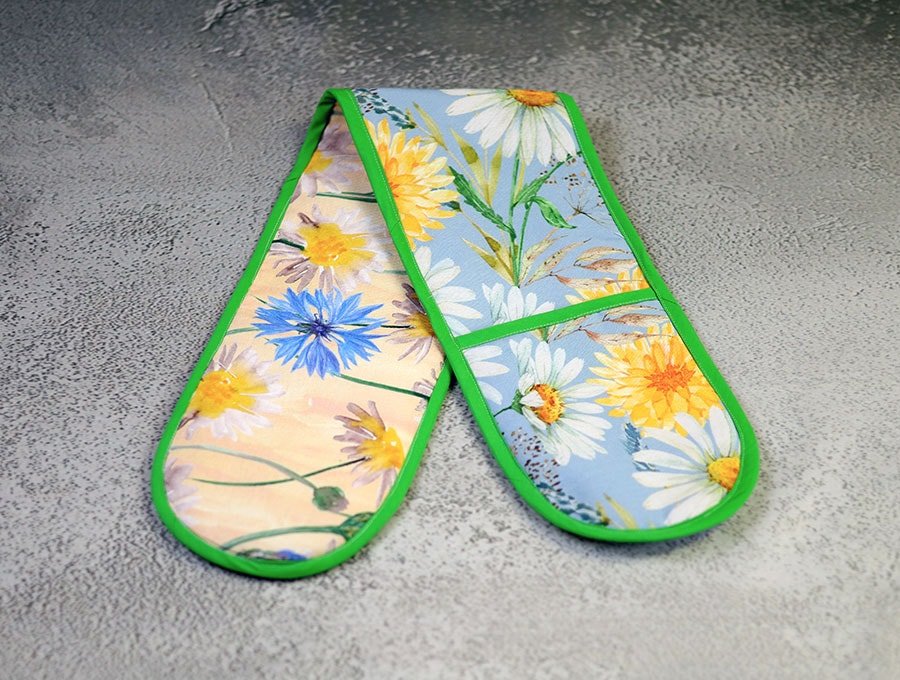
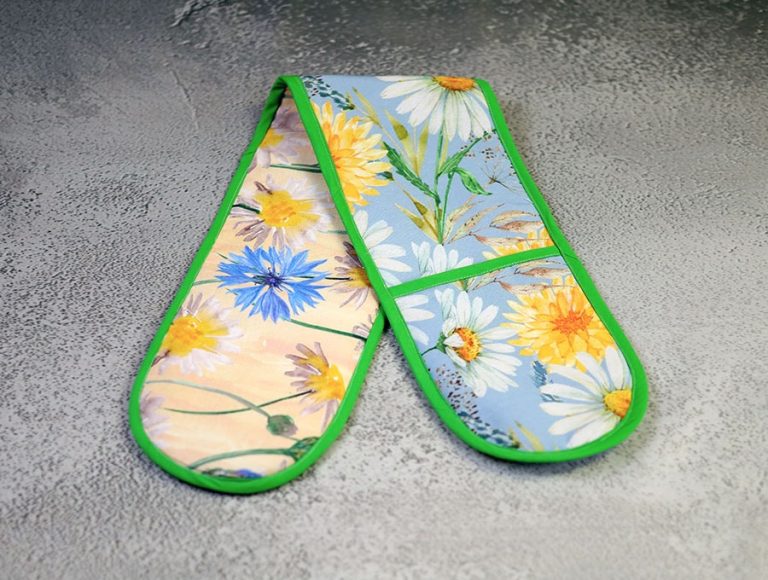
The Double oven mitt – Pattern is one of the most practical sewing projects you can undertake for your home, offering a level of safety and convenience that standard gloves simply cannot match. If you have ever struggled to pull a heavy, piping-hot casserole dish out of the oven with two separate mitts, you know how awkward it can be to maintain a secure grip while protecting your wrists and forearms. A double-sided mitt connects two hand pockets with a long bridge of heat-resistant fabric, allowing you to wrap your hands around large pans with a continuous layer of protection. It is a game-changer for anyone who spends significant time baking or roasting.
Creating your own kitchen accessories using a Double oven mitt – Pattern allows you to customize the length and width to fit your specific body type and the size of your cookware. Most store-bought mitts are a “one size fits all” solution that often leaves smaller hands feeling swallowed or larger hands exposed to burns. By taking the DIY route, you can select high-quality insulated batting and heavy-duty cotton fabrics that reflect your personal style while ensuring maximum heat resistance. It is an ideal project for intermediate sewers who want to practice quilting techniques while producing something highly functional for daily use.
In this detailed guide, we are going to explore the nuances of the Double oven mitt – Pattern, from the selection of specialized heat-safe materials to the final construction steps. We will discuss why certain fabrics are mandatory for kitchen safety and how the structural design of a double mitt prevents common kitchen accidents. Whether you are making this for your own culinary adventures or as a thoughtful housewarming gift, understanding the logic behind the pattern will ensure your finished product is both beautiful and protective. Let’s dive into the essential components of this classic kitchen essential.
The most critical factor when starting your Double oven mitt – Pattern is the choice of fabric. You must exclusively use 100% natural fibers, specifically heavy-weight cotton canvas or denim, for the exterior and lining. Synthetic fabrics like polyester, nylon, or blends are extremely dangerous in this context because they can melt onto your skin when exposed to high temperatures. A sturdy cotton duck fabric provides the necessary durability to withstand the friction of heavy pans while offering a classic, professional look to your handmade kitchen gear.
Inside the layers of your Double oven mitt – Pattern, you need a specialized thermal barrier. Standard polyester quilt batting is insufficient because it does not block heat effectively and can melt. Instead, look for Insul-Bright or a similar needle-punched polyester with a metallized polyester film. This material reflects heat back toward the source, providing that vital window of time needed to move a hot tray from the oven to the cooling rack. For maximum protection, many crafters layer this with a sheet of 100% cotton batting to absorb moisture.
Thread selection is another safety detail that shouldn’t be overlooked in your Double oven mitt – Pattern. Just like the fabric, your thread should be 100% cotton. While polyester thread is common and strong, it has a lower melting point than cotton. In a high-heat environment like a professional-grade oven, cotton thread ensures that the seams of your insulated mitt remain intact. Using a slightly longer stitch length can also help maintain the strength of the seams when working through multiple thick layers of insulation.
Before you begin cutting your Double oven mitt – Pattern, it is highly recommended to pre-wash all your cotton fabrics. Kitchen accessories undergo frequent laundering to remove grease, flour, and food spills. Since cotton is prone to shrinking, pre-washing ensures that your finished mitt won’t warp or become too short after its first wash. This step is essential for maintaining the dimensional stability of the mitt, especially since the internal thermal layers do not shrink at the same rate as the outer decorative fabric.
The “bridge” section of the Double oven mitt – Pattern—the long piece connecting the two hand pockets—requires careful measurement. Generally, this section should be long enough to span the width of your largest roasting pan plus the length of your forearms. A standard length is usually between 30 and 35 inches. Measuring your wingspan and your oven width beforehand allows you to tailor the sewing pattern to your specific needs, ensuring the mitt isn’t so long that it drapes into the food or so short that it pulls at your wrists.
Finally, consider the grip surface of your Double oven mitt – Pattern. Some modern patterns incorporate a layer of silicone-coated fabric or specialized “grip” material on the palms. If you choose to add this, ensure the material is specifically rated for high-temperature kitchen use. A textured surface provides extra security when handling glass or ceramic dishes, which can become slippery when covered in condensation or oil. This added feature transforms a basic cloth mitt into a high-performance culinary tool.
The layout of a Double oven mitt – Pattern is unique compared to standard gloves. It typically consists of one long rectangular body piece and two smaller pocket pieces that form the hand inserts. When you lay out your fabric, you are looking to create a “sandwich” of materials. You will need to cut the main body from your outer fabric, your lining, and your heat-resistant insulation. Precision in cutting these long strips is vital to ensure the mitt hangs straight and doesn’t twist during use.
When cutting the hand pockets for your Double oven mitt – Pattern, you have the choice between a rounded “mitten” shape or a simple rectangular pocket. Rounded edges are generally more aesthetically pleasing and easier to slide your hands into quickly. However, they require a bit more skill when it comes to sewing around curves with thick layers. Using a rotary cutter and a cutting mat is the best way to achieve clean, professional edges through the dense layers of cotton and thermal batting.
The internal layering is where the Double oven mitt – Pattern gets its protective power. Most experts suggest a specific order: outer fabric, a layer of 100% cotton batting, the metallized thermal barrier, and then the lining fabric. This four-layer system creates a thick, padded feel that mimics professional commercial oven mitts. Because you are sewing through four or more layers, using quilting clips instead of traditional pins will prevent your pins from bending and help keep the layers perfectly aligned.
Marking the quilting lines is a step that adds both style and structure to your Double oven mitt – Pattern. Quilting the layers together prevents the insulation from shifting or bunching up inside the mitt over time. You can use a tailor’s chalk or a disappearing ink pen to mark a classic diamond or grid pattern across the long body of the mitt. Quilting not only makes the mitt more durable but also makes it more flexible, allowing the fabric to bend easily around the handles of heavy pots.
Another important aspect of the Double oven mitt – Pattern is the “thumb” placement, if your chosen design includes one. While many double mitts are simple rectangular pockets, some include a thumb partition for a more anatomical grip. If your pattern includes this, pay close attention to the notches and alignment marks. A misplaced thumb can make the mitt uncomfortable to use and may even reduce your grip strength, which is a safety hazard when dealing with heavy, hot liquids.
Lastly, don’t forget to cut a small loop for hanging. Most Double oven mitt – Pattern designs include a fabric loop sewn into the center or the side of the bridge. This allows you to hang the mitt on your oven handle or a kitchen hook, keeping it within reach at all times. Using a scrap of the outer canvas fabric for this loop ensures it matches perfectly and is strong enough to support the weight of the thick, insulated mitt without fraying or snapping.
The primary challenge of the Double oven mitt – Pattern is the thickness of the material. Your sewing machine will be working through several layers of heavy fabric and insulation, which can cause skipped stitches or broken needles. To avoid this, use a size 100/16 or 110/18 denim needle. These needles are designed to pierce through dense weaves without deflecting. A walking foot is also an invaluable tool here, as it feeds the top and bottom layers of the “fabric sandwich” through the machine at the same rate.
When joining the hand pockets to the main body of the Double oven mitt – Pattern, it is best to use a generous seam allowance. This provides extra strength at the points where your hands will be exerting pressure. Reinforce the entry points of the pockets with backstitching or a small zigzag stitch. These areas take the most strain every time you slide your hands in, so double-stitching ensures that your handmade mitt won’t start falling apart at the seams after just a few months of use.
Binding the edges is the most common way to finish a Double oven mitt – Pattern. Using double-fold bias tape provides a clean, professional finish and encases all the raw edges of your thick layers. You can buy pre-made bias tape, but making your own from the same cotton fabric used in the lining creates a more cohesive look. The bias tape also adds another layer of durability to the perimeter of the mitt, which is the area most likely to come into contact with the hot edges of the oven racks.
If you find that the layers are too thick to fit under your presser foot when sewing the Double oven mitt – Pattern, try using a “hump jumper” or a folded piece of cardboard to level the foot. This helps the machine transition over the bulky seams at the pocket edges. Sewing slowly and using the handwheel to manually guide the needle through particularly thick sections can prevent machine timing issues and ensure that every stitch in your DIY kitchen project is secure and even.
Topstitching is the final sewing step that gives the Double oven mitt – Pattern its “boutique” appearance. A neat row of stitching around the entire edge of the mitt, about 1/8 of an inch from the binding, keeps everything laying flat. This is especially important for the bridge section, as it helps the mitt maintain its shape when hanging. Choosing a contrasting thread color for the topstitching can make the quilted design pop, highlighting the craftsmanship that went into your work.
Once the sewing is complete, give your finished Double oven mitt – Pattern a good press with a steam iron. While the insulation is heat-resistant, a blast of steam on the cotton exterior helps set the stitches and smooth out any wrinkles caused during the assembly process. Check all the seams one last time for any gaps or loose threads. A well-finished mitt should feel substantial, flexible, and ready to tackle everything from Sunday roasts to delicate holiday cookies.
The beauty of a project completed from a Double oven mitt – Pattern is its longevity, but proper care is required to maintain its heat-reflective properties. Because the mitt is used around food, it will eventually get stained. It is best to spot-clean small spills immediately. When a deep clean is necessary, machine wash the mitt on a gentle cycle with cold water. Avoid using fabric softeners, as they can sometimes leave a residue on the fibers that might slightly reduce the heat resistance of the cotton over time.
Air drying is the preferred method for a mitt made from a Double oven mitt – Pattern. While you can use a dryer on low heat, the intense tumbling and high heat of a commercial dryer can cause the internal metallized film of the Insul-Bright to crinkle or lose its effectiveness over many cycles. Laying the mitt flat on a drying rack allows the thick layers to dry thoroughly without the risk of heat damage to the internal components.
One of the most versatile aspects of the Double oven mitt – Pattern is that it doubles as a giant trivet. When you are not using it to move pans, you can lay the long bridge across your dining table or countertop to protect the surface from hot dishes. The thermal insulation works both ways—it keeps heat away from your hands and away from your furniture. This dual-purpose functionality makes it one of the most efficient items you can have in a modern kitchen.
As your Double oven mitt – Pattern ages, it is important to inspect it for “hot spots.” Over years of heavy use, the fibers in the batting may eventually compress or wear thin in the areas where you grip the pans most frequently. If you start to feel the heat coming through more quickly than before, it may be time to sew a new one. Luckily, since you already have the pattern and the skills, creating a replacement is a quick and rewarding afternoon task.
You can also adapt the Double oven mitt – Pattern for seasonal decor. Many crafters make different versions for Christmas, Thanksgiving, or summer barbecues. Using festive prints or bright colors allows you to rotate your kitchen accessories to match the holiday spirit. Because the sewing project uses relatively small amounts of fabric, it is a great way to use up high-quality scraps from larger quilting projects, making it an eco-friendly choice for the sustainable home.
Finally, the Double oven mitt – Pattern makes an incredible gift for the “foodies” in your life. When paired with a nice baking dish or a set of wooden spoons, it becomes a thoughtful, personalized present. Everyone needs oven mitts, but few people own a high-quality, double-sided version. By sharing your handmade creations, you are providing friends and family with a tool that enhances their safety and enjoyment in the kitchen for years to come.
No, regular polyester batting is not safe for this project. It does not provide adequate thermal protection and can melt at high temperatures. You must use batting specifically designed for heat resistance, such as 100% cotton batting or products like Insul-Bright which contain a heat-reflective metallic layer.
A standard Double oven mitt – Pattern usually measures between 30 and 35 inches in length. This allows enough room to safely grip a large pan while ensuring the bridge of the mitt protects your forearms and chest from the heat of the oven.
Generally, no. If you use Insul-Bright or any insulation with a metallized film, it contains metal and should never be placed in a microwave. If you need something microwave-safe (like a bowl cozy), you must use 100% cotton fabric, 100% cotton thread, and 100% cotton batting with no metallic components.
A mid-to-heavy weight cotton canvas (7oz to 10oz) is ideal for a Double oven mitt – Pattern. It provides the structural integrity needed to support heavy pans and offers a durable exterior that can withstand frequent washing and high heat.
Yes, but it is considered an “advanced beginner” or intermediate project. The main challenge is sewing through very thick layers of fabric. If your machine can handle the bulk and you are comfortable sewing straight lines and binding edges, you can definitely succeed with this pattern.
The primary benefit of the Double oven mitt – Pattern is safety and convenience. It provides a continuous barrier of heat protection across your body, and you never have to hunt for a “missing” second mitt. It also makes it much easier to balance large, heavy items like Thanksgiving turkeys or heavy cast-iron Dutch ovens.
In this guide, we have explored the essential steps to creating a high-quality kitchen tool using a Double oven mitt – Pattern. We covered the vital safety requirement of using 100% cotton fabrics and specialized thermal batting to ensure your hands remain protected from extreme heat.
We also discussed the construction process, emphasizing the importance of quilting the layers for stability and using the right sewing machine needles to handle the bulk. By following a structured Double oven mitt – Pattern, you can create a durable, dual-purpose accessory that serves as both a protective glove and a tabletop trivet, bringing both safety and style to your culinary space.