
Horizontal Row Quilt - Pattern

The Double Windmill Block – Pattern is a striking quilt block that offers both movement and symmetry in one powerful visual design. Its rotating appearance adds a sense of energy and fluidity to any quilt, while its balanced structure makes it easy to incorporate into both traditional and modern quilting styles. Whether you’re creating a full quilt or a single statement block, this pattern is sure to capture attention.
At its core, the Double Windmill Block – Pattern is a variation of the classic windmill or pinwheel block, but with added complexity. This block uses clever fabric placement and piecing techniques to create the illusion of two overlapping windmills spinning in opposite directions. The result is a dynamic block that keeps the viewer’s eye moving across the quilt surface.
In this article, we’ll guide you through the history, construction, fabric selection, and creative variations of the Double Windmill Block – Pattern. You’ll learn how to assemble it step by step and discover tips to make your blocks clean and precise. Whether you’re new to quilting or looking for your next challenge, this guide will help you bring this beautiful block to life.
The Double Windmill Block – Pattern evolved from the traditional windmill or pinwheel blocks commonly used in early American quilts. These blocks were often created to symbolize motion, progress, or even the changing seasons. The “double” version takes the idea a step further by incorporating overlapping shapes that mimic the blades of two rotating windmills.
What makes this pattern so visually interesting is its sense of depth and movement. Unlike simpler blocks, the Double Windmill creates a layered, almost three-dimensional effect that gives your quilt a bold and sophisticated look.
Over time, this block has gained popularity among intermediate and advanced quilters due to its intricate layout and piecing requirements. However, with proper guidance, confident beginners can also take on the challenge and produce beautiful results.
Its versatility is another major appeal. The Double Windmill Block – Pattern works well as a focal point in wall hangings, a repeated motif in large bed quilts, or even as a mini quilt project. It pairs wonderfully with solids, tone-on-tone fabrics, and small prints.
Despite its complexity, the block is made from basic geometric shapes: triangles, rectangles, and squares. It’s the strategic placement and color contrast that creates the windmill illusion, making the design accessible to anyone with patience and a love for precision.
In quilting groups and online communities, this block is often used in themed challenges or swaps because of the creativity it allows. Each quilter can bring a unique flair to the same basic layout, resulting in a wide range of interpretations from a single Double Windmill Block – Pattern.
Choosing the right fabrics for your Double Windmill Block – Pattern is essential to highlighting the dynamic, spinning motion of the design. Because the block features overlapping elements, color contrast and value placement play key roles in its success.
Start by selecting two high-contrast colors for the windmill blades. These should differ in either color, tone (light vs. dark), or print scale. One option could be a bold solid paired with a subtle print, or a dark background contrasted by vibrant colors.
The background fabric should be neutral or low-volume, so it doesn’t compete with the windmill shapes. Popular choices include light gray, off-white, cream, or even soft pastels. Make sure the background allows the windmill arms to stand out.
You can also use gradient or ombré fabrics to add even more movement to the design. Placing gradients within each blade segment enhances the illusion of spinning and adds visual depth to the block.
If you’re making a multi-block quilt using this pattern, consider selecting a cohesive color palette across all blocks but varying the fabric placements. This will create a consistent look while adding interest from block to block.
Pre-cuts such as fat quarters or layer cakes work well for this pattern since you only need small pieces of multiple colors. Make sure to pre-wash fabrics if you’re combining pre-cuts with yardage to avoid shrinkage issues later.
Finally, test your fabric combinations by laying them out or using digital quilt design software. This step can help you make sure your fabric choices are working together before you cut and sew.
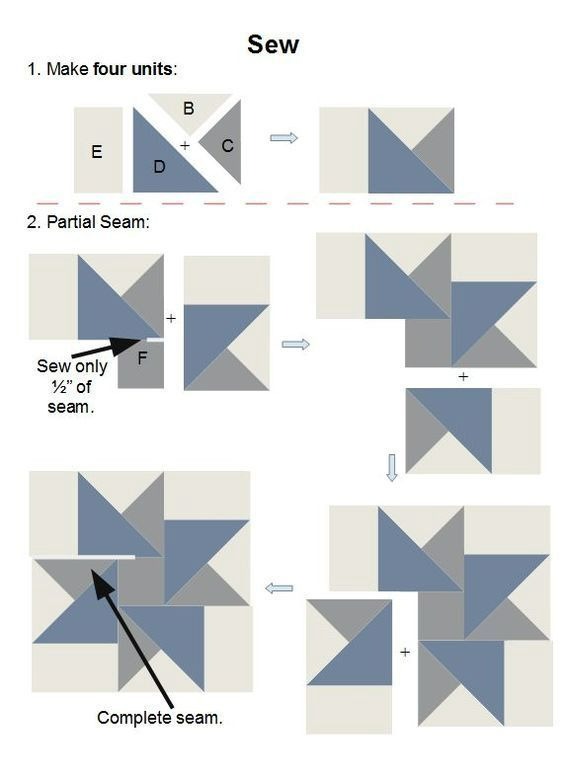
The construction of the Double Windmill Block – Pattern involves precision, but it follows logical steps that can be repeated for consistent results. You’ll mainly be working with half-square triangles (HSTs) and flying geese units.
Begin by cutting your fabric according to your pattern measurements. Most versions of this block are based on a 4×4 grid layout, meaning you’ll sew together 16 smaller units to form the full block.
Start by making your HSTs. Pair your windmill fabrics right sides together, draw a diagonal line, sew 1/4” from each side, then cut along the line and press. You’ll need several of these in alternating fabric combinations to build the double windmill effect.
Next, assemble flying geese units, which often make up the outer parts of the windmill. These involve sewing small squares onto rectangles at a diagonal and trimming to create clean triangle points. Accuracy in cutting and stitching is crucial to maintain the block’s sharp angles.
Once all your units are assembled, lay out the block in the correct formation. It’s helpful to use a design board or a flannel surface so the pieces don’t shift. Check your layout carefully before sewing rows together.
Sew your rows one at a time, pressing seams as you go. Some quilters prefer pressing seams open to reduce bulk, while others press to the side to “nest” seams for better alignment. Choose the method that gives you the best accuracy.
After all rows are joined, square up the block using a ruler and rotary cutter. A well-trimmed block ensures smooth assembly when joining multiple blocks into a quilt top.
One of the best parts about the Double Windmill Block – Pattern is how adaptable it is. Once you master the basic construction, you can explore different variations to make the design your own.
Try rotating blocks in your quilt layout to form secondary patterns. When set side by side, the windmill blades can intersect or create new shapes like diamonds or stars, depending on their orientation.
Use scrappy fabrics for a vibrant, eclectic look. Each windmill blade can be made from a different fabric, creating a patchwork-style block that adds warmth and personality to your quilt.
For a modern aesthetic, experiment with minimal color palettes—such as all-black windmills on a white background or neon blades on gray fabric. The bold contrast and clean lines work especially well in contemporary quilts.
Another fun variation is the offset windmill, where some of the blades are extended or shifted slightly. This breaks the symmetry of the traditional block and creates a unique, artistic look.
You can also make a mini version of the Double Windmill block for use in small projects like potholders, mug rugs, or quilted coasters. These mini blocks are great for practicing your technique without committing to a full quilt.
Finally, consider combining this block with other complementary blocks—like the pinwheel, Ohio star, or flying geese—to create a sampler quilt with dynamic motion and diversity in every row.
Q1: Is the Double Windmill Block suitable for beginners?
A: While it’s slightly more advanced than basic blocks, confident beginners with some experience in HSTs and flying geese can absolutely give it a try.
Q2: What size is a standard Double Windmill block?
A: Common finished sizes are 12” or 16”, but the block can be scaled up or down depending on your project.
Q3: Do I need special tools to make this block?
A: No special tools are required, but a rotary cutter, quilting ruler, and a flat surface for layout are helpful for accuracy.
Q4: Can I make this block using pre-cuts?
A: Yes! Fat quarters, charm packs, and layer cakes all work well, especially if you plan your cutting carefully.
Q5: What’s the best way to press seams in this block?
A: Many quilters prefer pressing seams open for a flatter finish, especially when working with lots of triangles and intersections.
Q6: How many blocks do I need for a queen-size quilt?
A: That depends on the block size. For 12” blocks, you’ll need about 64 blocks for a quilt that measures approximately 96” x 96”.
The Double Windmill Block – Pattern offers a wonderful blend of tradition and innovation. Its movement, symmetry, and visual depth make it a compelling choice for any quilter looking to create something both classic and dynamic. While it may appear complex at first glance, with the right guidance and attention to detail, it becomes an enjoyable and rewarding project.
In this article, we covered everything from the block’s origins and appeal to fabric selection, sewing techniques, and creative adaptations. Whether you’re making a single block or an entire quilt, the Double Windmill is sure to impress.


