
American-style placemat with a fruit theme - Pattern

The Dutchman’s Puzzle Quilting – Pattern is one of those timeless designs that captures the essence of traditional Americana while offering a sophisticated geometric appeal for modern makers. This specific quilt pattern is renowned for its movement and symmetry, relying heavily on the clever arrangement of triangles to create a “spinning” visual effect. Whether you are looking for a weekend project or a centerpiece for a king-sized bed, mastering the Dutchman’s Puzzle is a rewarding milestone for any quilter.
In this comprehensive Dutchman’s Puzzle – Quilting Tutorial – Pattern guide, we will break down the history, the technical construction, and the creative variations of this beloved block. Many beginners feel intimidated by the amount of points that need to be matched, but with the right quilting tutorial techniques, you can achieve crisp, professional results. The beauty of the Dutchman’s Puzzle lies in its versatility; it looks equally stunning in vintage reproduction fabrics as it does in bold, monochromatic solids.
By following this Dutchman’s Puzzle – Quilting Tutorial – Pattern, you will learn how to efficiently cut your fabric and assemble the units using the “flying geese” method. This method is the backbone of the entire design, and perfecting it will improve your skills for dozens of other quilt patterns. Throughout this article, we will explore the best tools, step-by-step assembly instructions, and tips for choosing the perfect color palette to make your Dutchman’s Puzzle stand out.
The Dutchman’s Puzzle is a classic patchwork design that dates back several centuries, often associated with the early settlers and the evolution of geometric folk art. Its name is thought to reflect the heritage of the “Pennsylvania Dutch” or the Dutch immigrants who brought rich textile traditions to the United States. In terms of visual structure, it is a star-like block that uses pairs of triangles to create a sense of constant rotation.
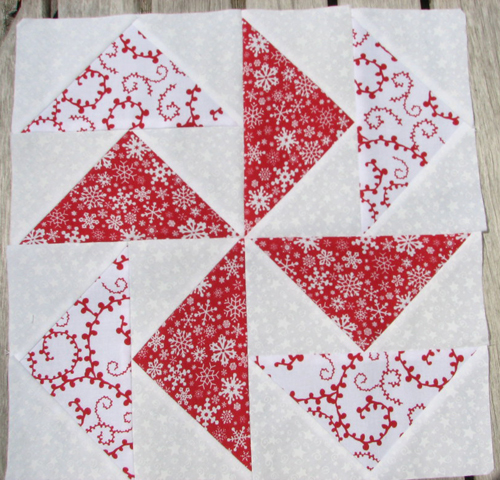
When you look at a Dutchman’s Puzzle – Quilting Tutorial – Pattern, you will notice that it is primarily composed of flying geese units. A flying geese unit is a rectangle that is twice as wide as it is tall, featuring a large central triangle flanked by two smaller ones. In this specific quilt pattern, these units are grouped in pairs, with the “points” of the triangles facing each other or spinning around a center axis.
The mathematical precision of the Dutchman’s Puzzle makes it a favorite for those who love symmetrical quilting patterns. Traditionally, it was made using scraps of fabric, giving it a “charmed” or “scrappy” look that told a story of frugality and creativity. Today, modern quilters often use high-quality quilting cotton to ensure that the points remain sharp and the block lays perfectly flat after pressing.
One of the key reasons this Dutchman’s Puzzle – Quilting Tutorial – Pattern remains popular is its scalability. You can create a small 6-inch block for a decorative pillow or scale it up to a 12-inch or 18-inch block for a faster quilt assembly. Understanding the ratio of the triangles is the first step in mastering the layout before you even touch your sewing machine.
Because the Dutchman’s Puzzle relies on so many diagonal seams, it is an excellent project for practicing your 1/4 inch seam allowance. Accuracy is vital here; if your seams are off even by a hair, the final block might turn out slanted or “wonky.” This is why using a dedicated quilting tutorial is essential for ensuring your measurements are spot on from the very first cut.
As we dive deeper into this Dutchman’s Puzzle – Quilting Tutorial – Pattern, remember that the color contrast is what defines the “puzzle” aspect. By choosing a dark fabric for the “geese” and a light fabric for the background, you create a sharp silhouette. Alternatively, using multiple colors can transform the block into a vibrant, kaleidoscopic work of art that looks much more complex than it actually is.
To successfully complete the Dutchman’s Puzzle – Quilting Tutorial – Pattern, you need to start with the right materials. High-quality 100% cotton fabric is the gold standard for quilting because it holds its shape and doesn’t slip during the sewing process. You will need at least two contrasting colors: one for the “geese” (the triangles) and one for the background to make the pattern pop.
A sharp rotary cutter and a self-healing cutting mat are non-negotiable for this quilting tutorial. Since the Dutchman’s Puzzle involves cutting many small triangles and rectangles, a dull blade can lead to frayed edges and inaccurate sizes. Using a clear acrylic quilting ruler will help you align your fabric grains correctly, ensuring that your pieces don’t stretch out of shape.
In addition to cutting tools, a high-quality sewing machine with a consistent straight stitch is necessary for this Dutchman’s Puzzle – Quilting Tutorial – Pattern. Many quilters prefer using a “patchwork foot” or a “quarter-inch foot” to maintain that perfect seam width. This ensures that when you join your units together, the points of your triangles aren’t “chopped off” in the seam allowance.
Don’t forget the importance of pressing tools like a reliable steam iron and a wool pressing mat. In the Dutchman’s Puzzle, seams can become bulky where multiple points meet. Pressing your seams open or to the side (following the tutorial’s directions) will help the block lay flat and make the final quilt pattern much easier to quilt by hand or machine later on.
Marking tools, such as a water-soluble pen or a Hera marker, are also very helpful for this Dutchman’s Puzzle – Quilting Tutorial – Pattern. You may need to draw diagonal lines on the back of your fabric squares to guide your sewing. Accurate marking is often the secret difference between a beginner-looking quilt and a masterpiece that looks like it came from a professional studio.
Lastly, consider your thread choice. A fine, strong 50wt cotton thread in a neutral color like grey or tan works best for the Dutchman’s Puzzle. You want the thread to be strong enough to hold the seams but thin enough that it doesn’t add extra bulk to the intersections. With these tools ready, you are prepared to tackle the assembly of this iconic quilt pattern.
The heart of the Dutchman’s Puzzle – Quilting Tutorial – Pattern is the construction of eight flying geese units for every single block. The most efficient way to do this is the “four-at-a-time” method, which saves fabric and prevents you from having to sew individual small triangles. In this quilting tutorial, we focus on maximizing your time while maintaining the highest level of accuracy.
To start, you will cut one large square for the “geese” and four smaller squares for the background. Place two small squares on opposite corners of the large square, right sides together. Draw a diagonal line across the small squares and sew a 1/4 inch seam on both sides of that line. Once you cut along the line and press the flaps open, you are halfway to completing your units for the Dutchman’s Puzzle.
Repeat the process by adding the remaining small squares to the new corners of your heart-shaped fabric piece. This clever quilt pattern technique eliminates the need to handle stretchy bias edges, which is a common frustration for many. By following this specific Dutchman’s Puzzle – Quilting Tutorial – Pattern method, you ensure that your units are perfectly squared up before they are joined.
Once you have your eight flying geese units, it is time to pair them up. In the Dutchman’s Puzzle, two geese are stacked on top of each other to form a square sub-unit. Pay close attention to the orientation of the triangles. You want the “nose” of one goose to point toward the base of the other, creating the “spinning” motion that defines this quilting pattern.
Accuracy during the “joining” phase is where the magic happens. Align the edges perfectly and pin at the intersections where the points meet. When you sew these pairs together, aim to stitch just a hair’s breadth outside the point of the triangle. This ensures that when you open the unit, the point of the Dutchman’s Puzzle remains perfectly visible and sharp.
After you have four pairs of flying geese, you essentially have a “four-patch” layout. Arrange these four squares so that the triangles seem to chase each other around the center of the block. This is the moment where the Dutchman’s Puzzle – Quilting Tutorial – Pattern truly comes to life. Sew the top two units together, then the bottom two, and finally join the two rows to complete your block.
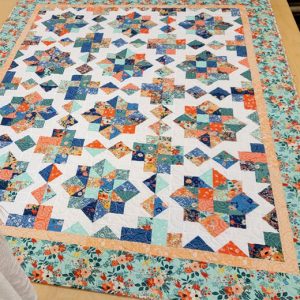
Completing a single block is just the beginning of your journey with the Dutchman’s Puzzle – Quilting Tutorial – Pattern. Once you have mastered the block, you must decide on the overall layout of your quilt. You can sew the blocks directly to one another for a “borderless” look that creates a secondary pattern of interlocking stars, or you can use sashing to separate them.
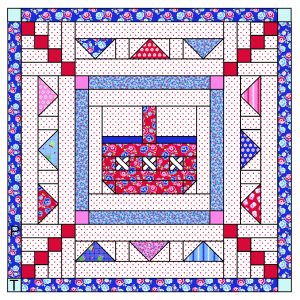
Adding sashing—strips of fabric between the blocks—is a great way to give the eyes a place to rest. In this Dutchman’s Puzzle – Quilting Tutorial – Pattern, sashing can also help you hide slight variations in block sizes. If your points didn’t line up perfectly, a beautiful sashing fabric can distract from those minor imperfections and make the overall quilt pattern look cohesive.
Choosing a border is the next step in finishing your quilting tutorial project. A simple solid border can frame the complexity of the Dutchman’s Puzzle beautifully. However, if you’re feeling adventurous, you can create a “pieced border” using more flying geese units to echo the theme of the central design. This adds a layer of professional flair to your finished quilt top.
Once the top is finished, you will need to choose a “batting” (the middle layer) and a backing fabric. For a Dutchman’s Puzzle – Quilting Tutorial – Pattern, a cotton or cotton-blend batting provides a classic, flat look that highlights the intricate stitching. When it comes to the “quilting” itself—the stitching that holds the layers together—you can follow the lines of the triangles or use a contrasting “free-motion” design.
Binding is the final touch. This involves sewing a strip of fabric around the raw edges of your quilt to seal them. For a Dutchman’s Puzzle, a striped binding or a color that matches the “geese” can provide a stunning frame. This quilting tutorial recommends a double-fold binding for durability, ensuring your hard work lasts for generations.
Finally, don’t forget to label your quilt! Every Dutchman’s Puzzle – Quilting Tutorial – Pattern you complete is a piece of your personal history. Include your name, the date, and the name of the pattern on a small fabric label on the back. This turns your project from a simple blanket into a cherished heirloom that celebrates the timeless beauty of the Dutchman’s Puzzle.
1. Is the Dutchman’s Puzzle block suitable for absolute beginners?
While a total beginner can certainly try it, the Dutchman’s Puzzle is considered an “intermediate” block because it requires precise point matching. However, if you follow a detailed Dutchman’s Puzzle – Quilting Tutorial – Pattern and practice your flying geese units first, you can definitely succeed.
2. What is the most common mistake when making this quilt pattern?
The most common mistake is “chopping off the points.” This happens when the seam allowance is too wide. To avoid this, always check that your stitches are not crossing over the very tip of the triangle.
3. How many colors should I use for a Dutchman’s Puzzle?
Traditionally, this quilt pattern uses two colors (one light and one dark). However, it looks fantastic as a “scrappy” quilt where every set of “geese” is a different color against a consistent neutral background.
4. Can I use the “No-Waste” flying geese method for this tutorial?
Yes! The “No-Waste” or “Four-at-a-Time” method is highly recommended for the Dutchman’s Puzzle – Quilting Tutorial – Pattern because it is faster and more accurate than cutting individual triangles.
5. What size is a standard Dutchman’s Puzzle block?
The most common sizes are 12 inches by 12 inches or 6 inches by 6 inches. Because the block is based on a grid, it is easy to scale as long as your flying geese units maintain a 1:2 height-to-width ratio.
6. Do I need to use pins for this pattern?
In this quilting tutorial, pinning is highly recommended. Because there are many intersections where seams meet, pins help keep the fabric from shifting, ensuring your points stay sharp and aligned.
In this Dutchman’s Puzzle – Quilting Tutorial – Pattern, we have explored the rich history, the essential tools, and the step-by-step techniques required to create this stunning geometric design.
We learned that the secret to a perfect Dutchman’s Puzzle lies in the accuracy of your flying geese units and the precision of your 1/4 inch seams. By choosing high-quality fabrics and using modern cutting methods, you can transform a complex-looking quilt pattern into an enjoyable and rewarding sewing experience.


