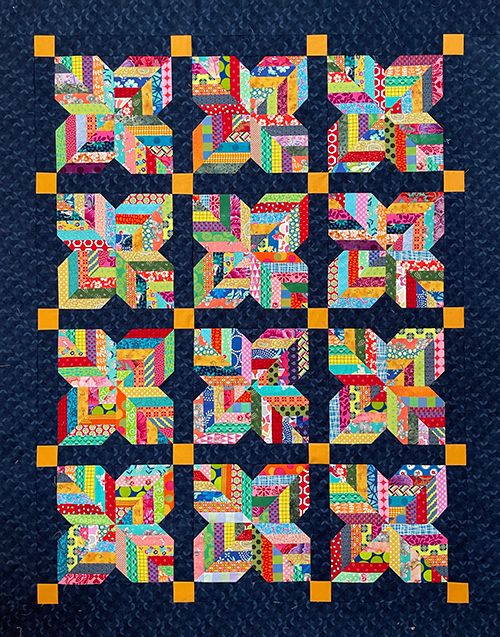
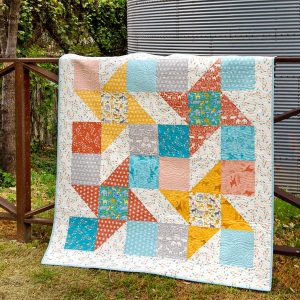
Easy Scrappy Lap Quilt - Tutorial

This Easy Scrappy Lap Quilt – Tutorial is your gateway to clearing out that overflowing fabric bin while creating something truly cozy and meaningful. If you have been hoarding small pieces of fabric from past projects, wondering if they will ever find a home, a scrappy quilt is the ultimate solution for sustainable crafting. A lap quilt is the perfect size for beginners and seasoned quilters alike, providing just enough warmth for a cold evening on the sofa without the overwhelming commitment of a king-sized bedspread.
In this comprehensive Easy Scrappy Lap Quilt – Tutorial, we focus on the beauty of imperfection and the joy of color play. Unlike traditional quilts that require strict color coordination and expensive yardage, the scrappy method thrives on variety. By mixing different patterns, textures, and hues, you create a visual tapestry that tells the story of your sewing journey. Every square in an easy lap quilt represents a memory, making the final product much more than just a blanket—it becomes a functional heirloom.
The structure of this Easy Scrappy Lap Quilt – Tutorial is designed to keep the process stress-free and enjoyable. We will move through the phases of sorting your scraps, mastering the randomized patchwork technique, and finishing the quilt with a professional touch. Even if you have never quilted before, this “easy” approach eliminates the fear of “matching seams” perfectly, allowing the vibrant chaos of the fabrics to hide any minor mistakes. Let’s grab those fabric piles and turn them into a stunning, one-of-a-kind handmade lap quilt.
The first step in any Easy Scrappy Lap Quilt – Tutorial is the sorting phase. You want to gather all your cotton fabric scraps and group them roughly by size or color. For a truly “scrappy” look, don’t worry about things matching perfectly; instead, look for a balance of light, medium, and dark values. This contrast is what gives a scrappy quilt its depth and prevents the design from looking like a flat, unrecognizable blur of color.
Once you have your scraps, you need to decide on a base shape. For this Easy Scrappy Lap Quilt – Tutorial, we recommend using 5-inch squares (often called charm squares) or 2.5-inch strips. Standardizing your scrap sizes makes the assembly much faster and ensures that your patchwork rows align without frustration. If your scraps are smaller, you can sew them together into “crumb” blocks first and then trim them down to the desired square size.
Lay your pieces out on a flat surface or a design wall. This is where the magic of the Easy Scrappy Lap Quilt – Tutorial happens. Move the squares around until the colors feel distributed evenly. A helpful trick is to take a black-and-white photo of your layout with your phone; this allows you to see the tonal balance and identify any “clumps” of dark or light fabric that might be distracting to the eye.
While the goal is randomness, a little bit of organization goes a long way. Some quilters prefer a controlled scrappy look, where they pick a “neutral” fabric, like a soft cream or grey, to place between the busy squares. This gives the eye a place to rest and makes the colorful fabric scraps pop even more. Regardless of your choice, the beauty of a lap quilt is that there are no strict rules—only your personal preference.
Preparation also involves checking your equipment. Ensure your rotary cutter has a fresh blade to prevent frayed edges on your precious scraps. You will also need a neutral-colored thread, such as tan or light grey, which blends seamlessly into almost any fabric color. Since this is an easy quilt tutorial, having a consistent quarter-inch seam allowance foot on your sewing machine will make the sewing process significantly smoother.
Finally, iron every single scrap before you start cutting. It might seem tedious, but wrinkles can lead to inaccurate measurements, which causes the quilt blocks to become distorted during assembly. A crisp, flat piece of fabric is much easier to work with and results in a higher-quality finished lap quilt. Once your pieces are cut and pressed, you are ready to start the exciting process of “chain piecing” your rows together.
In this Easy Scrappy Lap Quilt – Tutorial, we use a technique called chain piecing to save time and thread. This involves sewing pairs of squares together one after another without cutting the thread in between. It creates a long “chain” of fabric that you can later snip apart. This method is incredibly efficient for an easy scrappy project, allowing you to assemble the entire quilt top in a fraction of the time it would take to sew each piece individually.
Once your pairs are ready, you will begin sewing them into rows. For a standard lap quilt size (approximately 50″ x 60″), you might have 10 squares per row and 12 rows in total. As you sew, pay attention to the direction you press your seams. A professional tip for this Easy Scrappy Lap Quilt – Tutorial is to “nest your seams” by pressing the seams of row one to the right and row two to the left.
Nesting the seams allows the fabric to lock together at the intersections, resulting in perfect quilt corners without much effort. This is particularly helpful in a scrappy quilt where the different weights of fabric might make the seams bulky. By alternating the pressing direction, you reduce the thickness at the corners, making it easier for your sewing machine needle to pass through the layers without skipping.
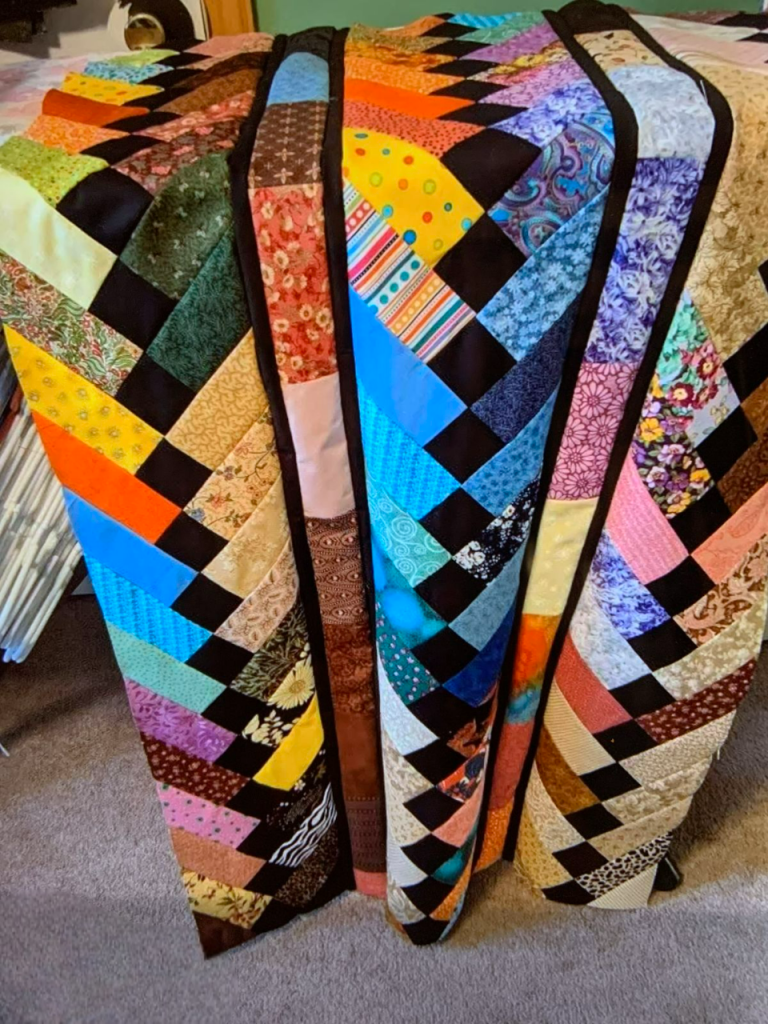
As your rows come together, the Easy Scrappy Lap Quilt – Tutorial starts to reveal its final character. You will see the interaction between the different prints—a floral next to a geometric, or a solid next to a stripe. This variety is the soul of the scrappy aesthetic. Don’t be afraid to leave in “ugly” fabrics; once they are surrounded by other colors in a patchwork design, they often become the most interesting part of the quilt.
Consistency is key during the assembly of the quilt top. Always maintain that 1/4-inch seam, as even a tiny deviation can lead to a quilt that doesn’t lay flat. If you notice your edges aren’t lining up perfectly, don’t panic. Because this is an easy lap quilt, you can always trim the edges of the finished quilt top before adding the borders or the binding to make everything look square and intentional.
Once all your rows are joined, give the entire quilt top a good press. Start from the center and work your way out to avoid stretching the fabric. At this point in the Easy Scrappy Lap Quilt – Tutorial, you have completed the “flimsy”—the completed top that is now ready to be transformed into a three-layered “quilt sandwich.” Take a moment to admire the vibrant collection of memories you’ve sewn together.
The “quilt sandwich” is a term we use in this Easy Scrappy Lap Quilt – Tutorial to describe the three layers: the quilt top, the batting, and the backing fabric. For a lap quilt, you want a backing that is soft and durable. Flannel or high-quality cotton are excellent choices. Make sure your backing and batting are at least 2-4 inches larger than your quilt top on all sides to allow for shifting during the quilting process.
Basting is the process of temporarily holding these layers together. For this Easy Scrappy Lap Quilt – Tutorial, you can choose between safety pin basting or using a temporary spray adhesive. Pin basting is more traditional and eco-friendly, while spray basting is faster and prevents the layers from puckering. If you use pins, place them about every 4 to 6 inches across the entire surface to ensure nothing moves.
Lay your backing fabric face down on a hard floor or a large table and secure it with masking tape so it is taut but not stretched. Place the quilt batting on top, followed by your completed scrappy quilt top face up. Smooth out every wrinkle with your hands, moving from the center toward the edges. This step is vital for a flat quilt, preventing those dreaded “tucks” on the back of the project.
When choosing batting for your Easy Scrappy Lap Quilt – Tutorial, consider how you plan to use it. If you want a warm, heavy quilt, choose a wool or cotton/poly blend. If you want a lightweight “summer” lap quilt, a thin 100% cotton batting is ideal. The type of batting you choose will also dictate how close your quilting stitches need to be, so always check the manufacturer’s instructions on the packaging.
In this easy tutorial, we focus on accessibility. You don’t need a professional long-arm machine to finish a lap quilt; a standard home sewing machine is more than capable. The smaller size of a lap-sized quilt makes it much easier to “scrunch and move” through the neck of your machine. This is why a lap quilt is the recommended starting point for anyone new to the quilting hobby.
Once the layers are basted, you are ready to “quilt” the layers together. This is the stage where you add the decorative stitching that holds everything in place. Whether you choose simple lines or more complex designs, the basting ensures that your easy scrappy project remains crisp and professional. Proper basting is the secret behind every award-winning quilt, regardless of its size.
For the quilting stage of this Easy Scrappy Lap Quilt – Tutorial, we recommend a “Stitch in the Ditch” or a “Straight Line” design. These are the most beginner-friendly quilting patterns. Straight lines can be achieved using a walking foot, which feeds the top and bottom layers through the machine at the same rate. This prevents the “shoving” effect that can happen with a standard presser foot.
Space your lines about 2 inches apart for a modern look, or follow the seams of your patchwork squares. The beauty of an Easy Scrappy Lap Quilt – Tutorial is that you can also try “organic” wavy lines, which are very forgiving and add a wonderful movement to the scrappy fabric. As you quilt, always start in the center and work your way toward the edges to “push” any excess fabric out.
After the quilting is done, it’s time to “square up” your quilt. Use a large quilting ruler and your rotary cutter to trim the excess batting and backing so they are flush with the quilt top. This gives you a clean, straight edge to apply the quilt binding. Squaring up is a satisfying step that makes your scrappy project look instantly refined and complete.
Binding is the fabric strip that wraps around the raw edges of your quilt. For this Easy Scrappy Lap Quilt – Tutorial, we suggest a double-fold binding. Cut 2.5-inch strips of fabric, sew them together to make one long piece, and fold it in half lengthwise. This provides a durable edge that will stand up to years of use and multiple trips through the washing machine.
Sew the binding to the front of the quilt, miter the corners, and then flip it to the back. You can finish the binding by hand for an invisible stitch or use your sewing machine for a faster, more modern finish. Many scrappy enthusiasts use a scrappy binding—sewing all their leftover strips together—to frame the quilt in the same colorful spirit as the top itself.
The final step in our Easy Scrappy Lap Quilt – Tutorial is to add a quilt label to the back. Write your name, the date, and the location where you made it. This turns your easy scrappy project into a documented piece of history. Give the finished quilt a final wash to achieve that “crinkly” vintage look that quilters love, and your Easy Scrappy Lap Quilt is ready to be enjoyed!
1. How many scraps do I need for an Easy Scrappy Lap Quilt?
The number of scraps depends on the size of your blocks. For a standard 50″ x 60″ quilt using 5-inch squares, you will need approximately 120 squares. It is always better to have a few extra so you can swap out colors that don’t seem to fit your patchwork layout.
2. Can I use fabrics other than cotton?
While 100% quilting cotton is the easiest to work with, you can incorporate other fabrics like linen or flannel. However, for an Easy Scrappy Lap Quilt – Tutorial, we recommend avoiding stretchy fabrics like jersey or silk until you are more experienced, as they can be difficult to stabilize.
3. What is the best way to wash a scrappy quilt?
Wash your handmade quilt on a gentle cycle with cold water. Using a “color catcher” sheet is a great idea for scrappy quilts, as it prevents dark dyes from bleeding into lighter fabrics. Air dry or tumble dry on low heat to maintain the integrity of the cotton fibers.
4. How do I make my quilt corners line up?
The secret to perfect corners in a scrappy quilt is using a consistent 1/4-inch seam allowance and “nesting” your seams. If your squares are slightly off, don’t worry—the busy nature of a scrappy design makes minor misalignments nearly invisible to the casual observer.
5. Do I need a special machine for quilting?
No! A standard domestic sewing machine is perfectly fine for a lap quilt. As long as your machine can do a straight stitch and has a “walking foot” attachment, you can complete this Easy Scrappy Lap Quilt – Tutorial from start to finish with ease.
6. How do I choose a backing fabric for a scrappy quilt?
Since the top is very busy, a neutral or wide-back fabric works best. However, some people like to go “full scrappy” and piece the back with large leftover chunks of fabric. For a lap quilt, comfort is king, so a high-quality brushed flannel is often the most popular choice.
This Easy Scrappy Lap Quilt – Tutorial has guided you through the colorful and rewarding journey of turning fabric remnants into a cozy masterpiece. We explored the importance of sorting scraps by value, the efficiency of chain piecing, and the essential steps of basting and binding.
Quilting is more than just a craft; it is a sustainable way to celebrate color and creativity while producing something that brings comfort to your home. Whether you keep your lap quilt for your own sofa or give it away as a heartfelt gift, the “scrappy” nature ensures that it is a unique expression of your individual style.


