
Horizontal Row Quilt - Pattern

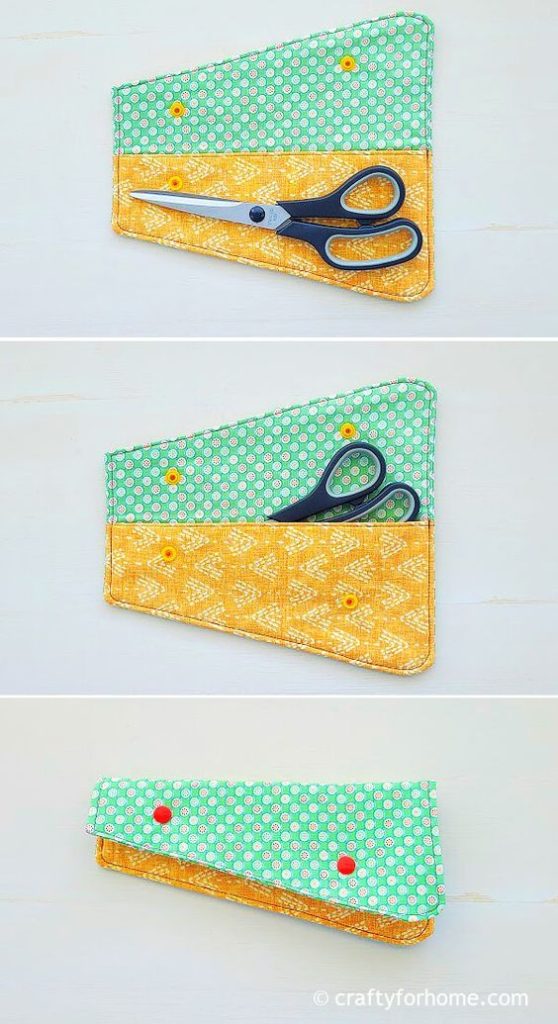
If you’re someone who enjoys sewing or crafting, you know how important it is to keep your tools organized and protected. An Easy Sewing Scissors Pouch – Pattern offers the perfect solution for safely storing your scissors while adding a personalized touch to your sewing kit. This DIY project is not only fun and fast, but it also gives you the freedom to use leftover fabric, experiment with colors, and create something truly functional.
Whether you’re a beginner looking for a starter project or a seasoned sewist wanting to make a practical accessory, an easy sewing scissors pouch is the perfect option. It requires minimal materials, can be completed in under an hour, and helps prevent your scissors from getting dull or damaging other tools in your bag. Plus, you can easily make multiple pouches in different sizes for different types of scissors.
In this article, we’ll walk you through everything you need to know to make your own Easy Sewing Scissors Pouch – Pattern. From selecting materials and customizing your design to sewing techniques and final embellishments, this guide will help you create a beautiful and functional pouch that’s just right for you.
To begin any project using an Easy Sewing Scissors Pouch – Pattern, you’ll want to gather the proper materials. Choosing the right supplies ensures your pouch will be both durable and attractive.
Start with your main fabric. Quilting cotton is a popular choice for pouches because it’s easy to sew, widely available, and comes in countless colors and prints. If you want a sturdier exterior, canvas or denim are great options that add structure and extra protection.
Next, consider the lining fabric. This is the inside of your pouch that comes into contact with your scissors. Soft fabrics like flannel or smooth cotton are ideal because they help protect the scissor blades and reduce wear over time.
Don’t forget to add interfacing between the outer fabric and the lining. Fusible interfacing gives your pouch structure and helps it maintain its shape, especially if you’re using thinner cotton.
You’ll also need a closure option. Depending on your design preference, this could be a snap button, a small magnetic clasp, or even a simple loop and button. The closure keeps your scissors from slipping out and adds a polished finish.
Make sure you have sharp scissors, thread, sewing pins, and an iron handy. These are basic tools that will make your sewing process smoother and more precise.
Finally, having a printed Easy Sewing Scissors Pouch – Pattern on hand is crucial. Many free or low-cost patterns online provide templates that can be adjusted to fit your specific scissor size.
The beauty of working with an Easy Sewing Scissors Pouch – Pattern is that it gives you a solid foundation while allowing endless customization. With just a few adjustments, you can make the pattern suit your exact needs and preferences.
Most beginner patterns feature a simple fold-over flap design, which is easy to cut and sew. This basic shape fits a wide variety of scissors and offers quick access while keeping the blades secure.
You can resize the pattern to fit different tools. If you have large fabric shears or small embroidery scissors, measure your scissors and scale the pattern accordingly. Be sure to leave extra room for seam allowances and fabric bulk.
Try modifying the pouch to include extra pockets for additional tools like seam rippers, thread snips, or measuring tapes. You can add these to the front or back by cutting extra fabric pieces and stitching them in during assembly.
Another creative option is to personalize the pouch with your name, initials, or a decorative appliqué. This adds a personal flair and makes your pouch easier to identify if you’re in a group sewing class or workshop.
Consider changing the shape of the flap for visual interest. Instead of a straight flap, try a curved edge, pointed triangle, or even a scalloped design. These small changes can elevate the final look.
If you’re making pouches as gifts or for sale, think about using coordinated fabric bundles. These often come in matching prints and colors, giving your pouches a cohesive and professional appearance.
Now it’s time to bring your Easy Sewing Scissors Pouch – Pattern to life. This section walks you through a basic method to sew your pouch, with tips for a clean, professional finish.
Start by cutting your fabric pieces based on your chosen pattern. You should have one outer piece, one lining piece, and one interfacing piece for structure. If your pattern includes a flap, cut that section accordingly.
Iron the interfacing onto the wrong side of the outer fabric. This helps the pouch keep its shape and adds durability. Make sure the edges align perfectly before fusing the layers together.
Place the lining and outer fabric right sides together, pin them securely, and sew around the edges—leaving a small opening at the bottom or side for turning the pouch inside out.
Clip the corners and curves to reduce bulk, then turn the pouch right-side out through the opening. Use a point turner or blunt tool to carefully push out the corners for a crisp finish.
Press the pouch with an iron to smooth out any wrinkles. Then, topstitch around the edge for a neat appearance and to secure the layers in place. This also closes the turning hole.
Fold the bottom portion of the pouch upward to form the pocket, pin it in place, and sew along the sides to secure. Finally, add your flap closure—whether it’s a snap, Velcro, or button.
Once your Easy Sewing Scissors Pouch – Pattern is sewn together, the fun really begins. You can personalize your pouch in a variety of creative and functional ways.
Add embellishments like lace trim, ribbon, or decorative buttons. These not only enhance the visual appeal but also help reflect your unique style.
Use contrasting thread colors for visible topstitching. This can create a designer look, especially when paired with solid or minimalist fabric choices.
Consider quilting the fabric layers for extra texture and padding. Quilting also adds a handmade feel that stands out, especially when done with decorative stitching patterns.
Use a fabric label or tag to give your pouch a branded look. This is especially useful if you’re selling the pouches at craft fairs or online marketplaces.
Make themed pouches for holidays, seasons, or events. For example, use floral fabric in the spring or create Christmas-themed pouches as stocking stuffers for your sewing friends.
If you have a lot of scissors, create a full set of pouches in different colors or patterns to identify each one quickly. This helps keep your sewing area organized and efficient.
Q1: What is the best fabric for making a sewing scissors pouch?
A: Quilting cotton, canvas, and denim are great options. Use soft flannel or cotton for the lining to protect the blades.
Q2: Can I make this pouch without a sewing machine?
A: Yes, you can sew by hand using a backstitch for durability, but it will take longer. A sewing machine is recommended for quicker results.
Q3: Where can I find an Easy Sewing Scissors Pouch – Pattern?
A: Many websites, Etsy shops, and craft blogs offer free or inexpensive downloadable patterns that are beginner-friendly.
Q4: How long does it take to sew a scissors pouch?
A: For most people, it takes 30 minutes to an hour, depending on the complexity of the design and your sewing experience.
Q5: Can I make a pouch for different types of scissors?
A: Absolutely! Just measure your scissors and resize the pattern accordingly. You can make small pouches for embroidery scissors or larger ones for shears.
Q6: How can I make the pouch more protective?
A: Use thicker interfacing, add padding like batting, or consider quilting the fabric for extra cushioning.
Crafting your own Easy Sewing Scissors Pouch – Pattern is a rewarding, fast, and creative way to organize your sewing tools. With just a bit of fabric, a simple pattern, and a little time, you can make a functional pouch that reflects your personal style. From fabric selection to final stitching, each step brings you closer to a handmade item that’s both beautiful and useful.
We hope this guide inspired you to start sewing your own scissors pouch today! If you tried this project or have tips of your own, please leave a sincere opinion and suggestions in the comments. Your feedback helps us and our community grow together in creativity and craftsmanship.


