
Horizontal Row Quilt - Pattern

The Entwined Star Quilt – Pattern is a stunning and timeless design that blends geometric precision with traditional quilt artistry. Whether you’re a beginner eager to try your first quilt block or an experienced quilter looking to add a unique piece to your collection, this pattern offers both visual appeal and creative satisfaction.
What makes the Entwined Star Quilt – Pattern so captivating is the illusion of movement created by overlapping shapes. The “entwined” effect gives the impression of interlocking stars, making it a dynamic and eye-catching piece suitable for bed quilts, wall hangings, or even table runners.
In this comprehensive guide, we’ll explore everything you need to know about creating this quilt, from choosing your fabrics and tools to step-by-step assembly. By the end, you’ll have all the skills and confidence needed to complete your own Entwined Star Quilt – Pattern with pride.
The beauty of the Entwined Star Quilt – Pattern lies in its clever use of symmetry and contrast. Understanding the structure and design elements is the first step to success when working with this pattern.
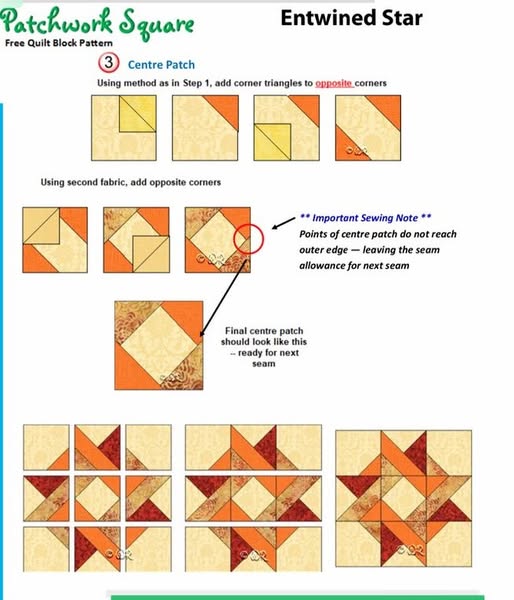
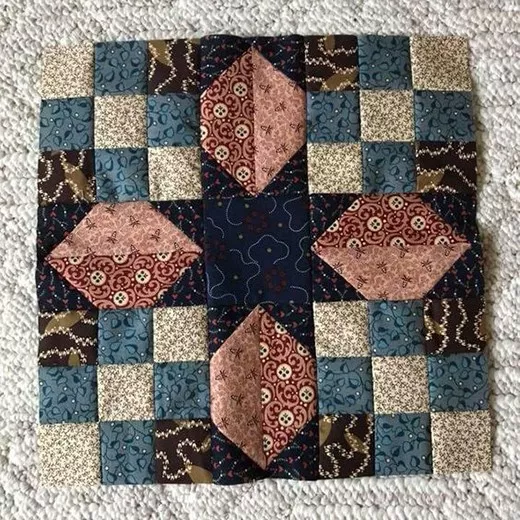
The typical block layout involves an eight-pointed star, with interwoven shapes that create a layered visual. The design may look complex, but it’s surprisingly approachable once broken down into manageable steps.
Quilters often rely on half-square triangles (HSTs), flying geese, and diamond-in-a-square units to create the intertwining effect. Mastering these basic units is key to bringing your star to life.
This pattern shines when you use contrasting fabrics—light and dark, or complementary color palettes. A strong contrast between the background and the star points enhances the dimensional effect of the “entwining.”
Precision cutting and piecing are crucial. A small mistake in alignment can distort the symmetry. So, always use a rotary cutter, quilting ruler, and accurate seam allowances to maintain consistency throughout the project.
You can choose to create one large central block or several smaller blocks sewn together into a larger quilt. Both approaches allow you to highlight the detailed design while accommodating your skill level and available time.
Before diving into the assembly of the Entwined Star Quilt – Pattern, it’s important to gather the right tools and materials. This sets the foundation for a smooth and enjoyable quilting experience.
Start by choosing your fabric wisely. Quilting cotton is the best choice for both beginners and advanced quilters. You’ll need at least three main fabrics: one for the star points, one for the background, and one for the “entwined” illusion pieces.
Fat quarters work well for this pattern since you’ll be cutting a variety of small shapes. Choose bold colors or high-contrast prints to make the stars stand out. Solids or tone-on-tone fabrics can also work beautifully.
Essential tools include a rotary cutter, cutting mat, clear quilting ruler, sewing machine, neutral thread, and basic sewing notions like pins or clips. Having a quarter-inch foot on your machine will help maintain accurate seam allowances.
You’ll also need batting and backing fabric if you plan to make a full quilt. Cotton or bamboo batting provides warmth without too much bulk, making it easier to quilt detailed designs.
Don’t forget a quality iron and ironing board. Pressing after each step helps your seams lay flat, which is crucial for keeping the star pattern crisp and aligned.
Consider using a design wall or laying out your blocks on the floor to preview the layout before stitching everything together. It’s helpful for visualizing color placement and ensuring balance across your quilt.
Once you’ve gathered your materials, it’s time to begin piecing your Entwined Star Quilt – Pattern. This section walks you through the step-by-step process of bringing your star to life.
Begin by cutting your fabric into the required shapes—triangles, squares, and rectangles. Use a rotary cutter and quilting ruler to keep edges straight and precise. Label your pieces with sticky notes or use a diagram to track placement.
Start with the basic units: half-square triangles and flying geese. These are the building blocks of the star. Chain piecing can save time and ensure uniformity across multiple units. Press seams open or to one side, depending on your preference.
Next, assemble the star points using your completed units. Arrange them carefully on your work surface to ensure correct orientation. The “entwined” effect comes from placing darker fabric in the appropriate positions to mimic weaving.
Join the star points with center blocks and background pieces. Work in rows or quadrants, depending on your layout. Take your time to line up seams and intersections, especially in the center where multiple points meet.
Once your block is complete, square it up using a ruler to ensure it matches the intended dimensions. If making a larger quilt, repeat the block assembly process as needed and then join the blocks into rows.
Finish by adding borders, if desired. A contrasting border can help frame the stars and add a polished look. Then sandwich your quilt top with batting and backing, baste it, and quilt using either straight-line or free-motion techniques.
With the quilt top complete, it’s time to bring your Entwined Star Quilt – Pattern to life through quilting and finishing. This is where the magic truly happens.
Start by layering your quilt top with batting and backing. Use spray baste or safety pins to hold the layers together. Make sure the layers are flat and wrinkle-free to avoid puckering during quilting.
Choose a quilting design that complements the star pattern. Echo quilting around the star shapes enhances the layered effect. You can also use free-motion designs like swirls, feathers, or even straight-line quilting for a modern finish.
Use a walking foot or free-motion foot depending on your machine and comfort level. Always test your tension on a scrap sandwich before starting on your actual quilt.
Once quilting is done, trim the excess batting and backing to square up the edges. Then prepare your binding—2.5” wide strips work well. Attach the binding by machine on the front, then fold over and hand-stitch or machine-stitch to the back.
Label your quilt with your name, date, or a custom message. This adds a personal touch and makes your quilt special for years to come.
Finally, give your quilt a gentle wash and press to bring out the softness and texture. Now you’re ready to gift it, display it, or snuggle under your beautiful handmade Entwined Star Quilt – Pattern creation.
Q1: Is the Entwined Star Quilt suitable for beginners?
Yes! While the design looks intricate, it’s built from basic units like HSTs and flying geese. With accurate cutting and sewing, beginners can definitely complete it.
Q2: How many fabrics do I need for this pattern?
Typically, three to five fabrics are used: one for background, one for the main star, and one or two for the intertwined elements to create contrast and depth.
Q3: Can I make the quilt in different sizes?
Absolutely. You can scale the blocks up or down depending on your needs. Just adjust the cutting measurements proportionally to maintain the design.
Q4: What is the best quilting method for this design?
Echo quilting around the star shapes enhances the woven look. You can also do straight-line quilting or free-motion quilting depending on your skill and equipment.
Q5: How long does it take to finish an Entwined Star Quilt?
For a lap-size quilt, expect 10–15 hours depending on your pace. Larger quilts may take longer, especially if adding complex quilting designs.
Q6: Where can I find a printable pattern?
Many quilting websites and blogs offer free or paid versions of the Entwined Star Quilt – Pattern. Search for downloadable PDFs or paper piecing templates if needed.
The Entwined Star Quilt – Pattern is more than just a quilt—it’s a work of art that reflects craftsmanship, creativity, and tradition. Through thoughtful fabric selection, careful piecing, and expressive quilting, you can bring this striking design to life in your own unique way.
This guide walked you through every essential step, from understanding the block structure to selecting materials and assembling your final quilt. Whether you’re making it as a gift, heirloom, or personal project, your completed quilt will be a source of pride and beauty.
We’d love to hear from you! Have you tried this pattern? Share your feedback, tips, or favorite color combos in the comments below. Your insights can help inspire others in the quilting community. Happy sewing! 🧵✨


