
Horizontal Row Quilt - Pattern

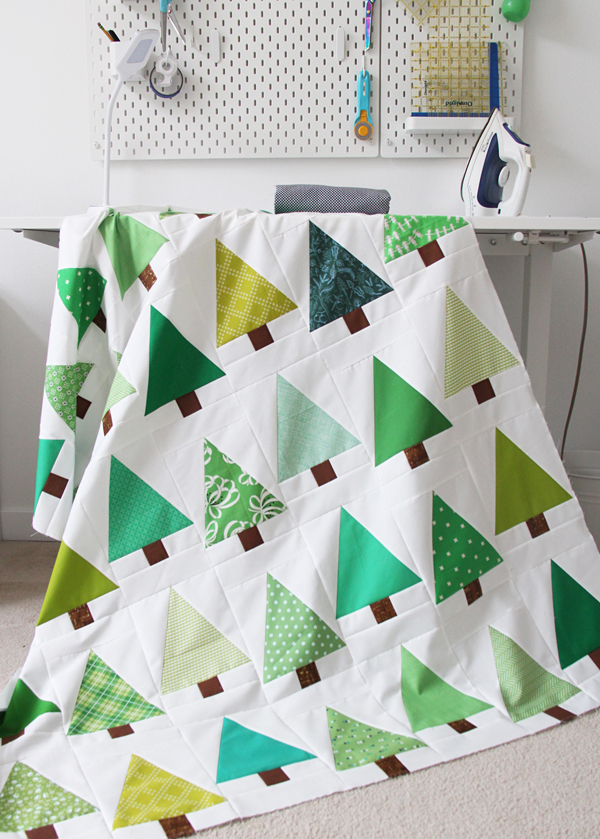
The Evergreen Quilt – Pattern is a timeless design that captures the natural beauty of pine trees and the cozy comfort of handmade quilting. Inspired by the majestic evergreens that stand tall year-round, this quilt is perfect for winter decor, holiday gifts, or year-round rustic charm. Whether you’re a seasoned quilter or new to the craft, this pattern offers a satisfying project filled with seasonal spirit and endless creativity.
From traditional green palettes to modern interpretations with bold colors, the Evergreen Quilt – Pattern is highly versatile. It can be scaled from a wall hanging to a full-sized bedspread, offering flexibility for every quilter’s needs. The block-based design typically features evergreen trees arranged in rows, often with snowy backgrounds or holiday-themed accents.
In this article, you’ll learn how to create your own Evergreen Quilt – Pattern, from selecting fabrics to piecing the blocks and assembling the final quilt. With detailed tips, expert techniques, and plenty of inspiration, you’ll be ready to bring the outdoors inside with a cozy, nature-themed quilt.
Fabric selection is one of the most enjoyable parts of quilting. When working on the Evergreen Quilt – Pattern, your fabric choices help bring the forest to life and determine the overall mood of your project.
Begin by selecting various green fabrics for your evergreen trees. Using a mix of prints and solids adds depth and visual texture. Think forest greens, olive, emerald, and even mint or teal for a more modern take.
For the background, white, ivory, or light blue fabric works beautifully to create the look of a snowy sky or winter atmosphere. Light grays or subtle prints can also offer a neutral base that lets the trees shine.
Consider adding a brown or gray fabric for tree trunks if your version includes them. Wood-grain prints or textured solids enhance realism and tie the natural theme together.
Borders, sashing, and binding should complement the quilt’s core color scheme. Red or plaid accents give a festive holiday feel, while earthy tones like rust, beige, or navy maintain a rustic aesthetic.
Scrappy quilts are ideal for this pattern. Using leftover fabric from your stash adds personality and reduces waste. You can also incorporate metallics or glittery fabrics for a snowy, magical effect.
Lastly, prewashing fabrics is recommended to avoid shrinkage and color bleeding. Once your fabrics are pressed and cut, you’re ready to dive into the construction process of your Evergreen Quilt – Pattern.
The tree block is the heart of the Evergreen Quilt – Pattern, and assembling it is a fun and methodical process. Each block generally consists of triangular “branches” stacked to form a tree silhouette, with or without a trunk.
Start by cutting triangles or flying geese units for the tree sections. These typically decrease in size from bottom to top, creating a triangular tree shape. You can use templates, rulers, or pre-cut shapes depending on your preferred method.
Piece the tree sections together starting from the bottom. Align each layer and sew with precision to maintain symmetry. Press seams as you go to keep the block flat and neat.
If your block includes a trunk, sew a small rectangle in a coordinating color centered at the base of the tree. It can be flanked by background fabric to keep the tree centered within the block.
Once all tree sections are sewn together, square up the block to ensure it’s uniform in size. Common sizes include 8″, 10″, or 12″ blocks, but you can adjust this to fit your overall quilt layout.
Repeat this process to create as many blocks as needed. Mixing different greens and background prints across blocks creates interest and gives your quilt a natural, forest-like feel.
Don’t forget to label your blocks or keep them organized as you sew. A design wall or layout table can help you visualize your finished Evergreen Quilt – Pattern before assembly.
After creating your tree blocks, it’s time to assemble the quilt top. The Evergreen Quilt – Pattern can be as simple or complex as you like, depending on your arrangement and added design elements.
Layout your blocks in rows, spacing them evenly. Decide if you want to add sashing between blocks or let them sit edge to edge. Sashing can add structure and help highlight each tree individually.
Consider adding cornerstones, setting triangles, or other elements to customize your layout. These additions can turn a simple quilt into a striking visual composition.
Once your layout is finalized, sew the blocks together row by row, pressing seams in alternating directions to reduce bulk. Join rows to complete the quilt top and press all seams flat.
Add borders if desired. A thin inner border in a contrasting color can help frame the quilt, while a wider outer border gives it a finished, polished look.
For quilting, consider designs that complement the forest theme. Swirls can resemble wind or snow, while vertical lines mimic tree trunks. Free-motion quilting or custom motifs like stars or snowflakes add a personal touch.
Layer the quilt top with batting and backing, baste the layers, and quilt using your preferred method. Finish with binding in a coordinating or contrasting fabric, and your Evergreen Quilt – Pattern is ready to enjoy or gift.
One of the best things about the Evergreen Quilt – Pattern is how easily it can be adapted for different styles, seasons, and settings. Whether you’re making it for winter decor or year-round rustic charm, here are some ideas to inspire your creativity.
Create a holiday version with red, green, and gold fabrics, or add applique ornaments and stars to decorate the trees. This makes a festive throw or wall hanging for your Christmas décor.
Try a modern color palette, using non-traditional hues like navy, mustard, and blush. This gives the quilt a contemporary edge while maintaining the classic tree motif.
Make a mini quilt or table runner using just a few tree blocks. These smaller projects are perfect for beginners or quick gifts and still showcase the charm of the pattern.
Use the tree block in other projects like tote bags, pillows, or stockings. It’s a versatile block that works well in many formats and adds a handmade touch to your accessories.
Combine the Evergreen Quilt – Pattern with other nature-themed blocks like stars, cabins, or animals for a full sampler quilt. This expands your creative options and tells a richer story through fabric.
Quilt guilds and sewing circles can also use this pattern for swaps or group quilts. Each member can contribute a unique tree block for a collaborative, community-based project.
Q: What size should I make each evergreen block?
Most blocks are 8″ to 12″, but the pattern is flexible. Choose a size that fits your overall quilt plan or project type.
Q: Can I make this pattern using precuts?
Yes! Fat quarters and charm squares are perfect for the tree sections and backgrounds. Just adjust your cutting dimensions accordingly.
Q: Is this pattern beginner-friendly?
Definitely. The Evergreen Quilt – Pattern uses simple shapes like triangles and rectangles, making it great for all skill levels.
Q: How many tree blocks do I need for a throw-sized quilt?
It depends on block size. For 10″ blocks, you might need around 30 to 42 blocks for a generous throw.
Q: Can I use scraps to make this quilt?
Yes! Scrappy versions are especially beautiful and offer a great way to use up leftover green fabrics and backgrounds.
Q: What quilting design works best?
Straight-line quilting, swirls, or nature-inspired motifs like snowflakes work well. Choose a style that complements your fabric choices.
The Evergreen Quilt – Pattern is more than just a seasonal project — it’s a celebration of nature, tradition, and creative expression. Whether you choose classic greens or bold, modern prints, this pattern offers a rewarding experience for quilters of all levels.
We’ve walked through every step of the process, from fabric selection and block construction to final quilting and creative variations. Now it’s your turn to bring this beautiful forest-inspired quilt to life.


