
Horizontal Row Quilt - Pattern

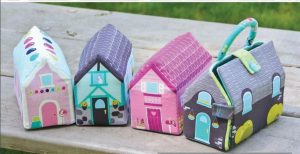
If you’re looking for a beginner-friendly and practical sewing project, this Fabric Box Bag Tutorial – Pattern is exactly what you need. With its clean lines, structured shape, and endless customization options, a fabric box bag is perfect for organizing cosmetics, sewing tools, travel essentials, or even as a stylish gift bag.
This project is ideal for anyone who wants to explore sewing with zippers and boxed corners. It’s also a great scrap buster—letting you use up your favorite leftover fabrics to create something both beautiful and useful. Plus, once you’ve made one, you’ll want to make more for family and friends.
In this guide, we’ll walk you step-by-step through the process of creating your own fabric box bag. We’ll cover material selection, cutting and prepping fabric, sewing techniques, and helpful customization tips. This Fabric Box Bag Tutorial – Pattern is written to be simple enough for beginners, yet detailed enough to help more experienced sewists enjoy the process.
To begin your Fabric Box Bag Tutorial – Pattern, start by gathering the right supplies. The materials you choose can make a big difference in the look, feel, and function of the finished bag.
Select two types of fabric: one for the outer layer and one for the lining. Quilting cotton is a great choice for both because it’s easy to sew, widely available, and comes in endless prints and colors. For a more luxurious look, consider linen, canvas, or even denim.
You’ll need interfacing or fusible fleece to give your bag structure. This makes the bag stand upright and feel sturdy. Fusible fleece is perfect if you want a padded, slightly puffy look, while standard interfacing gives a clean, crisp finish.
Don’t forget a good-quality zipper. For most box bags, a 10″ to 14″ zipper works well. Nylon coil zippers are beginner-friendly and easy to sew over. Metal zippers add a more polished look but may be more difficult to handle.
You’ll also want coordinating thread, scissors or a rotary cutter, a ruler or measuring tape, pins or clips, and your sewing machine. Optional items include a zipper foot (helpful for sewing close to the zipper) and tailor’s chalk for marking.
If you plan to make your box bag water-resistant or easy to wipe clean (great for toiletry bags), consider using PUL or laminated cotton for the lining. These are slightly more challenging to sew but add durability.
Now that you’ve gathered your materials, it’s time to cut the pieces for your Fabric Box Bag Tutorial – Pattern. For a standard-sized bag, you’ll need two rectangles each of outer fabric, lining fabric, and interfacing—roughly 10″ x 14″ in size.
Start by fusing the interfacing or fleece to the wrong side of your outer fabric pieces. This step is important for achieving the structured boxy shape. Always follow the interfacing manufacturer’s instructions for best results.
Trim your fused fabric pieces and lining to ensure all layers are the same size. Accurate cutting at this stage leads to a more professional-looking bag in the end. Square corners and straight edges matter.
Next, you’ll mark and cut out squares (usually 2″ x 2″) from each corner of the rectangles. These cutouts will form the boxed corners later on, giving your bag its unique three-dimensional shape.
Before assembling the layers, prep your zipper. If it’s too long, shorten it by stitching across the teeth with a tight zigzag stitch and trimming the excess. Be careful not to cut into the zipper pull side.
Pin or clip your outer fabric pieces to the zipper, right sides together, sandwiching the zipper between the outer layer and lining. Stitch along both sides using a zipper foot if possible. Then press and topstitch to keep everything neat and in place.
Once the zipper is attached, you’ll have a “tube” of fabric. Open the zipper halfway (very important!), then align the edges and prepare to sew the sides and box the corners.
This part of the Fabric Box Bag Tutorial – Pattern is where everything starts to take shape. With your fabric tube and zipper ready, let’s get into the sewing assembly.
Turn the fabric layers so that the outer fabrics are right sides together and the lining fabrics are also right sides together. Pin or clip the open ends and sew across both sides, leaving a small opening in the lining side for turning later.
Now it’s time to sew the boxed corners. Match the side and bottom seams at each cutout corner and pinch them together to form a straight line. Clip and sew across each one to close the corners and give the bag its boxy structure.
Repeat this step on all four corners (two in the outer fabric and two in the lining). Be sure to backstitch at the beginning and end of each seam to secure the stitches.
Once all the corners are boxed, reach into the opening in the lining and gently pull the entire bag right side out. Take your time, especially when turning the corners, to keep everything smooth and crisp.
Tuck in the raw edges of the opening in the lining, then stitch it closed with a small straight stitch or ladder stitch. Push the lining into the bag and adjust the corners so the bag stands up properly.
Give your new fabric box bag a final press, smoothing the seams and making sure everything sits as it should. You now have a beautiful, functional handmade item ready to use or gift!
One of the best parts of this Fabric Box Bag Tutorial – Pattern is how easy it is to customize the bag to your style and needs. These bags are endlessly versatile and make fantastic personalized gifts.
Change up the fabric prints for seasonal versions—like florals for spring, plaids for fall, or even holiday-themed designs. You can make smaller versions for kids’ snack bags or larger ones for travel pouches.
Add embellishments like fabric labels, applique, or decorative stitching. Consider embroidering initials or names for a custom touch—especially nice for teacher gifts or wedding party favors.
If you’d like a handle, sew a fabric loop or strap into the side seam during assembly. This makes the bag even more practical for travel or carrying toiletries.
To protect against spills or messes, use laminated cotton or waterproof lining. These options are ideal for bags used to carry makeup, lunches, or wet swimwear.
Make it a matching set! Use the same fabric to create coordinating items like makeup brush rolls, coin purses, or tote bags. The box bag pattern can serve as a foundational project for an entire collection.
With each bag you make, your skills will improve and your creations will become more polished. Whether you’re sewing for fun, function, or business, this Fabric Box Bag Tutorial – Pattern is a great place to begin.
Q: Can I sew a fabric box bag as a beginner?
Yes! This project is beginner-friendly. As long as you can sew straight lines and handle a zipper, you’ll be successful with this tutorial.
Q: What is the best fabric to use for a box bag?
Quilting cotton is ideal for beginners, but canvas, denim, and linen also work well. For lining, waterproof or wipeable fabrics are a great option.
Q: How do I make the bag stand up?
Use interfacing or fusible fleece between the outer fabric and lining. This gives structure and shape to the bag.
Q: Can I wash my fabric box bag?
Yes, if you’ve used machine-washable fabric. Wash gently and air dry to maintain the shape. Avoid high heat if using fusible materials.
Q: What zipper size should I use?
Most box bags work well with a 10–14 inch zipper. You can trim it to size if needed.
Q: Can I resize the pattern?
Absolutely! Just adjust the rectangle dimensions and corner cutouts. Larger or smaller versions work great for different uses.
The Fabric Box Bag Tutorial – Pattern is a fun, functional, and highly customizable sewing project that opens the door to a world of creative possibilities. Whether you’re organizing your home, prepping for travel, or crafting heartfelt gifts, this box bag will serve you well.
We’ve covered materials, cutting, sewing steps, and custom options—everything you need to successfully complete your own box bag. It’s an ideal project to grow your sewing confidence and create something beautiful with your hands.


