
American-style placemat with a fruit theme - Pattern

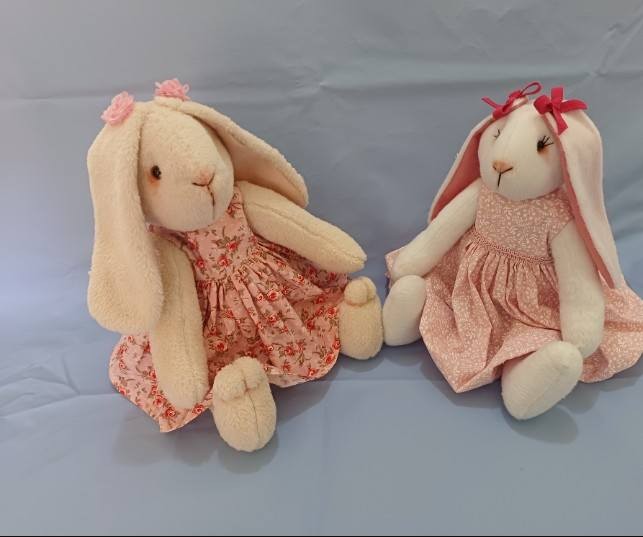
Creating Fabric Bunnies – Pattern projects is one of the most rewarding ways to dive into the world of soft toy making, offering a perfect blend of creativity and nostalgia. Whether you are a seasoned seamstress or a curious beginner, working with a Fabric Bunnies – Pattern allows you to transform simple scraps of cotton, linen, or fleece into heirloom-quality companions that carry a unique personal touch. The beauty of these projects lies in their versatility, as they can serve as charming nursery decor, thoughtful Easter gifts, or even comforting weighted toys for children, all while letting you experiment with different textures and colors.
The process of selecting a Fabric Bunnies – Pattern is the first step in a journey that combines technical skill with artistic expression. When you follow a well-designed Fabric Bunnies – Pattern, you aren’t just sewing pieces of cloth together; you are learning about grain lines, seam allowances, and the intricate art of soft sculpture. This hobby has seen a massive resurgence lately, as more people look for sustainable alternatives to mass-produced plastic toys, choosing instead to craft something durable and meaningful that can be passed down through generations.
In this comprehensive guide, we will explore everything you need to know about mastering the Fabric Bunnies – Pattern workflow. We will break down the essential materials, the technical jargon of the craft, and the little secrets that make a stuffed animal go from looking “homemade” to “hand-crafted professional.” By understanding the core components of a Fabric Bunnies – Pattern, you will gain the confidence to customize your creations, ensuring that every rabbit you stitch has its own distinct personality and charm.
When you first download or purchase a Fabric Bunnies – Pattern, the most important thing to look at is the pattern key and the seam allowance. Most Fabric Bunnies – Pattern designs assume a standard 1/4 inch allowance, which is crucial for maintaining the correct proportions of the bunny’s limbs and head. If you ignore these specifics, your final plushie might end up with uneven ears or a skewed face, so always read the introductory instructions carefully before cutting your first piece of high-quality quilting cotton.
The pattern pieces themselves are the heart of your project, usually consisting of the body, underbelly, ears, and limbs. A high-quality Fabric Bunnies – Pattern will include notches or small markings that help you align the fabric correctly during the pinning stage. These markings are essential for ensuring that the curves of the bunny’s back match the curves of the belly, providing that signature rounded, cuddly shape that makes these toys so appealing to hold.
Choosing the right fabric is just as vital as the Fabric Bunnies – Pattern itself, as the stretch and weight of the material affect the final look. For a classic look, many crafters prefer woven cotton or linen blends, which provide stability and are easy to handle under a sewing machine. If you want a softer, more “squishy” result, you might opt for minky or cuddle fleece, though these require more pinning because they tend to shift during the sewing process.
To get the best results from your Fabric Bunnies – Pattern, you should always pre-wash your fabric to prevent shrinking later on. This is especially important if the bunny is intended for a child and will likely end up in the laundry. Using a sharp rotary cutter and a self-healing mat will give you much cleaner edges than traditional scissors, making it significantly easier to follow the precise lines of the Fabric Bunnies – Pattern template.
Don’t forget the importance of the grainline when laying out your Fabric Bunnies – Pattern pieces on the cloth. The grainline indicates the direction of the threads in the fabric, and placing your pieces correctly ensures the bunny won’t warp or stretch out of shape once it is stuffed. Most patterns will have an arrow indicating how to align the piece with the selvage edge of the fabric, a detail that separates amateur work from professional-grade plushies.
Lastly, consider the interfacing requirements mentioned in your Fabric Bunnies – Pattern. Some designs suggest using a lightweight fusible fleece on the inside of the ear pieces to give them a bit of “stand-up” structure without making them stiff. This attention to detail ensures that your Fabric Bunnies – Pattern results in a toy that looks lively and holds its shape over time, rather than looking flat or limp after just a few weeks of play.
Once the sewing is complete, the next phase of your Fabric Bunnies – Pattern journey is the stuffing process, which is where the “soul” of the toy is created. Many beginners make the mistake of using large clumps of polyester fiberfill, which can lead to a lumpy appearance. Instead, use small, golf-ball-sized amounts and start by filling the extremities—like the tips of the ears and the ends of the paws—to ensure a smooth finish throughout the entire Fabric Bunnies – Pattern silhouette.
The density of the stuffing can completely change the character of your Fabric Bunnies – Pattern creation. A firmly stuffed bunny will stand up better and show off the intricate seams of the Fabric Bunnies – Pattern, making it ideal for a decorative shelf piece. On the other hand, a lightly stuffed bunny has a “floppy” feel that is much more suitable for snuggling, though you must be careful not to leave any “empty” spots where the fabric might fold or crease unnaturally.
[Image showing the process of stuffing a fabric bunny with polyester fiberfill]
To achieve a professional look, many artisans use a hemostat or a specialized stuffing tool to push the fill into the tight corners of the Fabric Bunnies – Pattern. This ensures that every curve designed by the pattern creator is fully realized. If you find your bunny’s neck is a bit “wobbly,” you can add a bit of extra stuffing or a small fabric roll inside to provide structural support, a common trick when working with a larger Fabric Bunnies – Pattern.
Another pro tip for your Fabric Bunnies – Pattern project is the use of weighted beads or poly-pellets in the bottom of the bunny. By placing a small pouch of pellets in the base before finishing the stuffing, you give the bunny a “bottom-heavy” feel that allows it to sit upright on its own. This is a popular modification to any standard Fabric Bunnies – Pattern and adds a premium, high-end feel to the finished product.
The closing seam, usually done at the back or bottom, should be finished with a ladder stitch (also known as an invisible stitch). This hand-sewing technique ensures that the entry point for the stuffing is completely hidden, maintaining the seamless magic of the Fabric Bunnies – Pattern. Taking your time with this final closure is the difference between a toy that looks like a DIY project and one that looks like it came from a high-end boutique.
Finally, remember that the Fabric Bunnies – Pattern is just the skeleton; the stuffing is the muscle. You can manipulate the shape even after the bunny is closed by gently “massaging” the fiberfill from the outside. This helps to distribute the stuffing evenly and remove any internal gaps, ensuring that the final form of your Fabric Bunnies – Pattern is symmetrical and aesthetically pleasing from every angle.
The most exciting part of finishing a Fabric Bunnies – Pattern is adding the facial features, as this is where the bunny’s personality truly emerges. While some people use safety eyes, many crafters prefer the safety and charm of hand-embroidered eyes. Using a simple satin stitch for the nose and a backstitch for the mouth can turn a basic Fabric Bunnies – Pattern into a whimsical character with a story to tell.
Choosing the right thread for your Fabric Bunnies – Pattern details is essential for a polished look. Embroidery floss is the standard choice, allowing you to use varying numbers of strands to control the thickness of the lines. For a minimalist look, a simple “X” for eyes and a small pink triangle for the nose works wonders on a Fabric Bunnies – Pattern, whereas a more detailed design might include tiny eyelashes or rosy cheeks made with fabric chalk or actual blush.
Placement is everything when following your Fabric Bunnies – Pattern facial guide. Even a millimeter difference in eye placement can change the expression from “happy” to “surprised.” Most experts suggest using disappearing ink pens to draw the face onto the fabric before you start stitching. This allows you to step back and ensure the face is centered and aligned with the proportions intended by the Fabric Bunnies – Pattern.
If you are making the bunny for a very young child, safety is the priority over the Fabric Bunnies – Pattern aesthetics. Avoid using buttons or small plastic parts that could become choking hazards. Instead, rely on thread-jointing or secure embroidery. A well-executed Fabric Bunnies – Pattern using only textile elements is not only safer but often carries a more timeless, “shabby chic” appeal that parents love.
Beyond the face, you can customize your Fabric Bunnies – Pattern by adding monograms or dates to the ears. This makes the bunny a perfect commemorative gift for births or weddings. Using a contrasting thread color against the inner ear fabric makes the embroidery pop, highlighting the hand-crafted nature of the project and adding a layer of value that a store-bought toy simply cannot match.
Don’t be afraid to experiment with different textures for the embroidery as well. You could use wool yarn for a chunky, rustic look on a linen Fabric Bunnies – Pattern, or fine silk thread for a delicate finish on a satin rabbit. The beauty of working with a Fabric Bunnies – Pattern is that it provides the structure, but you provide the soul through these final, intricate artistic choices.
To take your Fabric Bunnies – Pattern to the next level, consider the technique of top-stitching around the ears. This not only keeps the layers of fabric from shifting but also adds a crisp, tailored edge that defines the bunny’s silhouette. Many high-end Fabric Bunnies – Pattern designs recommend this step to ensure the ears have a “memory” and stay in the desired position, whether they are floppy or upright.
Another advanced tip for your Fabric Bunnies – Pattern is the use of inner ear contrasts. By using a different fabric for the “inside” of the ear—perhaps a floral print or a soft corduroy—you add visual interest and depth to the toy. When the ears flop forward, this contrast becomes a focal point of the Fabric Bunnies – Pattern, making the design feel more complex and professionally thought out.
If you want your bunny to be poseable, you can integrate a plastic coated wire or a pipe cleaner into the ears or limbs, provided the toy is for an older child or adult collector. This allows the user to bend the ears into different expressions, adding an interactive element to the Fabric Bunnies – Pattern. Always ensure the ends of the wire are looped and padded to prevent them from poking through the fabric over time.
For those using a Fabric Bunnies – Pattern to make a collector’s item, consider sculpting the face with thread. By taking a long needle and pulling thread through the head from the eye location to the back of the neck, you can create “indentations” for the eyes. This gives the head a more 3D, anatomical shape that enhances the realism of the Fabric Bunnies – Pattern, moving it away from a flat pillow-shape and toward a true sculpture.
Choosing the right sewing machine needle is a technical detail often overlooked in Fabric Bunnies – Pattern guides. For thick fabrics or multiple layers (like where the ears meet the head), a 90/14 needle or a “denim” needle might be necessary to prevent skipped stitches. Using a walking foot can also be a lifesaver, as it helps all layers of the Fabric Bunnies – Pattern move through the machine at the same speed, preventing the fabric from “creeping.”
Finally, always finish your Fabric Bunnies – Pattern project with a thorough “lint roll” and a light steam press (avoiding the eyes if they are plastic). This removes any stray threads or bits of stuffing and “sets” the seams, giving the bunny a crisp, clean appearance. Presenting your finished Fabric Bunnies – Pattern masterpiece with a personalized “Handmade by” tag is the perfect way to sign off on your hard work and creativity.
1. What is the best fabric for a Fabric Bunnies – Pattern?
The best fabric depends on the desired look. For beginners, 100% quilting cotton is best because it doesn’t stretch and is easy to sew. For a softer feel, minky, fleece, or linen are excellent choices, though they may require more advanced handling.
2. Can I resize a Fabric Bunnies – Pattern?
Yes, you can easily resize a Fabric Bunnies – Pattern by adjusting the print scale on your computer. However, remember that if you make it much smaller, the turns and curves will be harder to sew, and if you make it larger, you may need to reinforce the seams.
3. Are Fabric Bunnies – Pattern projects safe for babies?
They can be, provided you use embroidery for the face instead of buttons or plastic eyes, and ensure all seams are double-stitched for durability. Always use non-toxic, hypoallergenic stuffing for toys intended for infants.
4. How long does it take to complete a Fabric Bunnies – Pattern?
A basic Fabric Bunnies – Pattern can usually be completed in 2 to 4 hours, depending on your sewing speed and the amount of hand-finishing or embroidery you choose to add.
5. Do I need a sewing machine for a Fabric Bunnies – Pattern?
While a sewing machine makes the process much faster and the seams stronger, you can definitely sew a Fabric Bunnies – Pattern entirely by hand using a tight backstitch. It simply requires more patience and time.
6. Where can I find a good Fabric Bunnies – Pattern?
You can find them on sites like Etsy, Pinterest, or dedicated sewing blogs. Many designers offer free versions for beginners, while more complex, professional-grade patterns are usually available for a small fee.
In conclusion, working with a Fabric Bunnies – Pattern is a delightful way to explore the world of textile arts while creating something truly special. We have covered the importance of selecting the right materials, the technical nuances of cutting and sewing, the secrets to perfect stuffing, and the artistic flair of embroidery and customization.
By following these steps, you transform a simple Fabric Bunnies – Pattern into a cherished companion that reflects your personal style and skill. Whether you are crafting for profit, for a gift, or for your own collection, the journey of bringing a fabric rabbit to life is one filled with joy and satisfaction.


