
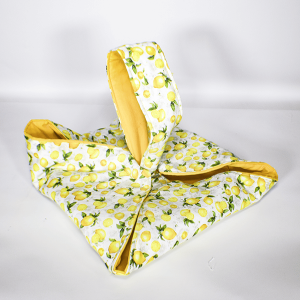
American-style placemat with a fruit theme - Pattern

Finding the perfect FABRIC CHICKEN – PATTERN is a delightful journey for any sewing enthusiast looking to add a touch of handmade charm to their home decor. These whimsical creations serve multiple purposes, from rustic kitchen doorstops to adorable shelf sitters that bring a farmhouse aesthetic to life. Whether you are a seasoned quilter or a beginner just learning to navigate a sewing machine, working with a FABRIC CHICKEN – PATTERN offers a rewarding project that allows for endless creativity through color mixing and textile selection.
In the world of DIY crafts, the popularity of the FABRIC CHICKEN – PATTERN has soared because of its versatility and the minimal materials required to get started. Many crafters find that these projects are excellent “scrap busters,” allowing you to utilize those beautiful leftover pieces of cotton or linen that are too small for a quilt but too lovely to throw away. By following a well-designed FABRIC CHICKEN – PATTERN, you can transform simple fabric remnants into a charismatic poultry collection that makes for heartfelt, personalized gifts for friends and family.
To ensure your project is a success, understanding the nuances of the FABRIC CHICKEN – PATTERN is essential for achieving that professional, “store-bought” finish with a handcrafted soul. This article will guide you through the essential components of creating your own fabric birds, focusing on the technical terms and artistic choices that matter most. From selecting the right sewing notions to mastering the stuffing techniques, we will explore everything you need to know to master the art of the FABRIC CHICKEN – PATTERN while keeping your workspace organized and your creativity flowing.
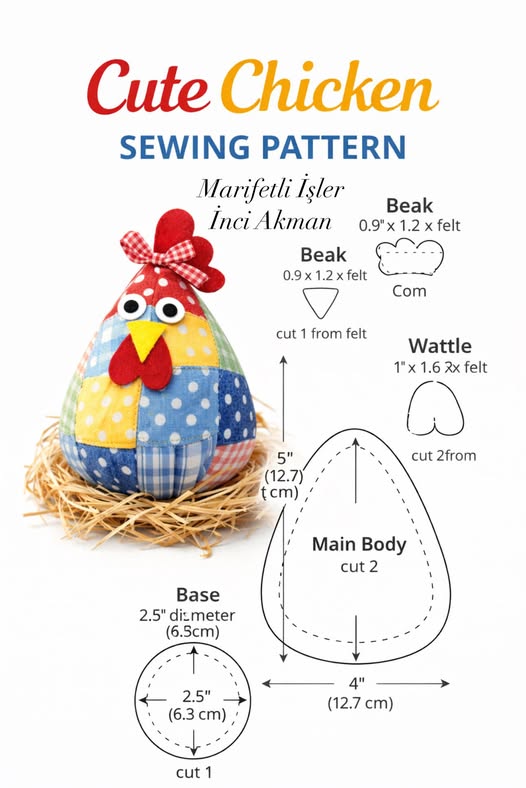
The foundation of any successful sewing project lies in the quality of the FABRIC CHICKEN – PATTERN you choose to follow. A good pattern provides clear lines for cutting and precise seam allowances, which are crucial for ensuring the chicken’s body pieces fit together perfectly. When you look at a FABRIC CHICKEN – PATTERN, you will notice various markings that indicate where to place the beak, the comb, and the wings, making the assembly process much more intuitive for beginners.
Choosing the right material is the next step once you have your FABRIC CHICKEN – PATTERN ready. Cotton calico and fat quarters are among the most popular choices because they are easy to handle and come in a vast array of country-style prints. The weight of the fabric will influence how the chicken stands; heavier fabrics like denim or canvas provide more structure, while lighter cottons give a softer, more traditional plush look.
Before you make your first cut, it is vital to pre-wash your fabric to prevent any future shrinkage that could distort the shape of your chicken. Once dried and ironed, lay your FABRIC CHICKEN – PATTERN pieces onto the wrong side of the fabric. Using tailor’s chalk or a fabric marker, trace the shapes carefully, paying close attention to the grainline of the cloth to ensure the fabric doesn’t stretch awkwardly during the sewing phase.
A critical aspect of the FABRIC CHICKEN – PATTERN is the inclusion of the sewing instructions, which detail the order of assembly. Usually, you will start by sewing the smaller decorative elements like the felt comb and the beak before attaching them to the main body panels. This “inside-out” approach ensures that all raw edges are hidden within the seams, resulting in a clean and polished final product that looks professional.
For those who enjoy a bit of variety, a single FABRIC CHICKEN – PATTERN can often be scaled up or down to create a whole family of chickens. By using the enlarge/reduce feature on a photocopier, you can create tiny chick ornaments or large, heavy doorstops using the same basic shapes. This flexibility is what makes the FABRIC CHICKEN – PATTERN a staple in the digital libraries of many modern makers and hobbyists.
Finally, don’t forget to check the notions list included with your FABRIC CHICKEN – PATTERN. You will typically need high-quality polyester thread, sharp fabric shears, and perhaps some embroidery floss for adding hand-stitched details like eyes or decorative wing borders. Having all your supplies ready before you sit down at your machine will make the process of bringing your FABRIC CHICKEN – PATTERN to life much more enjoyable and efficient.
When working with a FABRIC CHICKEN – PATTERN, the “hand” or feel of the fabric determines the personality of the finished bird. Quilt-quality cotton is the gold standard because it holds its shape well and is available in endless patterns, from polka dots to floral motifs. Using contrasting fabrics for the wings and the body can make your FABRIC CHICKEN – PATTERN pop, adding visual interest and a custom designer feel to your creation.
The internal structure of your chicken is just as important as the exterior, and your FABRIC CHICKEN – PATTERN might suggest different types of interfacing. If you are using a very thin fabric, applying a fusible fleece to the back of the pieces can add necessary bulk and softness. This ensures that when you add the polyester fiberfill, the fabric doesn’t appear bumpy or strained, maintaining the smooth curves dictated by the FABRIC CHICKEN – PATTERN.
For chickens intended to function as doorstops, you will need to incorporate a weighted base. After following the FABRIC CHICKEN – PATTERN to sew the body, you can fill the bottom third with dried beans, aquarium gravel, or poly-pellets. This weight keeps the chicken upright and functional, while the top portion remains filled with soft stuffing to maintain that classic, cuddly appearance often associated with a FABRIC CHICKEN – PATTERN.
The beak and comb are the features that truly give the bird its character, and most FABRIC CHICKEN – PATTERN guides recommend using wool felt. Felt is ideal because it doesn’t fray, allowing you to leave the edges raw for a rustic look or sew them with a simple blanket stitch. Choosing a vibrant red for the comb and a bright orange or yellow for the beak provides the perfect contrast against the patterned body of your FABRIC CHICKEN – PATTERN project.
Intermediate sewists might want to experiment with textural variety by using minky fabric or faux fur for certain parts of the FABRIC CHICKEN – PATTERN. While these fabrics require more care—such as using a walking foot on your sewing machine—the result is a highly tactile and unique decorative piece. Mixing textures like a smooth cotton body with a fuzzy wing creates a sophisticated look that elevates the standard FABRIC CHICKEN – PATTERN.
Lastly, consider the thread weight and color. While a matching thread is standard, using a variegated thread or a bold, contrasting color for topstitching can add an extra layer of detail to your FABRIC CHICKEN – PATTERN. This technique draws attention to the beautiful lines of the pattern and showcases your sewing skills, making the finished chicken a true work of textile art that you can be proud of.
The first physical step in executing your FABRIC CHICKEN – PATTERN is the cutting process. Precision here is paramount; even a few millimeters of error can cause the body pieces to misalign during sewing. Use pattern weights to hold the paper in place and a rotary cutter for clean, sharp edges. This ensures that the curves of the FABRIC CHICKEN – PATTERN, particularly around the tail and neck, are smooth and easy to sew.
Once your pieces are cut, the pinning stage begins. Align the right sides of the fabric together, following the notches provided in your FABRIC CHICKEN – PATTERN. It is often helpful to use wonder clips instead of pins when working with multiple layers of fabric and felt, as they hold the pieces securely without distorting the material. This stage sets the stage for a smooth journey through the sewing machine.
When you begin sewing the FABRIC CHICKEN – PATTERN, start with a backstitch to secure the thread. Use a short stitch length (around 2.0mm) to ensure the seams are strong enough to withstand the pressure of the stuffing later on. As you navigate the curves of the FABRIC CHICKEN – PATTERN, move slowly and keep your needle in the “down” position when pivoting, which helps maintain a continuous, even line of stitching.
A professional secret for a perfect FABRIC CHICKEN – PATTERN result is clipping the curves. After sewing the pieces together but before turning them right-side out, make small snips into the seam allowance along any curved edges. This allows the fabric to stretch and lay flat once turned, preventing the puckering that can sometimes ruin the silhouette of a FABRIC CHICKEN – PATTERN design.
The “turning” process is where the magic happens. Carefully pull the fabric through the opening left in the seam—usually located at the bottom of the chicken as indicated by your FABRIC CHICKEN – PATTERN. Use a turning tool or a blunt chopstick to gently push out the corners and smooth the seams from the inside. This ensures that the full shape of the FABRIC CHICKEN – PATTERN is realized before you begin the stuffing process.
Finally, filling your creation requires a bit of patience. Add small handfuls of stuffing at a time, pushing them into the furthest corners of the chicken first (like the head and tail). If your FABRIC CHICKEN – PATTERN includes a base piece, you will sew this on last using a ladder stitch (or invisible stitch) by hand. This final hand-sewn closure is the hallmark of a carefully crafted FABRIC CHICKEN – PATTERN project.
Personalization is what makes your FABRIC CHICKEN – PATTERN truly unique. One popular way to customize is through embroidery. Before sewing the body pieces together, you can hand-stitch the chicken’s name, a small flower, or decorative patterns onto the side panels. This turns a standard FABRIC CHICKEN – PATTERN into a personalized heirloom that can be passed down through generations or given as a special commemorative gift.
Adding embellishments like buttons for eyes or lace trim for the wings can change the entire “vibe” of your chicken. If you are making the chicken for a child, ensure that any buttons are safety eyes or securely cross-stitched to prevent them from becoming a choking hazard. For a more sophisticated look, a FABRIC CHICKEN – PATTERN can be enhanced with vintage ribbons tied around the neck or small dried lavender sachets tucked inside the stuffing for a pleasant scent.
Another creative twist is to use fabric painting or stamping. You can use textile inks to create a “speckled” egg-layer look on plain cream fabric before you cut out your FABRIC CHICKEN – PATTERN pieces. This allows you to create custom fabric designs that aren’t available in stores, giving your FABRIC CHICKEN – PATTERN a truly artisanal and one-of-a-kind appearance that stands out in any craft fair or home.
Consider the seasonal possibilities of your FABRIC CHICKEN – PATTERN. For Easter, you can use bright pastels and floral prints, perhaps even adding a small fabric basket for the chicken to hold. For autumn or a rustic kitchen theme, use hessian (burlap) or warm earth tones. The FABRIC CHICKEN – PATTERN is a year-round crafting companion that adapts beautifully to any holiday or interior design trend you wish to explore.
If you are feeling adventurous, you can modify the FABRIC CHICKEN – PATTERN to include different wing shapes or even longer legs made of twine or weighted fabric tubes. These “shelf-sitter” versions are incredibly popular and add a whimsical, dangling element to the design. By altering just a few lines on your original FABRIC CHICKEN – PATTERN, you can create an entirely new character while maintaining the core structure of the bird.
Ultimately, the joy of the FABRIC CHICKEN – PATTERN lies in the satisfaction of seeing a flat piece of cloth transform into a three-dimensional character with its own personality. Don’t be afraid to experiment with bold colors or unconventional materials. Every time you use your FABRIC CHICKEN – PATTERN, you have the opportunity to refine your skills and produce something that brings warmth and a smile to anyone who sees it.
1. What is the best fabric to use for a fabric chicken?
Most experts suggest using 100% cotton fabrics like calico or quilting cotton. These materials are easy to sew, come in many patterns, and hold their shape well after stuffing. You can also use felt for the beak and comb for a classic look.
2. Can I make this chicken without a sewing machine?
Yes! While a machine is faster and provides stronger seams, you can absolutely sew a FABRIC CHICKEN – PATTERN by hand using a tight backstitch. It takes more time, but it results in a beautiful, hand-crafted aesthetic.
3. How do I make the chicken stand up on its own?
To ensure stability, you should fill the bottom of the chicken with something heavy like poly-pellets, clean gravel, or dried rice/beans before adding the soft polyester stuffing to the top. This lowers the center of gravity.
4. Is this a good project for absolute beginners?
Definitely. Most FABRIC CHICKEN – PATTERN designs use simple shapes and basic straight or slightly curved seams. It’s an excellent project for practicing curve control and learning how to turn and stuff a 3D object.
5. How do I clean my fabric chicken if it gets dusty?
If you used high-quality cotton and polyester stuffing, you can usually spot-clean the chicken with a damp cloth. If it needs a deeper clean, hand-wash it gently and let it air dry. Avoid machine washing if you used organic weights like rice or beans.
6. Where can I find a FABRIC CHICKEN – PATTERN?
You can find many patterns online through craft blogs, Pinterest, or digital marketplaces like Etsy. Some are free, while others are paid professional designs with detailed photo tutorials.
In conclusion, creating a decorative bird using a FABRIC CHICKEN – PATTERN is a rewarding and creative endeavor that combines the best of sewing, home decor, and personal expression. We have covered the essentials of choosing the right FABRIC CHICKEN – PATTERN, selecting the best materials like cotton and felt, and the technical steps of sewing, clipping curves, and stuffing to ensure a professional finish.
We also explored how to customize your project with embroidery and weights to turn a simple craft into a functional household item.


