
Broken Arrow Quilt - Pattern

When you decide to start a new DIY project, finding a Fabric Crab – Pattern that balances simplicity with a professional finish is the ultimate goal for any sewing enthusiast. Whether you are looking to create a whimsical coastal decoration, a soft toy for a child, or a unique gift, the Fabric Crab – Pattern offers a versatile foundation for your creativity. This specific design allows you to play with various textures and colors, bringing a touch of the ocean right into your craft room with a project that is as rewarding as it is charming.
Mastering the Fabric Crab – Pattern requires a bit of patience and an eye for detail, especially when dealing with those iconic curved claws and multi-legged symmetry. Using high-quality sewing materials like cotton batik, felt, or even recycled denim can drastically change the personality of your crustacean creation. Many crafters enjoy this particular sewing project because it provides an excellent opportunity to practice topstitching and working with small, intricate seams that define the anatomy of the crab.
To ensure your Fabric Crab – Pattern turns out perfectly, it is essential to focus on the grainline of the fabric and the precision of your seam allowance. An optimized sewing pattern should guide you through the process of stuffing the body to achieve that perfect “plump” look without overstretching the seams. As we dive deeper into this guide, we will explore the nuances of choosing the right textiles, the assembly process, and how to customize your crab to make it a one-of-a-kind piece of handmade decor.
Selecting the appropriate fabric is the first step in ensuring your Fabric Crab – Pattern looks professional and holds its shape over time. While woven cotton is the most popular choice due to its stability and wide array of prints, you might also consider minky fabric for a softer, plushie-style finish. The weight of the material matters significantly; a fabric that is too thin may tear during the stuffing process, while something too thick might be difficult to turn inside out through the small leg openings.
Don’t forget the importance of interfacing. If you are using a lightweight material, applying a fusible stabilizer to the back of your fabric pieces can provide the necessary structure for the claws to stand firm. This technique is a secret weapon in the sewing community for maintaining the integrity of complex shapes. When your Fabric Crab – Pattern has a sturdy base, the final product looks more like a high-end boutique item rather than a simple home craft.
The “eyes” of your crab are another crucial element that dictates the character of your piece. You can use safety eyes, which provide a polished look, or opt for hand-embroidery with embroidery floss for a more traditional, “folk-art” vibe. If the crab is intended for a small child, always prioritize safety sewing practices by avoiding small buttons or beads that could become choking hazards. Instead, use felt applique to create expressive features that are securely stitched down.
For the stuffing, polyester fiberfill is the industry standard for soft toy construction. It is lightweight, washable, and keeps its loft even after plenty of hugs. However, for a more eco-friendly Fabric Crab – Pattern, you might look into wool roving or recycled fabric scraps shredded into tiny bits. Keep in mind that the type of fill will affect the weight and “squishiness” of the crab, so choose based on whether it’s for play or display.
Thread choice is often overlooked but remains a pillar of durable sewing. Use a high-quality all-purpose polyester thread that matches or purposefully contrasts with your fabric. Using a reinforcement stitch on the joints where the legs meet the body is a smart move, as these areas experience the most tension. A strong thread ensures that your Fabric Crab – Pattern remains intact through years of handling or coastal breeze if used as porch decor.
Lastly, consider the aesthetic theme of your project. Are you going for a realistic look with sandy beards and mottled oranges, or a vibrant, modern look with geometric patterns and neon colors? The Fabric Crab – Pattern is a blank canvas. By mixing and matching different fabric prints, such as stripes for the belly and solids for the top shell, you can create a visual depth that makes the crab appear three-dimensional and lifelike.
Before you even touch your scissors, you must prepare your sewing pattern by ensuring it is printed at the correct scale. Many digital Fabric Crab – Pattern files come with a “scaling square” to verify dimensions. Once printed, it is highly recommended to transfer the paper pattern onto cardstock or template plastic. This makes it much easier to trace the pieces onto your fabric multiple times without the edges of the paper fraying or distorting.
When laying out your pieces on the textile, pay close attention to the fabric grain. Aligning the long axis of the crab’s legs with the grainline prevents them from twisting awkwardly once stuffed. Use tailor’s chalk or an erasable fabric pen to trace the outlines. Since the Fabric Crab – Pattern involves several identical legs, folding your fabric right-sides together and pinning the pattern through both layers can save time and ensure perfectly mirrored pairs.
Precision cutting is the difference between a crab that looks symmetrical and one that looks lopsided. Using sharp fabric shears or a rotary cutter with a fresh blade is vital. For the smaller curves of the claws in the Fabric Crab – Pattern, some crafters prefer using embroidery scissors for better control. Remember to leave the required seam allowance—usually 1/4 inch—unless the pattern specifically states that the allowance is already included in the template.
Marking your notches and pivot points is a step you shouldn’t skip. Most Fabric Crab – Pattern designs include small marks where the legs should be inserted or where the stuffing gap should be left open. Use small snips or dots within the seam allowance to indicate these spots. These “map coordinates” on your fabric will make the assembly phase much smoother, preventing the frustration of having to realign pieces halfway through a seam.
If you are working with a directional print (like fabric with a specific “up” and “down” pattern), be extra careful during the layout phase. You don’t want the patterns on your crab’s legs to be upside down compared to its body. Take a moment to step back and visualize the final Fabric Crab – Pattern before you make the first cut. This “measure twice, cut once” philosophy is the hallmark of an experienced seamstress or tailor.
After cutting, it’s a good idea to organize your pieces into “kits.” Keep the top shell pieces, bottom shell pieces, and leg sets in separate piles. This organization prevents you from accidentally sewing a claw where a leg should go. Since the Fabric Crab – Pattern can have up to ten separate appendages, staying organized is the best way to maintain your “sewing flow” and enjoy the creative process without unnecessary stress.
The assembly of the Fabric Crab – Pattern usually begins with the appendages. Sew the leg and claw pairs with the right sides together, leaving the flat ends open for turning. A helpful sewing tip is to reduce your stitch length when sewing tight curves; this creates a smoother line and prevents the seam from looking “pointy” when turned. Once sewn, clip the curves and “V” notches into the seam allowance to allow the fabric to lay flat once inverted.
Turning small tubes like crab legs can be tricky. Using a turning tool or a simple wooden chopstick can make this part of the Fabric Crab – Pattern much easier. Once turned, give them a good press with a steam iron. This might seem tedious, but crisp edges on the legs will give your finished crab a much more defined and professional silhouette. You can then lightly stuff the legs, leaving the last half-inch empty to make it easier to sew them into the body.
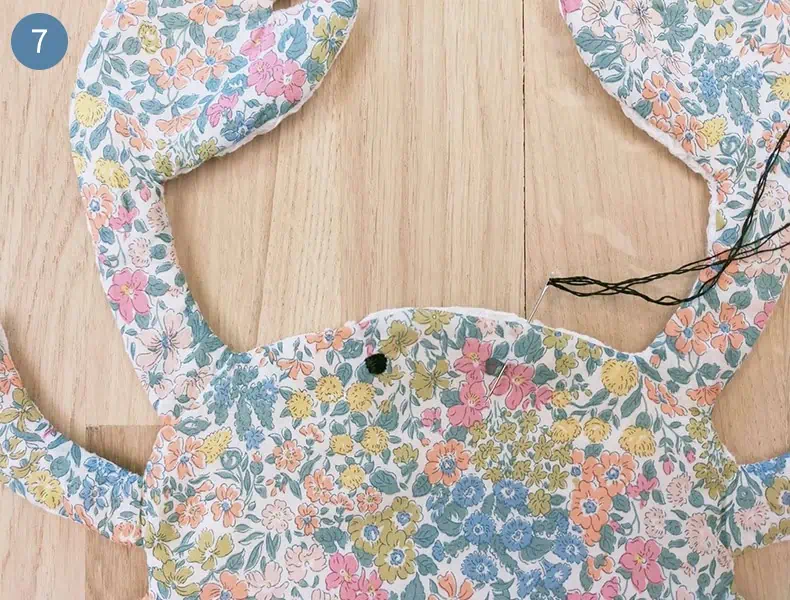
Now comes the “sandwich” phase. You will pin the legs and claws onto the right side of either the top or bottom body piece, pointing inward toward the center. This part of the Fabric Crab – Pattern requires careful pinning to ensure the legs don’t get caught in the wrong seams. Basting these pieces in place—sewing them with a long, temporary stitch—is a great way to keep everything secure before you add the final layer of fabric.
Place the remaining body piece on top (right sides together), encasing all the legs inside. Pin heavily around the perimeter. As you sew around the body of the Fabric Crab – Pattern, leave a 2-to-3-inch gap at the back for turning. It is vital to backstitch at the beginning and end of this gap, as the fabric will be under significant stress when you pull the entire crab through that small opening.
Once you have turned the crab right-side out, you will finally see your Fabric Crab – Pattern come to life. Reach inside with your turning tool to ensure the seams of the body are fully pushed out. Before stuffing the main body, this is the best time to check for any holes or missed stitches in the seams. It is much easier to fix a “pop” in the seam now than it is after the crab is full of fiberfill.
The final closure is often done using a ladder stitch (also known as an invisible stitch). This hand-sewing technique allows you to close the stuffing gap without any visible threads on the outside. By taking small, even stitches on either side of the opening, the seam disappears as you pull the thread taut. This attention to detail is what elevates a handmade fabric crab from a basic craft to a professional-grade plushie.
One of the best things about a Fabric Crab – Pattern is its scalability. You can take the original design to a print shop and enlarge it by 200% to create a funky floor pillow, or shrink it by 50% to make a cute keychain or Christmas tree ornament. When scaling down, remember to use thinner fabrics, as bulky materials like fleece become nearly impossible to turn when the dimensions are very small.
Customization doesn’t stop at size; you can also add functional elements to your Fabric Crab – Pattern. Why not add a small pouch on the crab’s belly to hold a tooth for the tooth fairy? Or, you could fill the bottom with plastic pellets or dried beans to give it weight, turning it into a charming doorstop or a bookend. These modifications make the pattern incredibly valuable for different holidays and needs.
Texture play is another way to make your Fabric Crab – Pattern stand out. You can use sequined fabric for a “disco crab” or burlap for a rustic, beach-house vibe. Adding “sand” textures by using a speckled print fabric can add realism. Some crafters even add a layer of crinkle paper inside the claws to turn the crab into a sensory toy for babies, providing both visual and auditory stimulation.
If you are skilled with a needle, consider adding surface embellishments. Use satin stitches to create patterns on the shell or add small beads to mimic the bumpy texture found on real crabs in the wild. You can even use fabric paint or markers to add gradients and shading to the fabric after the crab is assembled. This artistic touch turns the Fabric Crab – Pattern into a piece of soft sculpture.
For those who love a bit of humor, you can dress up your crab! Small felt hats, a tiny bowtie, or even a pair of “sunglasses” made from wire and felt can give your Fabric Crab – Pattern a unique personality. These little details are what make handmade gifts so special and memorable for the recipient. It allows you to tailor the gift to the person’s specific interests or decor style.
Finally, think about how you present or display your finished work. A group of crabs in varying sizes and colors—a “cast” of crabs—can make a stunning mantle display or a mobile for a nursery. Sharing your finished Fabric Crab – Pattern projects on social media platforms like Instagram or Pinterest using relevant hashtags can also connect you with a global community of makers who share your passion for coastal sewing.
What is the best fabric for a Fabric Crab – Pattern?
The best fabric for beginners is 100% quilting cotton. It is easy to cut, doesn’t slip while sewing, and comes in infinite colors. Advanced sewers might enjoy using velvet or faux fur for a more unique texture.
How do I make the legs of the crab stay upright?
To keep the legs from flopping, stuff them firmly with fiberfill. If you want them to be poseable, you can insert a piece of pipe cleaner or armature wire inside the leg before stuffing, ensuring the ends are looped over so they don’t poke through the fabric.
Can I wash my fabric crab?
Yes, if you use washable materials like cotton and polyester stuffing. It is recommended to place the crab in a lingerie bag and use a delicate cycle with cold water, then air dry to maintain the shape and prevent the “eyes” from getting scratched.
How long does it take to complete a Fabric Crab – Pattern?
For an intermediate sewer, it typically takes about 2 to 4 hours from cutting to the final hand-stitch. Beginners should set aside an afternoon to ensure they can take the curves and stuffing process slowly.
Do I need a sewing machine for this project?
While a sewing machine makes the process much faster and the seams stronger, you can absolutely sew a Fabric Crab – Pattern by hand using a backstitch. It is a great “couch project” for those who enjoy slow crafting.
What is the most difficult part of the pattern?
The most challenging part is usually turning the small legs right-side out and sewing them into the body seam without catching other legs in the stitching. Using plenty of pins and sewing slowly around the corners will help you succeed.
In this article, we have explored the wonderful world of the Fabric Crab – Pattern, covering everything from the initial material selection to the final decorative touches. We learned that the secret to a great crab lies in the quality of the fabric, the precision of the cut, and the patience during assembly.
Whether you are making a weighted doorstop or a soft companion for a child, this pattern provides the perfect blueprint for success. By utilizing techniques like clipping curves and the ladder stitch, you can ensure your handmade creation looks as good as any store-bought item.


