
Bird-shaped Pincushion - Pattern

Finding the perfect FABRIC DISH HOLDER – Pattern can transform your kitchen organization from cluttered to charming while providing a sustainable alternative to plastic or metal racks. Whether you are a seasoned sewist or a curious beginner, creating your own Fabric Dish Holder allows you to customize the size, absorbency, and aesthetic to match your home decor perfectly. This project is not just about utility; it is about bringing a touch of handmade warmth into a space where we spend a significant amount of time every day.
The beauty of a FABRIC DISH HOLDER – Pattern lies in its simplicity and the high level of functionality it offers for modern kitchens. Unlike bulky store-bought versions, a DIY fabric dish rack can be easily folded and tucked away when not in use, making it an essential item for small apartments or minimalist living. By choosing the right materials, such as cotton batting or microfiber layers, you ensure that your dishes dry quickly while protecting your countertops from water damage and scratches.
In this comprehensive guide, we will explore everything you need to know about the FABRIC DISH HOLDER – Pattern, from selecting the best absorbent fabrics to mastering the assembly process. We will dive deep into the technical aspects of the pattern design, ensuring you have the knowledge to create a professional-looking kitchen accessory. By the end of this article, you will feel confident in your ability to sew a custom dish holder that is as durable as it is beautiful, adding a personalized flair to your culinary workspace.
Choosing the right textile is the foundation of any successful FABRIC DISH HOLDER – Pattern. Since this item will be in constant contact with moisture, you should prioritize 100% cotton fabrics for the exterior. Cotton is breathable, easy to wash, and comes in endless prints to suit your style.
Inside the Fabric Dish Holder, you need a core that can handle heavy lifting in terms of water absorption. Many crafters prefer using Zorb fabric or high-quality cotton flannel layers. These materials are specifically designed to hold several times their weight in liquid, keeping your kitchen dry.
Don’t forget the importance of the interfacing or batting when following your FABRIC DISH HOLDER – Pattern. A layer of low-loft polyester batting can provide the necessary structure to keep the holder from feeling flimsy. It also adds a bit of cushion to protect delicate glassware from hitting the hard counter.
The thread you choose matters more than you might think for a kitchen sewing project. Use a strong polyester thread that won’t degrade over time when exposed to humidity and frequent washing. This ensures the longevity of your handmade dish holder through many cycles in the laundry.
If you want to add a professional touch to your FABRIC DISH HOLDER – Pattern, consider adding a waterproof PUL (Polyurethane Laminate) layer at the very bottom. This prevents water from seeping through the fabric and sitting on your wooden or stone countertops. It’s a game-changer for heavy-duty kitchen use.
Lastly, think about the aesthetic appeal of your fabric choices. Mixing and matching bold geometric prints with solid colors can turn a simple dish drying mat into a statement piece. Always pre-wash your fabrics to prevent shrinking after the project is finished, ensuring the pattern dimensions remain accurate.
Before you dive into the cutting phase of the FABRIC DISH HOLDER – Pattern, gather your essential sewing notions. You will need a sharp rotary cutter, a self-healing cutting mat, and a long quilting ruler. Accuracy in cutting is vital to ensure all layers align perfectly during the final stitch.
A reliable sewing machine equipped with a walking foot is highly recommended for this project. Because the Fabric Dish Holder involves multiple layers of thick, absorbent material, a walking foot helps feed the fabric evenly. This prevents the “shifting” that often occurs with standard presser feet on bulky items.
Pins are useful, but sewing clips (like Wonder Clips) are even better for a FABRIC DISH HOLDER – Pattern. Clips hold thick layers together without bending or leaving permanent holes in waterproof materials like PUL. They provide a much stronger grip when you’re managing the bulk of the drying mat layers.
Ironing is a step you cannot skip if you want a crisp, professional-looking FABRIC DISH HOLDER – Pattern. A good steam iron will help you flatten seams and ensure the edges are sharp before topstitching. This attention to detail separates a “homemade” look from a “handmade” masterpiece.
Make sure you have a fresh denim or heavy-duty needle (size 90/14 or 100/16) in your machine. The FABRIC DISH HOLDER – Pattern requires sewing through several layers of cotton, batting, and potentially microfiber. A standard needle might break or cause skipped stitches under this pressure.
Prepare your workspace by clearing a large flat surface for laying out the pattern pieces. Organization is key to a stress-free sewing experience. Having your fabric markers, scissors, and bobbins ready will allow you to focus entirely on the creative process of making your custom kitchen accessory.
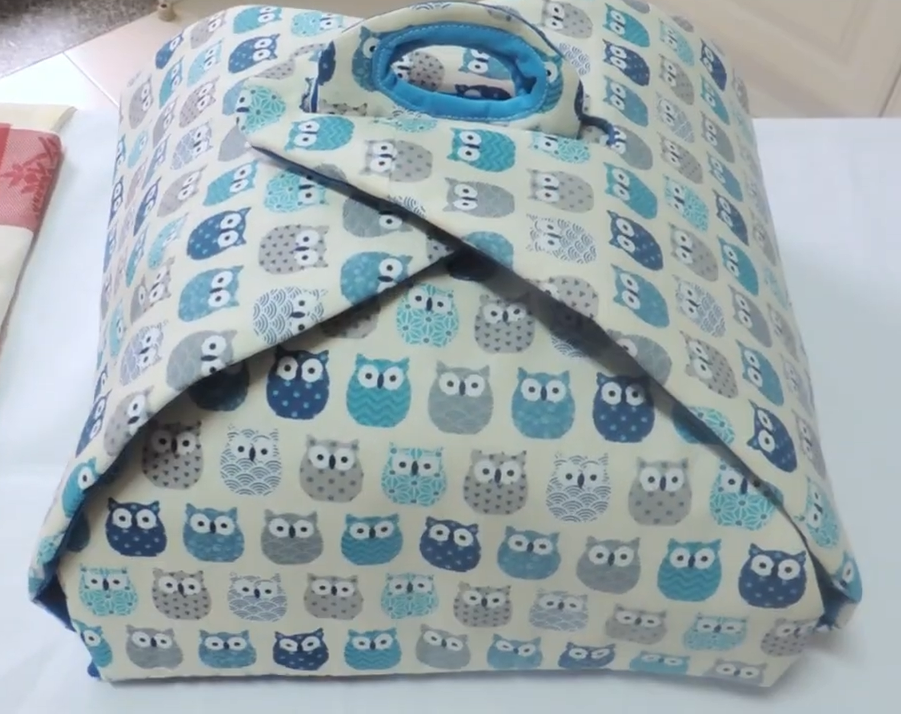
The first step in executing the FABRIC DISH HOLDER – Pattern is cutting your main panels to the desired size. A standard size is often 18 x 24 inches, but you can scale this up or down based on your counter space. Cut two pieces of outer fabric and one or two pieces of absorbent inner core.
Once cut, layer your materials according to the FABRIC DISH HOLDER – Pattern instructions. Usually, this means placing the two outer fabrics right sides together, with the batting or absorbent layers on the very top or bottom. This “sandwich” method allows you to sew around the perimeter and flip it right side out.
Leave a gap of about 4 to 5 inches on one side of the Fabric Dish Holder for turning. When sewing the perimeter, use a 1/2 inch seam allowance to ensure all layers are securely caught in the stitch. Backstitch at the beginning and end of the gap to prevent the thread from unravelling.
After sewing, clip the corners of your FABRIC DISH HOLDER – Pattern to reduce bulk. Carefully reach through the gap and turn the entire project right side out. Use a turning tool or a blunt chopstick to push the corners out so they are nice and sharp.
Press the edges of your Fabric Dish Holder thoroughly with your iron, tucked-in the raw edges of the opening. The next crucial step is topstitching around the entire edge. This not only closes the turning gap but also gives the pattern a polished, high-end look and extra durability.
To prevent the internal layers from shifting during use or washing, add quilting lines across the surface. You can sew simple straight lines, a diamond grid, or even wavy patterns. This final touch in the FABRIC DISH HOLDER – Pattern keeps the absorbent core flat and functional for years to come.
To keep your FABRIC DISH HOLDER – Pattern looking fresh, proper maintenance is essential. Since it’s made of fabric, it is fully machine washable. Use a gentle cycle with cold water and avoid fabric softeners, as they can coat the fibers and reduce the absorbency of the cloth.
Drying your Fabric Dish Holder is best done on a low heat setting or by air-drying. High heat can sometimes damage the internal fibers or shrink the outer cotton. If you used a waterproof layer, air-drying is the safest route to preserve the integrity of the laminate over time.
One of the best things about the FABRIC DISH HOLDER – Pattern is the ability to customize it for gifts. You can add a hanging loop made of ribbon or bias tape to one corner. This allows the user to hang the dish mat on a hook to dry between uses, saving even more counter space.
For those who want extra organization, you can modify the FABRIC DISH HOLDER – Pattern to include small “slots” or pockets. By sewing additional strips of fabric with elastic, you can create a dedicated area for drying silverware or small lids. This turns a simple mat into a high-performance drying station.
Consider the seasonality of your FABRIC DISH HOLDER – Pattern. You can sew different versions for holidays or change of seasons. A bright, floral fabric pattern is perfect for spring, while deep flannels or festive prints can warm up your kitchen during the winter months.
Finally, don’t be afraid to experiment with different sizes. You might want a mini FABRIC DISH HOLDER – Pattern specifically for your coffee station or a jumbo version for when you host large dinner parties. The versatility of this DIY project makes it a favorite among home sewists worldwide.
The most effective combination is 100% cotton for the exterior and Zorb, microfiber, or cotton flannel for the interior. These materials provide the best balance of aesthetics and moisture-wicking capabilities.
You can increase absorbency by adding more layers of flannel or using a specialized absorbent core material. Quilting the layers together also helps distribute moisture evenly across the entire surface of the dish holder.
Absolutely! This is an excellent beginner sewing project. It involves straight lines, basic layering, and simple topstitching. It’s a great way to practice handling thicker materials without the complexity of clothing construction.
Yes, most FABRIC DISH HOLDER – Pattern designs are intended to be machine washed. Use a mild detergent and avoid bleach to keep the colors vibrant and the fibers intact for long-term use.
If made with high-quality materials and reinforced stitching, a DIY dish holder can last for years. However, if it starts to lose its shape or develop a permanent odor despite washing, it might be time to sew a fresh one using a new FABRIC DISH HOLDER – Pattern.
In this article, we have explored the intricate yet accessible world of creating a FABRIC DISH HOLDER – Pattern. From the initial selection of high-quality cottons and absorbent cores to the final topstitching and quilting, you now have the blueprint to create a functional and stylish kitchen accessory.
We discussed the importance of using the right tools, like a walking foot and denim needles, to handle the bulk of the layers effectively. By following these SEO-optimized steps, you can ensure your project is not only a success in the sewing room but also a durable addition to your home.


