
American-style placemat with a fruit theme - Pattern

Creating a Fabric Flower – Pattern is one of the most rewarding ways to transform simple textile scraps into everlasting botanical art that adds a touch of elegance to any craft project. For many enthusiasts, the discovery of a versatile Fabric Flower – Pattern opens up a world of creative possibilities, allowing them to design accessories, home decor, and fashion embellishments that never wilt or fade. Whether you are looking to create a vintage-inspired silk rose or a modern cotton poppy, the foundational techniques of a Fabric Flower – Pattern remain accessible to beginners while offering endless complexity for the advanced artisan.
The allure of working with a Fabric Flower – Pattern lies in its incredible sustainability and the opportunity to “upcycle” cherished fabric remnants from previous sewing ventures. Instead of letting beautiful silk, linen, or organza scraps go to waste, a Fabric Flower – Pattern provides a purposeful second life for these materials, turning them into focal points for bridal bouquets, hair clips, or statement brooches. This craft bridges the gap between traditional millinery and modern DIY, making the Fabric Flower – Pattern a essential skill for anyone who loves to personalize their wardrobe with a handmade, organic touch.
In this comprehensive exploration, we will guide you through the intricate steps of mastering a Fabric Flower – Pattern, focusing on material selection, petal construction, and professional assembly. We will delve into the technical nuances of various styles—ranging from “burned edge” organza flowers to folded fabric rosettes—ensuring that your results look like they came straight from a high-end boutique. By understanding the structural logic of a Fabric Flower – Pattern, you will be empowered to experiment with scale, texture, and color, ultimately creating a garden of textile blooms that reflect your unique artistic vision and passion for handmade beauty.
The first step in executing a successful Fabric Flower – Pattern is selecting the appropriate fabric type, as the weight and weave of the textile will dictate the flower’s final character. For a soft, romantic look, lightweight silks and chiffons are ideal because they drape beautifully and respond well to heat-styling techniques often used in a Fabric Flower – Pattern. If you desire a more structured, modern bloom, sturdier cottons or felt provide the necessary “body” to keep petal shapes crisp and defined without needing internal support.
Color and print selection play a vital role in how the Fabric Flower – Pattern “reads” visually from a distance. While solid colors are classic, using gradient-dyed fabrics or small-scale floral prints can add an extra layer of realism and depth to each petal. Many designers recommend using tone-on-tone fabrics to create subtle shadows within the flower’s center, making the Fabric Flower – Pattern appear three-dimensional and lifelike. The interplay of light on different fabric finishes—such as satin versus matte linen—can also dramatically alter the flower’s mood.
Precision tools are non-negotiable when you are following a detailed Fabric Flower – Pattern. You will need a pair of ultra-sharp fabric shears or a rotary cutter to ensure that the edges of your petals are clean and free of fraying. For patterns that require heat-sealed edges, a small candle or a specialized soldering tool is used to gently melt the edges of synthetic fabrics like polyester organza. This specific step in the Fabric Flower – Pattern prevents the fabric from unraveling and gives the petals a natural, slightly curled appearance.
Adhesives and threads are the “invisible” heroes of a professional-grade Fabric Flower – Pattern. While many patterns rely on a needle and thread for a traditional “gathered” look, a high-temperature hot glue gun is often used for faster assembly and for securing petals to a base. Choosing a high-quality, clear-drying fabric glue is essential to ensure that no unsightly residue is visible on the finished Fabric Flower – Pattern. For sewn versions, a strong upholstery thread ensures that the tension of the gathers remains secure over time.
Don’t forget the importance of the “flower center” or the stamen in your Fabric Flower – Pattern. You can use seed beads, vintage buttons, or even pre-made floral stamens from a craft store to provide a focal point. The center of the flower is where you can truly express your personality; a sparkly rhinestone center turns a simple Fabric Flower – Pattern into evening wear, while a rustic wooden button makes it perfect for a farmhouse-style accessory. These small notions are what give the flower its “personality” and finished look.
Finally, consider the backing of your Fabric Flower – Pattern. To make the flower functional, you will need to attach it to a felt circle, a hair clip, or a brooch pin. Using a stiff felt base provides a flat surface for the petals to adhere to, ensuring the Fabric Flower – Pattern remains stable and doesn’t flop when worn. This foundational layer is the secret to a durable accessory that can withstand the rigors of being pinned to a coat or clipped into a busy hairstyle day after day.
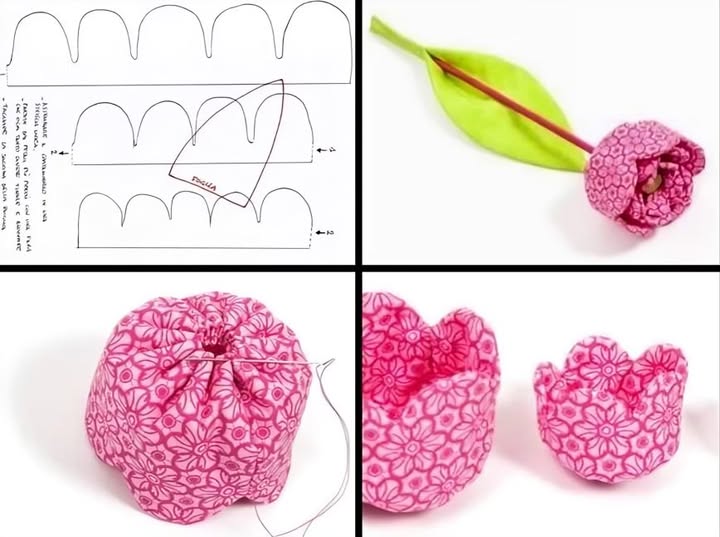
The core of a Fabric Flower – Pattern is the construction of individual petals, which are usually created through cutting, folding, or gathering. The “Kanzashi” method, a traditional Japanese technique, involves folding small squares of fabric into pointed or rounded petals to create a geometric and highly structured Fabric Flower – Pattern. This method is perfect for those who enjoy precision and want a flower that looks very symmetrical and uniform. It requires patience and a bit of practice with tweezers to hold the small folds in place.
Another popular technique in the Fabric Flower – Pattern world is the “Scalloped Circle” method. This involves cutting several circles of fabric, folding them in half or quarters, and stitching along the curved edge. When the thread is pulled tight, the fabric “ruffles” into a beautiful, voluminous petal. This approach is excellent for a Fabric Flower – Pattern made of cotton or linen, as it emphasizes the fabric’s natural texture and creates a full, “pom-pom” style bloom that is soft to the touch.
For a more organic and realistic Fabric Flower – Pattern, the “Layered Heat-Singed” technique is often used with synthetic fabrics. You cut various sizes of organic, irregular circles and briefly hold the edges near a flame. The heat causes the fabric to shrink and curl, mimicking the delicate, irregular edges of a real peony or rose. This method within the Fabric Flower – Pattern allows for incredible “flow” and movement, as no two petals will ever be exactly the same, resulting in a unique and artistic creation.
Managing the “bulk” at the base of the flower is a technical challenge in any Fabric Flower – Pattern. As you add more layers of petals, the center can become thick and difficult to manage. To solve this, many patterns suggest “offsetting” the petals—placing the second layer in the gaps of the first layer. This creates a fuller look with fewer layers and ensures that the Fabric Flower – Pattern remains relatively flat at the back, making it much easier to attach to clips or headbands without it sticking out too far.
Creating “wired petals” is an advanced variation of the Fabric Flower – Pattern. By gluing a thin floral wire to the center or the edge of each fabric petal, you gain the ability to “pose” the flower. This is particularly useful for bridal work or large-scale decor where you want the Fabric Flower – Pattern to look like it is caught in a breeze. Wiring the petals adds a professional “couture” touch that transforms a simple fabric scrap into a sophisticated, sculptural element that holds its shape indefinitely.
Finally, the assembly order is crucial when following a Fabric Flower – Pattern. Most patterns advise starting from the outside and working your way toward the center, or vice versa depending on the flower type. For a rose, you start with a tightly rolled center and wrap petals around it; for a daisy, you arrange all petals on a flat base first. Following the step-by-step instructions ensures that the proportions of your flower remain balanced and that the finished Fabric Flower – Pattern has the appropriate density and height.
Once you have mastered the Fabric Flower – Pattern, the next step is deciding how to integrate these blooms into your lifestyle or home. One of the most common uses is as a fashion accessory. A single, large fabric flower can be pinned to a denim jacket or a plain sun hat to instantly elevate the outfit. Because you can make the flower out of the exact same fabric as a dress or skirt, the Fabric Flower – Pattern allows for a “bespoke” level of coordination that is rarely found in mass-produced fashion.
In the world of home decor, the Fabric Flower – Pattern serves as a beautiful alternative to real plants. You can create a “forever bouquet” by attaching your fabric flowers to long wire stems wrapped in floral tape. Placing these in a glass vase provides a splash of color that never needs water or sunlight. This use of a Fabric Flower – Pattern is particularly popular for nursery decor or for people with allergies who still want the aesthetic beauty of flowers in their living space without the pollen.
Bridal and special event styling is another area where the Fabric Flower – Pattern truly shines. Many modern brides are choosing handcrafted fabric bouquets over real ones because they serve as a permanent memento of the wedding day. By using fabrics from a mother’s wedding dress or a family heirloom, the Fabric Flower – Pattern becomes a sentimental “storyboard” of family history. These flowers are also lighter to carry and won’t wilt during a long photo session in the summer heat.
Packaging and gift-wrapping can also be enhanced with a small Fabric Flower – Pattern. Instead of using a disposable plastic bow, attaching a handmade fabric flower to a gift box makes the presentation feel luxury and thoughtful. The recipient can then reuse the flower as a brooch or a hair clip, adding a “gift within a gift” element. This sustainable approach to gifting is a wonderful way to showcase your sewing skills while reducing the waste associated with traditional gift-wrapping materials.
The Fabric Flower – Pattern can also be scaled down to create delicate jewelry. By using fine silks and tiny beads, you can create “stud earrings” or “pendant necklaces” that feature miniature fabric blossoms. This requires a high level of detail and a very small hook or needle, but the result is a piece of wearable art that is incredibly lightweight and unique. Micro-fabric flowers are a specialized niche that demonstrates the amazing versatility of the basic Fabric Flower – Pattern logic.
Lastly, consider using the Fabric Flower – Pattern as a decorative element on pillows and throw blankets. Sewing a cluster of fabric flowers onto the corner of a cushion adds a “3D” texture that is very popular in interior design. When using flowers for home textiles, ensure you choose washable fabrics and secure the petals with strong stitching rather than glue. This ensures that your Fabric Flower – Pattern remains beautiful and intact even after the items are laundered or used frequently in a busy living room.
To ensure that your Fabric Flower – Pattern remains vibrant and beautiful for years, proper care is essential. Unlike real flowers, fabric versions can accumulate dust over time, which can dull the colors and flatten the petals. The best way to clean a Fabric Flower – Pattern is to use a hair dryer on a “cool” and “low” setting to gently blow away dust particles. For more stubborn dirt, a soft-bristled makeup brush can be used to delicately “sweep” the petals without disturbing the shape or the glue.
Storage is another important factor in the longevity of a Fabric Flower – Pattern. If you are not using the flowers, store them in a sturdy box where they won’t be crushed by other items. If the petals do become flattened, you can often “revive” them by using a clothes steamer from a distance. The gentle steam relaxes the fibers, allowing you to manually “fluff” the Fabric Flower – Pattern back into its original voluminous shape. Just be careful not to get the fabric too wet, as this can weaken certain glues.
Sunlight is the enemy of fabric, and a Fabric Flower – Pattern kept in a very sunny window may eventually fade. To prevent this, try to display your fabric blooms in areas with indirect light. If you are creating a bouquet that will be displayed permanently, you can use a UV-protectant spray designed for textiles. This creates a thin, invisible barrier that helps the dyes in your Fabric Flower – Pattern resist the bleaching effects of the sun, keeping your “garden” looking fresh for much longer.
If your Fabric Flower – Pattern was made using the “heat-singed” method, you might notice that the edges become slightly brittle over several years. This is a natural aging process for synthetic fibers. To maintain them, avoid touching the edges of the petals too often. If a petal does start to fray or look “fuzzy,” a quick pass with a sharp pair of thread snips can clean up the silhouette. Proper maintenance ensures that your Fabric Flower – Pattern remains a high-quality accessory rather than a tattered scrap.
For flowers attached to garments, always check the washability of the fabric. If the flower is made of delicate silk or has a glued-on center, it should be removed before the garment is washed. Many crafters solve this by attaching the Fabric Flower – Pattern to a small safety pin or a “snap” fastener rather than sewing it directly to the clothing. This allows you to easily “pop” the flower off before laundering the dress or coat, ensuring both the garment and the flower stay in pristine condition.
Finally, remember that the “imperfections” are what make a Fabric Flower – Pattern look real. In nature, no two flowers are identical, and your fabric versions should embrace that same organic variety. If a petal is slightly tilted or the color isn’t perfectly uniform, it only adds to the “handmade” charm. By following these care and maintenance tips, you can enjoy the timeless beauty of your Fabric Flower – Pattern creations and perhaps even pass them down as cherished family heirlooms.
What is the best fabric for a beginner’s Fabric Flower – Pattern?
100% Cotton is the best choice for beginners. It is easy to cut, doesn’t slip while you are sewing, and takes a “press” from an iron very well. Once you are comfortable with cotton, you can move on to more “fidgety” fabrics like silk or organza.
Do I need a sewing machine to make a Fabric Flower – Pattern?
No, most fabric flowers are actually easier to make by hand-sewing. The small, delicate movements required for gathering petals or “sculpting” a flower center are much more manageable with a simple needle and thread than with a bulky sewing machine.
How do I stop the edges of my fabric petals from fraying?
There are three main ways: using pinking shears (which cut a zig-zag edge), applying a liquid “fray check” solution to the edges, or using the “heat-singeing” method for synthetic fabrics. Choosing the right method depends on the look you want for your Fabric Flower – Pattern.
Can I make a Fabric Flower – Pattern out of old clothes?
Yes! This is called upcycling. Old silk scarves, cotton shirts, or even denim jeans can be turned into beautiful flowers. It’s a wonderful way to create a meaningful “memory flower” from a piece of clothing that has sentimental value but is no longer wearable.
How many layers of petals should a Fabric Flower – Pattern have?
A typical flower looks best with 3 to 5 layers. The first layer (the base) should have the largest petals, and each subsequent layer should get slightly smaller as you move toward the center. This creates the “depth” and “dimension” that makes a Fabric Flower – Pattern look realistic.
What is the fastest way to assemble a Fabric Flower – Pattern?
The fastest method is using a hot glue gun. While sewing is more durable for items that will be washed, hot glue allows you to build a flower in minutes. It is the preferred method for making “floral crowns” or decorative elements for gift boxes and party favors.
In this article, we have explored the artistic and technical world of the Fabric Flower – Pattern, from the initial selection of high-quality textiles to the advanced methods of heat-singeing and wiring petals. We learned that whether you are using cotton for a rustic look or silk for a high-fashion accessory, the key to a beautiful result lies in the precision of your cuts and the balance of your petal layers.
We also discussed the many ways to style these blooms—as hair accessories, home decor, and bridal bouquets—and how to properly care for them to ensure they last a lifetime. Mastering a Fabric Flower – Pattern is more than just a craft; it is a way to capture the fleeting beauty of nature and turn it into a permanent, personal expression of your creativity.


