Easy Scrappy Lap Quilt - Tutorial

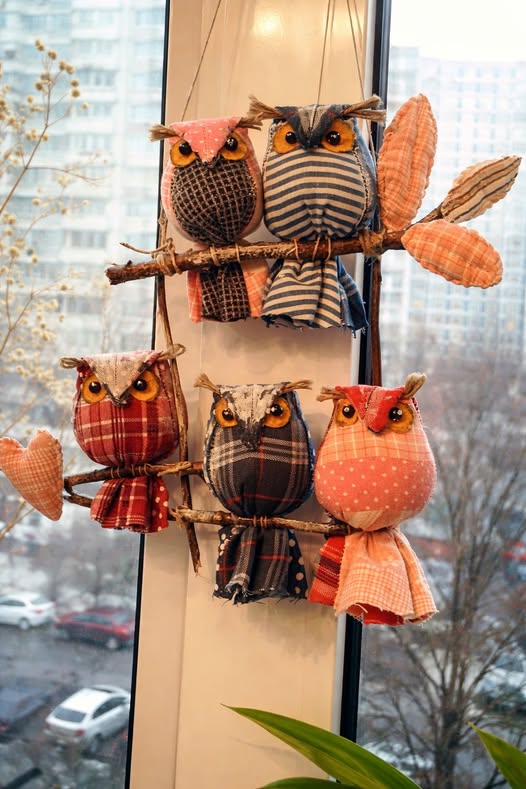
A Fabric owl- Pattern is one of the most delightful and versatile projects any sewing enthusiast can take on, whether you are a seasoned quilter or a complete beginner looking for a weekend hobby. There is something inherently magical about taking flat pieces of cloth and turning them into a soulful, wide-eyed creature that can serve as a toy, a decorative cushion, or even a functional doorstop. In the world of handmade crafts, the owl remains a perennial favorite because its shape is naturally conducive to creative fabric mixing, allowing you to use up those beautiful scraps of vintage cotton or textured felt you have been saving for the perfect occasion.
When you start working with a Fabric owl- Pattern, you are not just following a set of instructions; you are engaging in a process of character creation. Unlike many rigid sewing projects, an owl allows for a huge amount of personality through the placement of its eyes, the curve of its beak, and the choice of its “plumage” colors. This project is highly recommended for those who want to practice sewing curves and applying basic applique techniques without the pressure of making a complex garment. It is a forgiving, joyful project that results in a high-quality, professional-looking item that feels both modern and nostalgic at the same time.
In this comprehensive guide, we are going to explore every facet of the Fabric owl- Pattern, from the initial selection of your textile materials to the final, delicate stitches that bring the face to life. We will discuss the structural logic of the pattern, the best types of stuffing to ensure your owl stands upright, and how to scale the design for different purposes. Whether you are making a small keychain version or a large, huggable plushie, understanding the foundational steps will ensure your project is a success. Let’s dive into the details of crafting your very own feathered friend using a reliable and charming sewing template.
The first step in any successful Fabric owl- Pattern is choosing the right textile base. For a classic, durable owl, 100% cotton quilting fabric is the gold standard because it is easy to iron, doesn’t slip while sewing, and comes in an infinite variety of patterns. You can mix and match florals, polkadots, and solids to create a “shabby chic” look. If you prefer a more rustic feel, linen or light denim can provide a wonderful weight and texture that makes your handmade owl feel more like a designer home decor piece.
Texture is a vital component of the Fabric owl- Pattern, specifically when it comes to the owl’s chest and wings. Many crafters love to use felt or fleece for these parts because these fabrics do not fray, which makes the applique process much simpler. Using a contrasting texture, such as a soft velvet for the belly and a crisp cotton for the back, adds a sensory element to the project that is particularly appealing if the owl is intended as a gift for a child or a decorative plush toy.
The eyes are the most iconic part of any Fabric owl- Pattern, and the materials you choose here will define the creature’s expression. You can use large buttons for a quirky, “toy-story” look, or you can use layers of felt circles for a softer, more organic appearance. For those who want a very professional finish, safety eyes (plastic domes that snap into place) are an excellent option, though they should be avoided if the owl is meant for an infant who might chew on the small parts.
Don’t forget the importance of the internal structure in your Fabric owl- Pattern. While polyester fiberfill is the most common stuffing for a soft toy, you might want to consider using dried beans, poly-pellets, or even clean sand at the base. Adding a weighted bottom ensures that your fabric bird stays upright on a shelf or desk rather than toppling over. This simple modification transforms a simple plushie into a functional paperweight or a charming doorstop for your craft room.
Interfacing is an “invisible” material that can make a huge difference in your Fabric owl- Pattern results. If you are using very thin or stretchy fabrics, applying a light fusible interfacing to the back of the fabric pieces will give them more stability. This prevents the owl from looking “lumpy” once it is stuffed and helps the seams hold up against the internal pressure of the filling. It is a small extra step that elevates the quality of your sewing project significantly.
Finally, your thread choice should not be an afterthought when executing a Fabric owl- Pattern. While a matching thread is standard, using a contrasting thick embroidery floss for the beak or around the wing edges can add a beautiful “hand-stitched” aesthetic. This decorative top-stitching is a hallmark of the boutique craft style and highlights the effort you put into the handmade details, making the final product look like a treasured heirloom rather than a mass-produced item.
Before you even touch your fabric, you must prepare your Fabric owl- Pattern template. If you have downloaded a digital pattern, ensure you print it at “100% scale” to maintain the correct proportions. It is a good idea to trace your paper pattern onto cardstock or template plastic; this makes it much easier to trace around the shapes onto your fabric with a chalk marker or a disappearing ink pen, ensuring your cutting accuracy is spot on.
Once your template is ready, pay close attention to the grainline of the fabric as indicated on the Fabric owl- Pattern. Cutting “on the grain” ensures that your owl doesn’t stretch or warp out of shape when you start stuffing it later. If your pattern includes wings that are sewn separately and then attached, make sure you cut “mirror images” of the pieces so you don’t end up with two left wings, which is a common and frustrating mistake for many DIY crafters.
The order of operations is crucial when working through a Fabric owl- Pattern. Most designs will have you attach the face and belly details to the front body piece before you sew the front and back together. This is called “flat-bed applique.” It is much easier to sew the eyes and beak onto a flat piece of fabric than it is to try and hand-stitch them onto a rounded, stuffed body. Precision at this stage is what gives your owl its symmetrical beauty.
Pinning is your best friend when dealing with the curves of a Fabric owl- Pattern. Because owls are generally rounded, you will be sewing many convex and concave edges. Using plenty of pins—or better yet, clover clips—will help keep the fabric edges aligned. If you find the curves particularly tricky, try “stay-stitching” just inside the seam allowance; this acts like a guide and prevents the fabric from stretching as it moves under the sewing machine foot.
If your Fabric owl- Pattern features “tufted ears” (the little points at the top of the head), be very careful when sewing into those tight corners. You may need to shorten your stitch length as you approach the point to ensure the seam is strong enough to withstand the pressure of the stuffing. Achieving a sharp, clean point is the secret to making your fabric owl look alert and characteristic of the species, such as a Great Horned Owl or a Screech Owl.
After sewing the main body pieces together, it is essential to “clip your curves.” This means taking your scissors and making small snips into the seam allowance around the rounded parts of the Fabric owl- Pattern, being careful not to cut the actual stitches. This allows the fabric to spread and lay flat when you turn the owl right-side out. Without clipping, the seams will look puckered and the owl will have a distorted, “angular” shape rather than a smooth, organic silhouette.
The face is truly the soul of the Fabric owl- Pattern. When applying the eyes, think about the “rule of thirds” in design. Placing the eyes slightly lower on the head can make the owl look cuter and more “baby-like,” while placing them higher can give it a more regal or serious appearance. Most owl sewing guides suggest using a zig-zag stitch or a blanket stitch around the edges of the eye circles to keep them secure and add a decorative border.
For the beak in your Fabric owl- Pattern, a small triangle of felt or a contrasting fabric works best. Some patterns suggest a “3D beak” that is stuffed slightly, while others prefer a flat applique. If you are going for a minimalist look, you can even use a few satin stitches with embroidery thread to create a beak. The key is to ensure it is centered perfectly between the eyes to maintain the visual balance of the project.
The “belly” patch of the Fabric owl- Pattern is where you can really show off your favorite fabric prints. This is often a semi-circle or an oval shape stitched onto the front. To make this look professional, you can use “fusible web” (like HeatnBond) to iron the belly onto the body before sewing. This keeps the fabric perfectly flat and prevents it from shifting or wrinkling while you run it through the sewing machine, resulting in a clean, crisp finish.
Wings in a Fabric owl- Pattern can be either “flat” (sewn directly onto the sides) or “movable” (sewn separately and attached with buttons). Movable wings add a level of interactivity that children love. If you choose button-jointed wings, ensure you use a heavy-duty thread and sew through all layers of the body to make them sturdy. This small detail turns a simple fabric craft into an articulated toy that feels much more expensive and complex than it actually is.
Adding eyelashes or “eyebrows” can give your Fabric owl- Pattern a specific gender or mood. A few long straight stitches at the outer corners of the eyes can create a “sleepy owl” look, which is perfect for a nursery themed around bedtime. These tiny embroidery details are where you can let your creativity shine. You don’t need to be an expert at embroidery; even simple lines add a lot of depth and character to the finished bird.
Finally, consider adding a small “heart” or a “designer label” onto the back of the Fabric owl- Pattern. Many crafters like to hide a little message or a heart-shaped piece of felt inside the owl before closing the final seam. This “hidden secret” makes the handmade item feel extra special. It’s these thoughtful touches that distinguish a project made with a Fabric owl- Pattern from something bought at a big-box store, emphasizing the love and care put into the craft.
The way you stuff your Fabric owl- Pattern determines its final “hand-feel.” Always start with small clumps of stuffing and push them into the furthest corners first—usually the ears or the top of the head. Use a chopstick or a specialized stuffing tool to get the filling into those tight spots. Avoid using one large “blob” of stuffing, as this will lead to a lumpy owl. Consistent, small layers result in a smooth and professional appearance.
As you fill the body of the Fabric owl- Pattern, stop frequently to massage the owl from the outside. This helps distribute the fibers and prevents “cellulite” spots on the fabric. You want the owl to be firm enough to hold its shape but soft enough to be cuddly. If you are making a decorative item, you can pack it quite tightly; if it’s for a child, leave a little “give” so the plush owl remains soft and squishy.
The final closing of the Fabric owl- Pattern is usually done at the bottom or the side using a “ladder stitch” (also known as an invisible stitch). This hand-sewing technique allows you to join the opening so that the stitches are completely hidden on the inside. It takes a bit of practice to get the tension right, but once mastered, it makes the sewing project look like it was magically sealed without any visible seams.
If your Fabric owl- Pattern feels a bit unstable on its feet, you can “sculpt” it after it is closed. By using a long needle and thread, you can pull slightly between the front and back of the owl at the base to create a flatter “seat.” This is a technique often used in doll-making to help figures sit more realistically. It adds a structural integrity that keeps your handmade decoration looking its best on any flat surface.
For a finishing touch, you can “scent” your Fabric owl- Pattern. Some crafters like to put a small sachet of dried lavender or cedar shavings inside the stuffing. This makes the owl a wonderful addition to a linen closet or a bedside table. The gentle scent combined with the soft fabric creates a multi-sensory experience that is very soothing. Just ensure the recipient doesn’t have any allergies to the natural scents you choose.
Lastly, take a lint roller or a piece of tape to your finished Fabric owl- Pattern. During the sewing and stuffing process, the fabric often picks up stray threads and bits of fluff. Cleaning it off gives it that final “store-ready” look. Step back and admire your work! Every owl made from the same pattern will look slightly different, and those tiny imperfections are what make your handmade creation a unique piece of art.
There is no single “best” size, as it depends on your goal. For a decorative pillow, a height of 12-15 inches is ideal. For a small gift or ornament, 4-5 inches is perfect. Most Fabric owl- Patterns can be easily scaled up or down at a local print shop or on your home computer settings.
While a sewing machine makes the process much faster and ensures stronger seams, you can absolutely sew a Fabric owl- Pattern by hand using a backstitch. Hand-sewing gives you even more control over the tight curves and tiny details, though it will take significantly longer to complete the body.
Yes! Using old baby clothes, a favorite worn-out flannel shirt, or even fabric from a vintage skirt is a beautiful way to “upcycle” memories into a Fabric owl- Pattern. Just ensure the fabric is not too worn or thin, or reinforce it with interfacing to make sure it can handle being stuffed.
To add depth to the eyes in your Fabric owl- Pattern, try “layering.” Use a large circle of dark fabric, a slightly smaller circle of a lighter color (the iris), and a tiny white dot (the “sparkle” or reflection). This triple-layering technique makes the owl look like it is actually looking back at you.
If the owl is for a baby, you must modify the Fabric owl- Pattern for safety. Do not use buttons, beads, or safety eyes, as these can become choking hazards. Instead, embroider all facial features and ensure all seams are double-stitched for extra strength to prevent stuffing from escaping.
If you used 100% cotton and polyester stuffing, you can usually machine wash the owl on a cold, gentle cycle inside a pillowcase. However, if you added weights like beans or sand, or if you used felt, you should only “spot clean” with a damp cloth to avoid damaging the internal materials or causing the felt to pill.
Creating a Fabric owl- Pattern project is a journey through color, texture, and personality. We have explored the necessity of choosing high-quality natural fibers, the technical precision required during the cutting and sewing stages, and the artistic flair involved in designing the owl’s face and wings.
We also covered the vital steps of stuffing and “invisible” closing to ensure your finished product looks as professional as possible. This project is a testament to the beauty of handmade crafts—taking simple materials and a well-designed sewing template to create a companion that brings warmth and character to any home.


