
Horizontal Row Quilt - Pattern

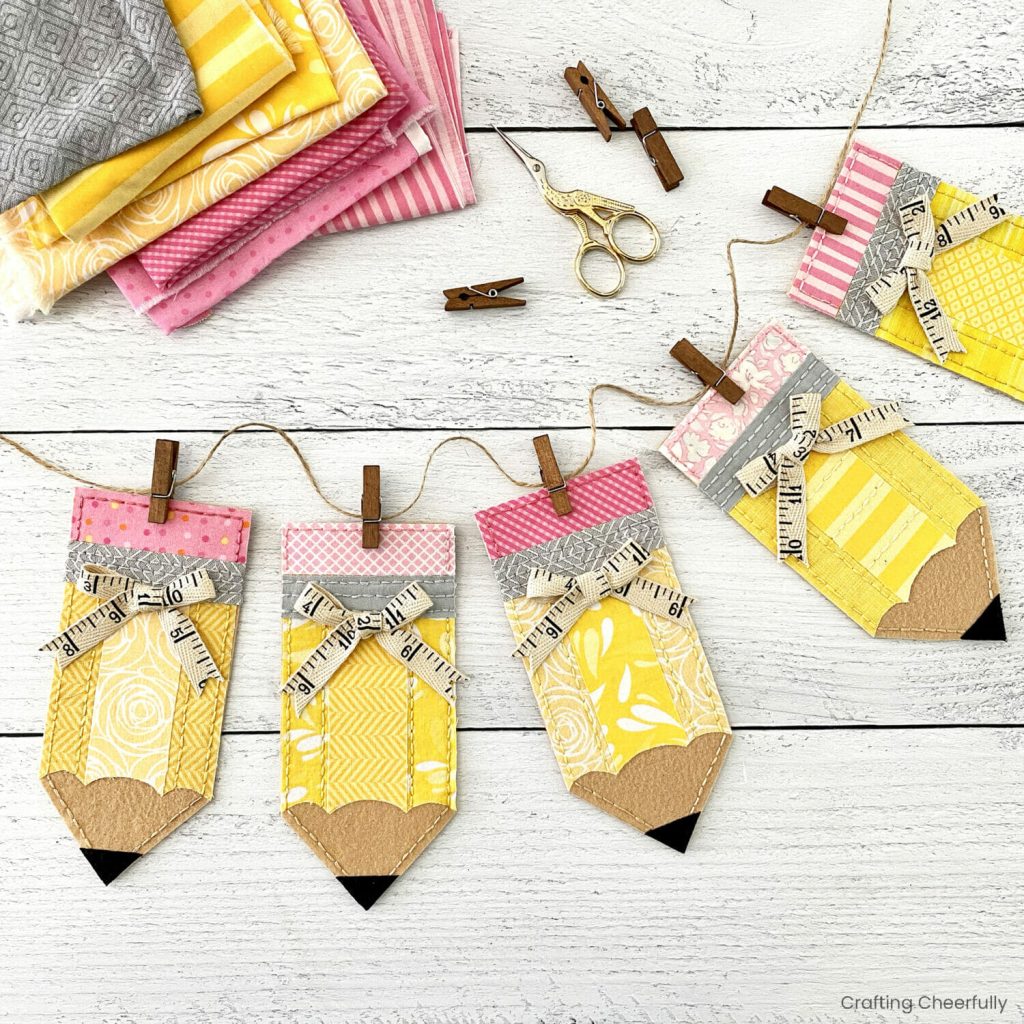
If you’re searching for a cheerful, beginner-friendly sewing project that can brighten up any classroom, study space, or crafting corner, the Fabric Pencil Banner – Pattern is a fantastic choice. This adorable banner mimics the look of classic pencils and is perfect for decorating spaces during the back-to-school season or for gifting to a beloved teacher. It combines simple sewing techniques with playful design elements, making it ideal for beginners and seasoned crafters alike.
From fabric selection to finishing touches, creating a Fabric Pencil Banner – Pattern allows for endless creativity. You can mix and match colors, choose from various fabric textures, and even personalize the banner with names, letters, or appliqué. It’s a great way to use up fabric scraps and add charm to your home or classroom without spending a fortune.
In this tutorial, we’ll walk you through everything you need to know to complete your own pencil banner—from gathering supplies to step-by-step assembly instructions. Whether you’re sewing solo or crafting with kids, this is a delightful project you’ll want to revisit year after year.
To begin your Fabric Pencil Banner – Pattern, it’s important to gather all necessary materials and think about your color palette. The beauty of this project is its flexibility—you can go traditional with yellow pencils or get playful with bright, patterned fabrics.
Start by choosing fabric for each section of the pencil: the wood (pencil tip), lead (the point), body (main color), and eraser. Felt or cotton fabrics work well, and quilting cotton is especially easy to work with. You’ll also need coordinating thread, scissors or rotary cutters, pins or clips, and a sewing machine.
For the pencil body, consider using fun prints or vibrant solids. If the banner is meant for a child’s room, let them help pick their favorite colors. For classrooms or offices, choose hues that match the existing decor. Keep in mind that a cohesive palette will make the banner look more polished.
Next, prepare the backing material. You can either make double-sided pencils by sewing two layers together or attach the pencil shapes to a felt or canvas base strip for a faster option. Don’t forget a ribbon or twine to string everything together once your pencil pieces are complete.
Optional supplies include fusible interfacing to add structure to the fabric, iron-on letters or embroidery floss for personalization, and pinking shears to add decorative edges.
Before cutting, sketch or print out a simple pencil shape pattern. You can easily divide the pencil into 4 or 5 segments (tip, wood, body, ferrule, and eraser) and use these templates to trace and cut out fabric pieces consistently.
Once your fabric and materials are ready, it’s time to dive into cutting and prepping each part of your Fabric Pencil Banner – Pattern. This is where the magic begins, as each pencil starts to take form with every section you prepare.
Use your pencil shape template to trace the different segments onto the fabric: triangle shapes for the pencil tips, rectangular strips for the body and eraser, and a small triangle or rectangle for the lead point. Be sure to leave about ¼ inch seam allowance on all sides if you plan to sew the pieces together.
If you’re making several pencils, it’s smart to cut all of one shape at once. For instance, cut all erasers from pink fabric, all bodies from yellow, etc. This speeds up the process and helps you maintain uniformity across your banner.
To add strength and help the pencils hold their shape, apply fusible interfacing to the back of each piece, especially the pencil body and eraser sections. This step is optional but recommended if you’re using lightweight cotton.
If you’d like to personalize your banner, this is the time to do it. Use iron-on vinyl, embroidery, or fabric markers to add names, words, or even numbers to the pencil bodies. This is a great idea for classroom banners or birthday parties.
Lay out the pieces for each pencil in order—lead, wood, body, ferrule (silver band), and eraser. Make sure the colors and proportions look right before you begin sewing.
You may also decide whether to sew the pencils as full shapes (front and back) or attach them flat onto a banner strip or twine. Each method offers a different final look, so choose the one that best suits your space and time.
Now it’s time to bring your Fabric Pencil Banner – Pattern to life by assembling the individual pencil segments. This is where your preparation pays off and the playful pencils begin to shine.
Start by sewing the pencil tip and lead sections together, right sides facing. Use a straight stitch and press the seam flat. Then attach the wood section to the pencil body, lining up the edges evenly. Repeat this process for each pencil.
After the body, add the ferrule section (the metallic-looking band on a real pencil) and finally the eraser segment. You should now have a full pencil shape, with five sections sewn together in a vertical strip.
If you’re making double-sided pencils, cut a second piece in the same shape for the back and sew the two layers together, leaving a small gap to turn it right side out. Once turned, press the seams flat and topstitch around the edge for a clean finish.
If your pencils are single-layer, consider backing them with felt for durability. This also makes them easier to hang and more visually striking, especially from a distance.
Once all your pencil pieces are complete, arrange them in order on a flat surface. Play with spacing and alignment to see what looks best before committing to your layout.
Attach the pencils to a ribbon, twine, or a wide strip of fabric using fabric glue, stitching, or hot glue. Make sure they’re evenly spaced and securely attached so the banner hangs well.
The best part of any craft project is adding your personal flair, and the Fabric Pencil Banner – Pattern gives you tons of opportunity to get creative. Don’t hold back—this is your moment to make it special.
Start by decorating your pencils with names, phrases, or themes. You can use iron-on letters, hand embroidery, or fabric paint. Popular choices include “Welcome,” “Create,” “Mrs. Smith’s Class,” or even the alphabet.
If you’re making this for a classroom, consider creating a pencil for each student, each with their name or initials. This adds a thoughtful, personalized touch and builds a strong sense of belonging.
You can also add extra embellishments, like buttons, rickrack, lace, or glitter fabric for extra sparkle. Small felt stars or apples can be stitched or glued between pencils for added dimension.
Hang your finished banner using push pins, adhesive hooks, or over a curtain rod. Make sure it’s placed at a level where the pencil shapes can be seen clearly and appreciated.
For seasonal flair, you can modify the pencils with festive fabrics—use red and green for the holidays, or pastel tones for spring. This turns your Fabric Pencil Banner – Pattern into a reusable decoration all year long.
Finally, take a moment to admire your work! This charming project is more than just decor—it’s a celebration of creativity, learning, and handmade beauty.
Q1: Can I make this project with kids?
Yes! While adults should handle the sewing, children can help with cutting shapes (using kid-safe scissors), choosing colors, and decorating with markers or stickers.
Q2: What size should each pencil be?
A common size is around 2.5 inches wide and 8 inches tall, but you can adjust based on your banner length and wall space.
Q3: Do I need a sewing machine?
A sewing machine is helpful for speed and neatness, but you can also hand-sew the pieces or use fabric glue for a no-sew version.
Q4: Can I use this pattern for other items like bookmarks or cards?
Absolutely! The pencil shape can be scaled down and repurposed for bookmarks, greeting cards, or appliqué patches.
Q5: What’s the best fabric to use?
Cotton is ideal, but felt also works well—especially for no-sew versions. You can even mix fabrics for added texture.
Q6: How do I store the banner after use?
Fold it gently and store in a dry, flat space to prevent creasing. You can also roll it around a cardboard tube to maintain shape.
The Fabric Pencil Banner – Pattern is a delightful and easy sewing project that adds joy, color, and personalization to any space. Whether you’re decorating a classroom, surprising a teacher, or crafting with kids, this project offers both creativity and practicality.
You’ve learned how to choose your fabrics, cut and prep your pieces, assemble your banner, and add decorative touches to make it truly unique. With a little time and imagination, you can create something meaningful that brightens up any room.
Now we’d love to hear from you! Did you try the tutorial? Do you have your own twist on the pattern? Share your honest thoughts and suggestions in the comments below. Your ideas may inspire fellow crafters around the world! 🧵✂️📚


