
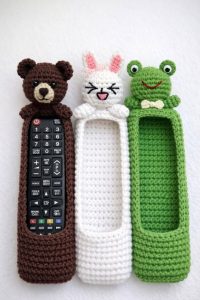
Patchwork Blocks With Stripes - Pattern

A Fabric Toiletry Bag – Pattern is one of the most rewarding sewing projects you can undertake, combining everyday utility with the endless creativity of textile design. Whether you are an experienced sewist or a curious beginner, crafting your own travel organizer allows you to customize every detail, from the waterproof lining to the specific dimensions of the internal pockets. In this guide, we will explore everything you need to know about creating a high-quality Fabric Toiletry Bag – Pattern that stands the test of time and keeps your essentials perfectly organized.
When looking for the perfect Fabric Toiletry Bag – Pattern, it is essential to consider the structural integrity of the design. A great sewing pattern should provide clear instructions on how to handle different layers of material, including the outer decorative fabric, the stabilizer, and the inner lining. By mastering this DIY sewing project, you gain the ability to create personalized gifts or even high-end products for a handmade business, all while ensuring the zippered pouch is sturdy enough for frequent travel.
Working with a Fabric Toiletry Bag – Pattern requires a bit of planning regarding your material choices. To achieve a professional finish, many creators opt for interfacing or batting to give the bag a “stand-up” quality that makes it easier to access items. This article will break down the technical aspects of the construction process, ensuring your handcrafted toiletry kit looks like it came straight from a boutique. Let’s dive into the details of selecting your materials and executing the perfect stitch for your next creative sewing adventure.
The success of your Fabric Toiletry Bag – Pattern starts with choosing a durable outer fabric. Most sewists prefer cotton canvas, denim, or upholstery-weight fabrics because they provide the necessary structure for a 3D shape. If you choose a lighter quilting cotton, make sure to back it with a firm fusible fleece to prevent the bag from collapsing when empty.
For the interior of your toiletry organizer, functionality is key. Since this bag will hold liquids and creams, using a water-resistant lining like laminated cotton or ripstop nylon is a smart move. This makes the Fabric Toiletry Bag – Pattern much easier to clean in case of spills, ensuring that your handmade accessory remains hygienic and looking new for years.
The zipper selection is another critical component of the Fabric Toiletry Bag – Pattern. A nylon coil zipper is generally preferred over metal ones for this project because it is easier to sew over and more flexible. Choosing a long-pull zipper can also add a touch of style and ease of use, especially when you are in a rush during your morning routine.
Don’t forget about the notions and tools required to finish the Fabric Toiletry Bag – Pattern. High-quality polyester thread is recommended for its strength and resistance to moisture. You will also need sewing clips rather than pins if you are using waterproof fabrics, as pins can leave permanent holes in the material, compromising the leak-proof design.
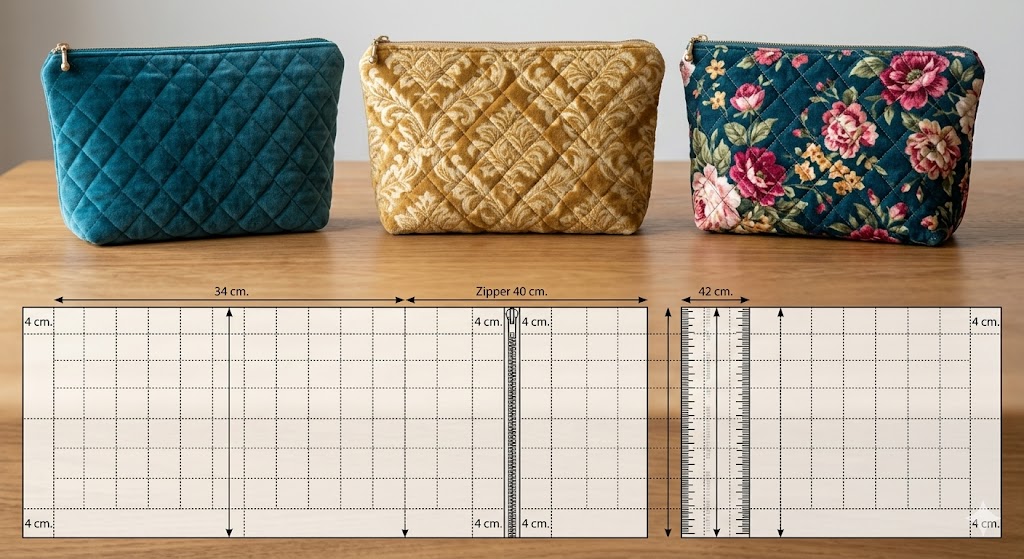
The “Pattern” aspect of the Fabric Toiletry Bag – Pattern refers to the blueprint or template used to cut the fabric pieces. This usually includes a main body piece, side panels (or “gussets”), and sometimes a grab handle. Understanding how these shapes fit together is the secret to achieving that classic “boxy” look found in professional travel kits.
Finally, consider adding interfacing to your Fabric Toiletry Bag – Pattern workflow. Fusible interfacing is applied to the wrong side of the fabric using an iron, providing the stiffness required for the bag to hold its shape. Without proper stabilization, your bag might look limp, so never skip this step if you want a professional sewing result.
Before you begin sewing your Fabric Toiletry Bag – Pattern, you must accurately cut your fabric pieces according to the measurements. Precision is vital in bag making because even a 1/4 inch error can lead to misaligned seams. Always use a rotary cutter and a quilting ruler to ensure your rectangles are perfectly squared for the toiletry bag assembly.
Once the pieces are cut, the next step in the Fabric Toiletry Bag – Pattern is prepping the layers. If you are using fusible fleece, center it on the wrong side of your exterior fabric, leaving the seam allowance clear to reduce bulk. This technique, often called “grading,” helps your sewing machine glide over the corners without skipping stitches.
Labeling your pieces is a helpful tip when following a complex Fabric Toiletry Bag – Pattern. Since the lining and exterior often have similar dimensions, using painter’s tape to mark each piece can save you from a frustrating visit to the seam ripper. Organization is the hallmark of an efficient sewing studio and ensures a smooth crafting experience.
The Fabric Toiletry Bag – Pattern often includes specific instructions for “boxing the corners.” This is the magical step that turns a flat pouch into a three-dimensional toiletry case. You will need to mark small squares at the bottom corners of your fabric, which will later be pinched and sewn to create the depth of the bag.
Ironing is just as important as sewing when executing a Fabric Toiletry Bag – Pattern. Pressing your seams open or to the side creates a crisp, professional look that distinguishes handmade items from “homemade” ones. Keep your iron nearby and press after every major seam to ensure the fabric layers lay flat and neat.
If your Fabric Toiletry Bag – Pattern features a handle, prepare it now. Folding a strip of fabric into fourths and topstitching along the edges creates a sturdy strap that can be tucked into the side seams. This small addition significantly increases the portability and convenience of your finished travel organizer.
The most intimidating part of the Fabric Toiletry Bag – Pattern for many is the zipper. However, using the “sandwich method” makes it simple: lay the exterior fabric face up, place the zipper face down on top, and then place the lining face down. This creates a clean-finished seam where the raw edges are hidden inside the toiletry bag.
After sewing the first side of the zipper, it is crucial to topstitch the fabric away from the zipper teeth. This is a vital step in the Fabric Toiletry Bag – Pattern because it prevents the fabric from getting caught in the zipper during use. Use a zipper foot on your machine to get as close to the teeth as possible for a sleek finish.
Repeat the sandwiching process for the second side of the Fabric Toiletry Bag – Pattern. Precision is key here to ensure the sides of your toiletry pouch line up perfectly. If the sides are uneven, the bag will look tilted once finished, so take your time to align the fabric edges before hitting the foot pedal.
Now comes the “boxing” technique mentioned earlier in the Fabric Toiletry Bag – Pattern guide. Match the side seam with the bottom seam, creating a triangle shape at the corner. Sew across this line to create the structural base. Doing this for both the exterior and the lining ensures the interior space of the bag fits perfectly inside the outer shell.
An important “pro-tip” for the Fabric Toiletry Bag – Pattern is to leave the zipper halfway open before sewing the side seams. If you sew the bag shut with the zipper closed, you will find it nearly impossible to turn the bag right-side out! This sewing hack is one that every bag designer learns early on.
The final closure of the Fabric Toiletry Bag – Pattern usually happens in the lining. Leave a 4-inch gap in the bottom of the lining to turn the bag through. Once the bag is turned, you can close this gap with a ladder stitch for an invisible finish or a quick machine topstitch for a durable, functional toiletry kit.
One of the best things about a Fabric Toiletry Bag – Pattern is the ability to add personal touches. You can incorporate quilt blocks, embroidery, or even fabric paint to the exterior panels before assembly. Customization turns a simple utility bag into a piece of art that reflects your personal creative style.
Adding internal pockets is a great way to upgrade your Fabric Toiletry Bag – Pattern. Small elastic loops can hold makeup brushes or toothbrushes, while flat pockets can keep razors and combs from rattling around. Planning these interior compartments during the cutting phase ensures they are perfectly integrated into the final design.
For those who want a more “rugged” look, the Fabric Toiletry Bag – Pattern can be made using waxed canvas or leather accents. These materials require a heavy-duty needle (size 100/16 or 110/18) and a slower sewing speed. The result is a sophisticated men’s dopp kit or a durable outdoor travel bag.
Consider the aesthetic appeal of your hardware. Using antique brass zippers or colorful plastic ones can completely change the “vibe” of your Fabric Toiletry Bag – Pattern. You can even add a tassel or a ribbon to the zipper pull to make it easier to grab, adding both function and a pop of color to your handmade project.
If you are making this Fabric Toiletry Bag – Pattern as a gift, think about creating a “set.” You could make a smaller version for jewelry and a larger one for hair products. Using coordinating fabrics creates a beautiful, cohesive travel collection that any recipient would be thrilled to receive for a birthday or holiday.
The final step in your Fabric Toiletry Bag – Pattern journey is the quality check. Clip any loose threads, ensure the zipper runs smoothly, and give the bag a final steam press. Taking pride in these finishing touches is what makes DIY sewing so fulfilling, leaving you with a Fabric Toiletry Bag – Pattern that you can be truly proud of.
What is the best fabric for a Fabric Toiletry Bag – Pattern?
The best fabrics are cotton canvas, oilcloth, or laminated cotton. These provide the necessary durability and moisture resistance needed for a bathroom environment. If using standard cotton, always use heavy interfacing to add structure.
How do I make my Fabric Toiletry Bag – Pattern waterproof?
You can use waterproof lining fabrics like PUL (Polyurethane Laminate) or ripstop nylon. Alternatively, you can apply a fabric laminating film to your favorite cotton print to make it water-resistant before you start sewing.
Can a beginner sew a Fabric Toiletry Bag – Pattern?
Yes! While zippers and boxed corners might seem tricky, they are fundamental sewing skills that are easy to learn with practice. This project is considered an advanced beginner level and is a great way to improve your accuracy.
What size zipper do I need for this pattern?
Most standard toiletry bags use a 10 to 12-inch zipper. It is often better to use a zipper that is slightly longer than the bag width, as it allows the bag to open wider, making it easier to install and use.
How do I clean my handmade fabric toiletry bag?
If you used washable fabrics and quality interfacing, most bags can be machine washed on a gentle cycle and air-dried. However, if you used waxed canvas or leather, you should only spot clean with a damp cloth.
Why does my bag look floppy even with a pattern?
This usually happens due to a lack of stabilizer. Ensure you are using a firm fusible fleece or a stiff sew-in interfacing. The structural support is just as important as the Fabric Toiletry Bag – Pattern itself.
In this article, we have explored the comprehensive journey of creating a Fabric Toiletry Bag – Pattern, from the initial selection of durable textiles to the technical mastery of zipper installation and boxing corners. We learned that the choice of interfacing and lining is what separates a simple pouch from a professional-grade travel organizer. By following these steps, you can create a functional, stylish, and completely unique sewing project that serves your needs or makes a perfect gift.
We hope this guide inspires you to sit down at your sewing machine and start your own Fabric Toiletry Bag – Pattern today! Whether you are upcycling old materials or using brand-new designer prints, the possibilities are endless. Please leave your sincere opinion in the comments below and share your suggestions for future patterns or sewing tips you would like to see covered on our blog!


